Platform Bed King Size 01:00 hour ATTENTION 1 - Read and observe carefully all the assembly instructions before beginning assembly. 2 - The assembly of the product must be done on a clean and flat surface. We suggest to use the packaging to cover the floor to avoid damages. 3 - The screws must be tightened periodically. 4 - Avoid contact with sharp objects. 5 - Avoid banging pieces together.
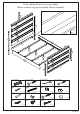
Parts and hardware list for assembly. Please conrm all parts available before assembly.
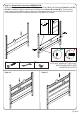
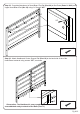
Step 01 - Place Wood Dowels (Part A) into ends of Bed Rails (Part 13) and Headboard Cross Rail (Part 05) A A A A A 13 13 05 A A 10x A A A A Step 02 - Attach cross rail (Part 05) to Headboard Posts (Parts 01 and 02) using screw “B” and Half Moon Nut “BC”, as shown. BC 02 B F BC B F 05 01 BC F B 02x F B 01x BC 02x Note Do Not Completely Tighten Screws – See Step 03 for clarification.
Step 03 - Head Board Assembly OBSERVATION: When placing Headboard Parts (Nos. 06,07,08 and 17) into Bed Post Channels (Parts 01 and 02), Do Not Completely Tighten Screws into Half Moon Nuts (Screw B and Nut BC). This will leave loose wiggle room allowing easier placement of Headboard Boards into the Bed Post Channels.
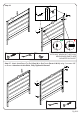
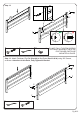
Step 06 F BC B B 06 F BC 06 BC F B 02x F B 01x BC 02x DO NOT FULLY TIGHTEN SCREWS INTO HALF MOON NUT UNTIL ALL HEAD BOARD PARTS ARE MOUNTED IN PLACE. Step 07 - Attach Head Board Top Rail (Part 09) to Bed Posts (Parts 01 & 02) using 2 x screws “G” as shown.
Step 08 - Complete Attachment of Head Board Top Rail (Part 09) to Bed Posts (Parts 01 & 02) and Upper Head Board Part (No. 06) using 6 x Screws “AP”. AP AP AP AP AP AP AP AP 07x Step 09 - Attach Headboard Center Support Rail (Part 18) to the back side of the of the Head Board centered using screws “AP”, as shown.
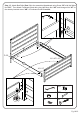
Step 10 - Foot Board Assembly OBSERVATION: When placing Foot Board Parts (No.11,16,10 and 17) into Foot Board Bed Post Channels (Parts 03 and 04), Do Not Completely Tighten Screws into Half Moon Nuts (Screw B and Nut BC). This will leave loose wiggle room allowing easier placement of Boards into the Bed Post Channels.
Step 12 BC B F F B BC 10 10 BC F B 02x F B 01x BC 02x DO NOT FULLY TIGHTEN SCREWS INTO HALF MOON NUT UNTIL ALL FOOT BOARD PARTS ARE MOUNTED IN PLACE. Step 13 - Attach Footboard Top Rail (Part 09) to Bed Posts (Part 03 & 04) using “G” Screws, as shown.
Step 14 - Attach Foot Board Lower Cross Rail (Part 12) to Bed Posts (Parts 03 & 04) using the 4 x Screws “BW”. Screw in “AR” screw into Footboard posts (Parts 03 & 04) – as shown in drawing.
Step 15 - Attach Bed Rails (Part 13) to the assembled Headboard using Screw “BI” with Half Moon Nut “BC”. Then Attach Footboard to bed rails using Half Moon Nut “AS” and Hexagon Nut “AT” to the already inserted screw “AR” of Footboard Posts 03 and 04.
Step 16 - Attach Floor leveler (Part BV) to Center Support Post (Part 15). Then Attach Support Post (Part 15) to the Center Support Cross Beam (Part 14) using screws “BL”, as illustrated in drawing. 4x FF 15 BL 14 BL BV 4x 15 F 01x BL 08x BV 04x Step 17 - Attach assembled Center Support Beams to Bed Rail Cleats using screws “AP” as shown. Please follow spacing directions for the beams per the illustration.
Step 18 - Place Wood Hole Caps (Part BJ) into Headboard and Footboard Bed Posts as shown.