Instruc�on Manual Please save this manual for future reference. Thank you for purchasing this product. This product has been manufactured with the highest standards of safety and quality. PLEASE READ ALL INSTRUCTIONS BEFORE ASSEMBLY. Unpack all parts from Styrofoam and bubble wrap inside the carton to ensure there are no missing or damaged parts. If any parts are missing or damaged, do not a�empt to assemble or use the product.
Instruc�on Manual Please save this manual for future reference.
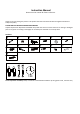
Instruc�on Manual Please save this manual for future reference. Step 1 Make sure the pins are installed correctly as shown with the “check mark” below: 1 ×14 2 ×6 Below shows how the pins are used to assemble the panels together. a b c 9 ×4 FIGURE A The above image shows the hardware needed for Step 1.
Instruc�on Manual Please save this manual for future reference. Assemble the base of the cabinet (best to prepare on an open flat (soft) surface): Insert pins (1) and lock screws (2) as shown in Figure A.
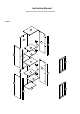
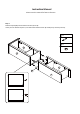
Instruc�on Manual Please save this manual for future reference. Step 2 Assemble shelves (E and F) as shown below. These shelves are not adjustable.
Instruc�on Manual Please save this manual for future reference. Step 3 Repeat Step 1 for panels G, H, D, and I. Refer to Figure A for assembly guide for inserting pins and locknuts.
Instruc�on Manual Please save this manual for future reference. Step 4 Assemble shelf (E) as shown below. This shelf is not adjustable.
Instruc�on Manual Please save this manual for future reference. Step 5 Add pins to the bottom of panel top J. Assemble the top of the cabinet (J) to the top portion of the cabinet (assembled panels G and H).
Instruc�on Manual Please save this manual for future reference. Step 6 Slide the panel back (K) into the top sections (G and H), and secure with bottom panel (L).
Instruc�on Manual Please save this manual for future reference. Step 7 Slide back panel (M) into the bottom section (A and B). Insert pins into bottom of panel L, and attach the bottom section (A and B) to top section (G and H).
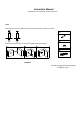
Instruc�on Manual Please save this manual for future reference. Step 8 Assemble the hinges and door knob to the doors (N x 2).
Instruc�on Manual Please save this manual for future reference. Step 9 Assemble the doors to the cabinet (doors open to the right).
Instruc�on Manual Please save this manual for future reference. Step 10 Shelves O (2) are adjustable, and may be placed in a few options in each section (1 shelf per section). First install the brackets inside the cabinet for where you want the shelves. To insert shelf O into the cabinet, tilt it at angle first to get it into the cabinet.
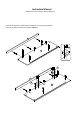
Instruc�on Manual Please save this manual for future reference. Assembled Cabinet Line Drawing: " .75 15 11 .8 1" " 9.65" 21.65" 3.15" 66.93" 9.17" 21.65" .