
Assembly Instructions
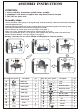
Table Of Contents

55
J
F
A
Table top
Center tray
Table leg
Parts list Parts picture Description
Q'ty
Parts list Parts picture Description
Q'ty
4
1
1
B
D
ASSEMBLY INSTRUCTIONS
22
11
2.Turn the table top(A) upside down on the soft clean surface. Loosely attach the legs(D) to the table top using
bolts(N),big flat washers(O), lock washers(P), nuts(Q)and nut caps(R).
1.Loosely attach the center plate(C) to the legs(D) using small flat washers(L), small lock washers(M) and bolts(K).
DO NOT tighten the bolts.
4.Then, you can put grate(H),grill rack(I) into the steel fire pit(G) one by one.
5.When you keep the fire pit free, you can put the center tray(B) on the upon ring stead as the spark screen.
1. Please read these instructions carefully before assembly.
2. Aluminum is soft metal over tighten may strip thread or break the part.
3. DO NOT use power tools.
Center plate
1
C
33
Spark screen
Steel fire pit
Grate
Grill rack
1
1
1
1
1
1
E
F
G
H
I
J
Upon ring
Warning : please do not use acid or alkaline washing liquid to clean the product.
Fork
Bolt
Big flat washer
4
8
1
Bolt
Wrench
8
(M6*35)
(M8*40)
Nut
8
(M8)
(M8)
8
Big lock washer
(M8)
Small flat washer
4
(M6)
4Small lock washer
(M6)
8
Nut cap
(M8)
K
L
N
M
O
P
Q
R
S
T
D
C
K
M
L
A
P
R
Q
O
G
66
ATTENTION:
Assembl y steps :
Basin
3.Please attach the the steel fire pit(G) to the upon ring(E) as this figure 3.
E
H
I
44
1
6.Please attach the Basin(T) to the upon ring(E) as this figure 6.
B
E
T
N