
Installation & Assembly
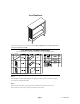
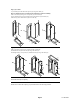
Table Of Contents

Step 8 and 9
CARE
Clean with mild soap and wipe dry.
REPLACEMENT PARTS
Please do not contact the company you purchased from as we can help you faster.
Step 3, 4, 5 and 6
Lay Left Side (B) on side and attach Top Unit (A) using 2 Hex Bolts (G).
Note: It will help to have a second person at this time to assist in assembly.
Slide 1 Back Panel (F) into grooves in Top Unit (A) and Left Side (B).
Insert 2 Wood Dowels (H) into Left Side (B) and 2 Wood Dowels (H) into Shelf (D).
Slide Shelf (D) onto 2 Wood Dowels (H) in Left Side (B)
Step 7, 8 and 9
7
,
Slide 1 Back Panel (F) into grooves in Shelf (D) and Left Side (B).
Attach Bottom Panel (E) to Left Side (B) using 2 Hex Bolts (G).
Attach Right Side (C) to Top Panel (A) and Bottom Panel (E) using 4 Hex Bolts (G).
Page 2Page 2 Low Bookcase