® H2GO SADDLE CARRIER / 1 PAIR SELLES PORTEUSES 876 INSTALLATION INSTRUCTIONS INSTRUCTIONS D’INSTALLATION ® SWEDEN CAR RACK SYSTEMS MADE IN U.S.A.
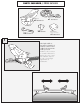
PARTS INCLUDED / PIÈCES INCLUSES Strap/Courroie x1 Saddle/Selle x2 753-2030-02 753-2041-02 Knob/Écrou Bolt/Boulon x2 915-0855-11 x2 753-0776 Buckle Bumper/ Tampon de la boucle x1 853-3102- 02 1 Place kayak saddles on bars and loosely attach bolt and knob as shown. Position saddles for the approximate width of your boat. Installez les selles sur les barres et attachez lâchement les boulons et les écrous, comme dans l’illustration.
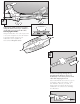
2 Load boat onto saddles. It may be necessary to readjust the distance between your saddles for a snug fit. Make sure boat is in line with vehicle. Securely tighten knobs. Chargez l’embarcation sur les selles. Il peut s’avérer nécessaire de déplacer les selles afin d’obtenir un ajustement parfait. Assurez-vous que l’embarcation est bien parallèle au toit du véhicule. Bloquez les écrous. 3 Route free end of strap, with logo side up, through the Buckle Bumper as shown.
For sailboards: Secure as shown. Planches à voile : Fixez comme dans l’illustration. 4 Always route straps under the bar as shown. Slide Buckle Bumper off the buckle. Place strap through the buckle as shown. Tighten strap and reposition Buckle Bumper over buckle. Faites toujours glisser la courroie sous les barres, comme dans l’illustration. Retirez le tampon de la boucle et faites passer la courroie dans cette dernière, comme dans l’illustration.
THULE RACK Guidelines When using Thule Load Carriers and accessories, the user must understand the precautions. The points listed below will assist you in using the rack system and will encourage safety. Please review the instructions and warranty carefully. Assembly and installation are the end user’s responsibility and beyond Thule’s control. Therefore, Thule exclusively limits its warranty to the repair or replacement of a defective Thule product.