Thule Jogging Kit Instructions D 51100507
Parts Description Two Aluminum Jogging Arms 16" Jogging Wheel Quick Release Wheel Skewer GENERAL WARNING These instructions contain many WARNINGS. Read and understand all of the WARNINGS. Failure to assemble and use this child carrier correctly may lead to serious personal injury or death to you or your passenger. • To prevent the child carrier from tipping backwards, the storage bags at the rear of the child carrier must not be loaded with excessive weight.
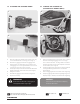
1.1 Installing the Jogging Arms A. B. C. D. E. F. G. H. 1.2 Installing the Quick Release SkeweR 1 3 2 4 Position both of the jogging arms in front of the Thule child carrier with the wheel dropouts forward. (See image 1) Insert the jogging arms into its corresponding VersaWing™. Make sure that the wheel dropout is pointed downward. (See image 2) Press and hold the small button on the jogging arm. Slide the jogging arm into the VersaWing™ until the large button enters inside the VersaWing™.
1.3 Installing the Jogging Wheel 1.4 Removing the Jogging Kit A. B. C. 1 D. E. Open the quick-release lever. Pull the jogging wheel out of the wheel dropouts. Press and hold the small button on one of the jogging arms. Pull the jogging arm out of the VersaWing™. Repeat with the other jogging arm. 2 A. B. C. D. E. F. G. Guide the jogging wheel up into the wheel dropouts until the wheel axle is resting inside the wheel dropouts. (See image 1) Close the quick-release lever.
1.5 ALIGNING THE JOGGING WHEEL B. C. D. E. F. G. 1 3 2 4 With the jogging kit installed, take note of which way the Thule child carrier is tracking. (See image 1) Remove the jogging wheel from the jogging arms. Slightly loosen the bolts attaching the drop-out to the jogging arm on the opposite side that the Thule child carrier is tracking. (See image 2) Gently tap the drop-out on the front so that it slides back slightly, towards the Thule child carrier. (See image 2) Retighten the bolts.