
Installation Guide


1
Apron Sink Installation Instructions
Please read these instructions carefully before beginning installation.
We recommend that apron sinks be installed by professional countertop installers
and we are not responsible for damages to the countertop or sink during installation.
TOOLS AND MATERIALS
Safety glasses tape measure pencil drill sealant
Plus: 1/2” or larger drill bit, hole saw 1-3/8”, support frame members, sanding block, assorted
sandpaper, orbital sander(optional).
BEFORE YOU BEGIN
1. Observe all local plumbing and building codes.
2. Inspect the drain and supply tubing. Replace if necessary.
3. Prior to installation, unpack the new sink and inspect for damage. To prevent damage, return the
sink to its original packaging until installation is ready.
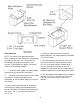
4. The cabinet and frame shown in these instructions are generic and may not represent actual
design or structure.
5. Before proceeding, determine how far the sink will extend beyond the front of the cabinet. It
should extend a minimum of 1/2” (1.3 cm) and a maximum of 2-3/4” (7 cm).
6. Shut off the hot and cold water supplies.
7. As applicable, assemble the faucet and drain to the sink before installing the sink.