
Installation Guide

Reveal
mount
Flush
mount
These instructions are for
solid surface countertops only.
We recommend that undermount
sinks be installed by professional
countertop installers and we are
not responsible for damage to
the countertop or sink during
installation.
Unpack the new sink and check
the contents of the materials
supplied. Your sink should include
a cut-out template and installation
hardware.
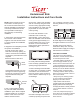
Supplied cutout template provides
two options of installation.
Flush mount: Sink edge is
ush with countertop opening. To
achieve a ush mount installation,
cut along the periforated line of the
template.
Reveal mount: Sink rim is
exposed approximately 1/4” from
the edge of counter top opening.
To achieve a reveal mount, leave
the periforated line along the
template.
Cut out appropriate template
for your sink model and desired
installation option. Place template
in desired position on countertop,
location center of the bowl over
cabinet and faucet holes.
Trace the outline of the template
and cut countertop along the inside
of the line using appropriate cutting
tools. Template is for guide only. Use
physical sink to ensure accurate
cutout opening.
Locate and drill holes on the
underside of the counter top,
approximately 1” from edge of the
sink to be installed. Holes should be
evenly spaced approximately 6” to
8” apart starting from every corner
as shown. It is recommended to
install a faucet at this point before
installing the sink.
Loosely attach mounting brackets
to the countertop, parallel to the cutout
opening using proper fasteners.
Clean sink ange and underside
of cutout area of countertop, making
sure that the area is smooth and
free from grease. Apply continuous
bead of silicone caulk evenly on top
of sink ange.
Position and align sink over the
countertop opening and press sink
onto countertop. Turn bent end of
mounting bracket to snug over the
sink rim.
Check alignment of sink again
and tighten fasteners to secure sink.
Wipe away excess silicone
caulk with a damp cloth. Connect
drain and water supply according to
manufacturer’s instructions.
• Be careful not to leave staining
materials in contact with the surface
for extended periods of time.
• The ideal cleaning technique is to
rinse thoroughly and blot dry any
water from the surface after each use.
• Use a mild detergent such as liquid
dishwashing soap and warm water for
cleaning. Do not use abrasive cleaners
that may scratch or dull the surface.
• Carefully read the cleaner product
label to ensure the cleaner is safe for
use on the material.
• Always test your cleaning solution
on an inconspicuous area before
applying to the entire surface.
• Wipe surfaces clean and rinse
completely with water immediately after
applying cleaner. Rinse and dry any
overspray that lands on nearby surfaces.
• Do not allow cleaners to soak on
surfaces.
• Use a soft, dampened sponge or
cloth. Never use an abrasive material
such as a brush or scouring pad to
clean surfaces.