
Instructions / Assembly


3. Refer to the illustration while doing assembly and follow the steps as below:
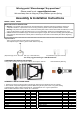
I Attach the top frame (N) onto the tabs of the TOP of four square pipes (Q) by the screws (P), do not
fasten the screws yet. Attach the bottom frame (S) onto the tabs of the BOTTOM end of the pipes (Q) by
the screws (P). Adjust four pipes, top and bottom frames to a perfect position, then fasten the screws.
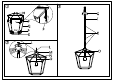
II Release the ring (L) from the rod (O) first. Insert the central rod (O) to the central hole of the top frame
(N), slide on the cap (M) to cover the top of the frame (N), then fix it in position with the ring (L). Place the
fixture wires (J) through the center hole of the top frame (N) and ring (L) for later installation.
III Determine how many stems should be assembled according to your desired hanging height. Thread the
short and long stems (I & K) onto the central rod (O) one by one, and attach the stems onto the swivel of
the canopy (G). Fixture wires (J) go through the stems (K & I) and canopy (G) for later wiring.
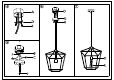
IV Adjust the studs on the mounting bracket (D) to a proper protrusion if necessary. As for a test, slide the
canopy (G) onto the studs to figure if the cap nuts (H) covers the protrusion properly. Thread the studs
toward the junction box (A) a little bit if it protrudes from the canopy (G) too much.
Attach the mounting bracket (D) to the junction box (A) by two mounting screws (E).
V Connect wires according to the wiring diagram on the right.
VI Slide the canopy (G) to the studs on the mounting bracket (D), then fix it with two cap nuts (H).
VII Screw the light bulb (R) onto the socket on the rod (O).
Illustration of assembly and wiring:
I.
N, S, P
Q
II.
L, M, N
O
III.
O ,K , I
G
IV.
E, D
A
V.
B, J, F
C
VI.
H, G
D
VII.
R
O
G
N
D
A
B
C
D
E
F
G
H
I
Q
S
P
K
L
M
N
O
J
P
R