
Technical Specifications


(404) 344-0000 • Fax (404) 349-0401 • www.tranzsporter.com
6
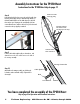
Assembly Instructions for the TP400 Hoist
Congratulations on purchasing the TranzSporter TP400 Hoist. Please read the following instructions completely before
starting assembly.
The TP400 Hoist ships in 4 units:
1) Box - Base Section, Top Cap & Brake Handle 2) Box - Collapsible Carriage & Plywood Attachments
3) Box - Motor Weldment & Manuals 4) Bundle of Tracks (3 -8 ft. Sections)
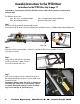
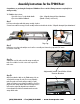
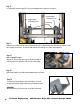
Step 2
Remove base section from its box and place on a clean floor or assembly area. Remove the top cap with a 7/16” wrench
(one bolt/nut on each side).
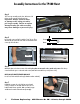
Step 3a
Starting at the top of the track section slide carriage assembly onto
track section so that the four rollers connect to the top rail of the
track section.
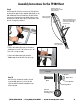
Step 3b
Adjust Tension Bracket - Make sure the TP400 carriage rollers are
on track, and the carriage rolls easily. There are two adjustable
track roller guides on the inside carriage assembly (see right).
Turn the nut clockwise/counter clockwise the adjust the tension (free
play) between the carriage and the tracks. If the carriage moves too
much in and out, tighten the adjustable tension bracket nut.
Correct adjustment should alow for minimal contact between the
carriage and the tracks
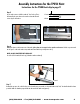
Step 1
If you have not already assembled the carriage assembly: Stop Now.
You must first assemble the carriage, follow the assembly instructions included in the #2 Box - “Collapsible Carriage & Plywood Attachments”.
Top Cap
Adjustable Inside Track Roller Guide
Tension Bracket