
Technical Specifications


Tie Down Engineering • 255 Villanova Dr. SW • Atlanta, Georgia 30336
3
Congratulations on purchasing the TranzSporter TP250 Hoist. Please read the following instructions completely before
starting assembly.
The TP250 Hoist ships in 4 units:
1) Box - Base Section, Top Cap & Brake Handle 2) Box - Collapsible Carriage & Plywood Attachments
3) Box - Motor Weldment & Manuals 4) Bundle of Tracks (3 -8 ft. Sections)
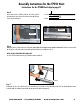
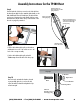
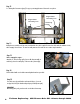
Step 4
“Roll”carriage assembly onto the base. At this time lock the base in
place using the Safety Pin as shown. Be sure to loop the lanyard over the
carriage base as shown.
Important: Always check for wear or damage to
the safety pin cable/pull ring assembly. Failure
to replace damaged safety pin cable assembly
may cause damage or personal injury.
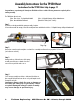
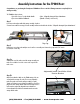
Step 2
Remove base section from its box and place on a clean floor or assembly area. Remove the top cap with a 7/16” wrench
(one bolt/nut on each side).
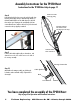
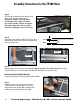
Step 3
Starting at the top of the track section slide carriage
assembly onto track section so that the four rollers
connect to the top rail of the track section.
Step 1
If you have not already assembled the carriage assembly: Stop Now.
You must first assemble the carriage, follow the assembly instructions included in the #2 Box - “Collapsible Carriage & Plywood Attachments”.
Top Cap
Assembly Instructions for the TP250 Hoist
Instructions for the TP400 Hoist skip to page 11