
Instruction Manual

TIE DOWN ENGINEERING • 5901 Wheaton Drive • Atlanta GA, 30336
www.tiedown.com • (404) 344-0000 • Fax (404) 349-0401
S
Tandem Axle Brake Line Kit
(“Add On” Kit #80327)
T
This brake line kit is designed to be used with the Tie Down Engineering Brake Line Kit # 80326. Read all
of the instructions first and familiarize yourself with the parts and layout before starting the installation. Make
sure your actuator is in good working condition, and that it is the proper model for your drum or disc brakes.
1. Follow all the installation instructions from the Single Axle Brake Line Kit, except for the installation of the
3/8” plug that is used in the 3rd “hole’ of the frame mounted T-block.
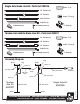
2. Attach one end of the 48 inch long flex hose into end of the T-block. Route the flexible flex hose down the
frame and to the center of the second axle. If the hose is to long, DO NOT CUT ANY BRAKE LINE or HOSE,
THE FITTINGS CANNOT BE REATTACHED. Instead, coil the flex hose at or near the axle line and secure the
loop with a cable tie. Secure the hose to the trailer frame with the C-clamps and self-taping screws provided.
NEVER CUT ANY BRAKE LINE HOSE!! It cannot be patched or flared, and comply with D.O.T. approved
systems. Use only factory completed hose sections.
3. Next, install a three-way brass adapter fitting to the end of the flex hose at the axle line. Attach the
three-way fitting to the side of the trailer frame using the stainless “T” bracket provided. Attach to the frame
using the self-tapping screws or a cable tie provided.
4. Connect a 24”Flex hose to the middle position on the “T” fitting. Plug the end or third hole in the “T” fitting
with the 3/8” plug provided. Connect the 2nd 24” flexible hose to the left brake (closest to your main brake
line). Connect the 76” flex hose to the right side brake. Determine a position on the axle where the three flex
hoses come together allowing free movement at the axle or brake. Connect the three hoses to a “T” fitting.
Attach the “T” fitting to the axle using the “T” bracket provided with the self-taping screws or a cable tie.
5. Tighten all connections to about 3 ft pounds using a 3/8” open end wrench.
6. Secure the Flex hoses to the frame and axle using the C-clamps and cable ties provided.
7. Fill your actuator with DOT 3 brake fluid and follow your actuator/brake’s instructions on bleeding the
system. Check all connections for leaks. Tighten as required.
8. After completing the installation, bleed the brakes using instructions from your actuator manufacturer and
test the brakes in an area where you will not upset normal traffic flow. Recheck all connections for leaks.
Check again after the first 25 miles.
NOTE: ALL Tie Down Brakes and Actuators use DOT 3 brake fluid.
Use of any other brake fluid may damage seals and voids the warranty.
Instruction Sheet #08058
1111005,A614