
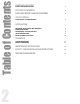
Instructions / Assembly


9
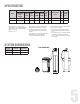
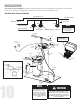
a) Attach the three brine grid legs to grid plate. The
legs will snap on to the tabs of the salt plate making
a “click” sound. For square brine tank there are four
legs.)
c)
Drop the brine grid with brine well inside the
brine tank such that the nut tting faces the
hole on the brine tank. Then press the grid
evenly inside the brine tank until the brine grid
legs touches the bottom of the brine tank.
b)
Insert the brine well assembly inside the grid
plate as well below.
d)
Take the brine tube and insert the nut and plastic sleeve as
shown below.
e)
Insert the tube in the oat assembly elbow and hand tighten
the nut. In many cases the brine line already come installed
from the factory. Leave the other end of the brine line tube
inside the brine tank
f)
For installation of brine tank at the installation site, pull the
other end of the brine tube from the hole on the brine tank.
The completed assembly is shown below.
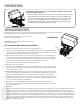
The hole in
the brine tank
should line up
with the brine
line as shown
for round and
square brine
tank.
IMPORTANT:
IN ROUND
BRINE TANK, IT
IS IMPORTANT
TO ALIGN THE
HANDLE TO
THE BRINE
WELL AS
SHOWN
Insert Sleeve
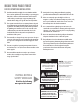
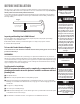
*NOTE
Resin Cleaner
An approved resin cleaner
MUST be used on a regular
basis if your water supply
contains iron.
See page 21 - Res-Up®
Feeder Installation
Instructions
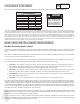
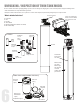
Attaching Brine Tubing to the Brine Line
of the Valve
Make sure the blue clip is secure
INSTALLING BRINE TANK