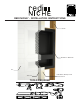
REDI NICHE® - INSTALLATION INSTRUCTIONS Studs Redi Niche® RN1620D Tile Thin-set TOOLS REQUIRED Redi Wall™ / Waterproofed Backer board
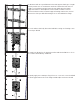
1. If framing Redi Niche into an existing finished wall (if new construction, skip to Step 2), first locate and mark the center of adjacent framing studs using a stud finder or by tapping the wall. Draw a level line between the two wall studs. a. Place the niche between the two marked studs with the flange walls flush against the wall and trace the outline of the niche on the wall. Be sure the top and bottom lines are level. b.
. Measure and cut top and bottom horizontal support framing to a length which permits each to run between and to be fastened to both vertical studs. Level and mechanically fasten the top and bottom horizontal support brackets to both adjacent vertical studs so that the vertical dimension between the horizontal support framing matches the vertical dimension of the pre-drilled fastening holes on the Redi Niche flange. 4.
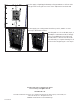
7. Then apply a liquid applied waterproofing membrane to all four niche flanges and covering at least 1 inch of the adjacent tile backer board 8. Now apply your setting material and set your tile, marble or stone directly to Redi Niche surface. Working with one of our double, triple, or quadruple combination models? Simply place your additional niche(s) directly beside, above or below each other. We recommend you complete framing for all niches before beginning to screw any in.