
Instructions / Assembly

Copyright © 2021. Tile Redi Sales, LLC. All Rights Reserved 1 Rev. 20210219
TILE REDI - INSTALLATION & TILING GUIDE
Redi Trench® Tileable Grate Assembly
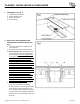
I. COMPONENTS: (See Fig. 1)
1. Tileable Drain Grate (x1)
2. Rubber Bumpers (x4)
3. Drain Strainer (x1)
4. Trench Recess
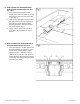
II. HOW TO TILE THE SHOWERPAN FLOOR
EDGES AROUND THE TRENCH RECESS: (See
Fig. 2)
1. Insert the Tileable Drain Grate into the
Trench Recess.
2. Dry fit the tiles to the shower pan floor.
3. Note Tiling Tip: Before setting tile on the
shower pan floor, you must comply with
the following: tile up to the edges of the
recessed trench (A and B) so that neither
the shower pan floor nor the Tileable
Drain Grate is visible, while at the same
time insuring (i) none of the Tileable Drain
Grate tiles extend beyond the edges of the
grate, (ii) none of the shower pan floor
tiles extend beyond the shower pan floor
into the space above the recessed trench,
(iii) proper drainage is achieved by having
none of the tiles encroach into the
drainage space between the tile shower
pan floor and the Tileable Drain Grate,
and (iv) neither the floor tile or the grate
tile will prevent the removal of the tiled
grate from the Trench Recess
4. Now, remove the Tileable Drain Grate
from the Trench Recess and tile the
shower pan floor. Then insert the Tileable
Drain Grate into the Trench Recess and
tile it using PL Premium adhesive, lining up
any grout lines on the tiled grate with the
grout lines on the surrounding shower pan
floor tile.