Decking Installation & Maintenance Guide TimberTech AZEK® Decking Installation Guidelines................................................................................................... 2 Tools Required................................................................................................................ 2 Installation Preparation................................................................................................. 4 Working with TimberTech AZEK Deck Boards...........................
Installing TimberTech AZEK® Decking TimberTech AZEK® Decking & Rim Joist Covers should be installed using the same good building principals used to install wood or composite decking and in accordance with the local building codes and the installation guidelines included below. AZEK® Building Products Inc. accepts no liability or responsibility for the improper installation of this product.
Installing TimberTech AZEK® Decking STOP! Read this section before you start! (continued) Always make sure to visit TimberTech.com to ensure you are viewing the most current installation instructions, care and cleaning, technical information and more. DO NOT attach deck boards to a floating sub-structure which is not mechanically fastened frequently and sufficiently to the building and roof deck.
Working with TimberTech AZEK® Deck Boards Excessive Construction Debris It is important during construction, the deck’s surface stay clear from excessive build-up of dirt, sand, and dust from tile, concrete, landscape blocks, or any other masonry products. If these materials are not removed immediately, the deck surface will become difficult to clean and can potentially damage the deck’s surface finish. Do not use AZEK Deck as a work surface.
Working with TimberTech AZEK® Deck Boards Expansion and Contraction AZEK Deck/Rim Joist Covers will have expansion and contraction with changes in temperature, unlike wood whose size will fluctuate with moisture changes. The expansion and contraction encountered may result in slight gaps, which might be noticed at the ends of boards or in splice joints. Fastening the deck boards according to the Installation Guidelines will help minimize expansion and contraction.
Working with TimberTech AZEK® Deck Boards • AZEK TopLoc color match stainless steel deck screws are also available. Your AZEK Building Products dealer can assist with more information on these products. • AZEK does not recommend any fastener that is not explicitly stated in the AZEK Decking and Installation Guide.
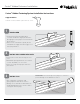
Cortex® Hidden Fasteners Installation Cortex® Hidden Fastening System Installation Instructions Suggested Drills Corded or cordless (18V battery) drill with 1/2” chuck. 1 DRIVE SCREW • Using Setting Tool provided, drive screw at medium or high speed until it disengages at the proper level below the deck surface. • Drive at one continuous speed, do not slow down or toggle the drill trigger in a start/stop manner. 2 INSTALL DECK SCREWS INTO JOISTS • Install two screws into decking at each joist.
Cortex® Hidden Fasteners Installation Important Information • The Cortex Setting Tool must be used to set the Cortex screw to the proper depth. Restricted Cortex Uses • The Cortex fastener must be driven perpendicular to the deck surface for proper fit and ideal finished look. The AZEK Cortex System is designed for traditional elevated deck surfaces. The following applications require a different fastening method: • The cored hole must be free of debris or moisture.
CONCEALoc® Hidden Fasteners Installation CONCEALoc® Hidden Fasteners for use with TimberTech AZEK Deck Boards CONCEALoc & Accessory Installation Instructions • CONCEALoc Hidden Fasteners – retail box for 100-square-foot coverage or bulk bucket for 1,000-square-foot coverage. Includes stainless steel screws. • CONCEALoc Gun Pail – 500-square-foot coverage for use with the fastener installation gun sold separately by TigerClaw. Includes quality coated pneumatic fasteners.
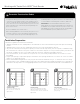
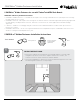
CONCEALoc® Hidden Fasteners Installation CONCEALoc® Hidden Fasteners Installation Instructions 2 POSITION CONCEALOC FASTENERS • Fully insert the CONCEALoc fastener into grooved edge of plank. Screw hole should be lined up with the center of support joist. Correct Incorrect 3 Incorrect Correct • Install provided screw at 45° angle through the fastener and into the joist while applying pressure on the fastener. • Install one fastener and screw at each joist.
CONCEALoc® Hidden Fasteners Installation 4 COMPLETE INSTALLATION • Place the next plank into position against the fasteners. Slightly raise the outer edge of the plank being installed and slide it onto the fastener until the plank contacts the spacer tab. When properly installed the inserted plank should be in contact with the bent-forward spacer tab at the left end of the clip.
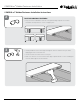
CONCEALoc® Hidden Fasteners Installation 6 HOW TO INSTALL ON DIAGONAL • When the deck is located in a corner of the house, start with small triangular piece of decking in the corner and work your way out. • Offset the clip 1/2” to the right of center line of the joist, so screw will not exit the side of the joist when driven. Incorrect 7 Correct: Shift over 1/2” HOW TO REPLACE A PLANK • Make two parallel cuts down the center of the board to be replaced, then remove the center piece.
Stair Code Compliance 1 In order to meet the AC174 Requirement for stair loading, follow one of the methods below: AZEK 1x6 Decking attached to Stringers using (2) #7 x 2 1/4” Screws 10.00” Maximum 26.00” Minimum 2 3 1/4” x .0131 roundrive framing nail in locations shown using pneumatic nailer. Attach 2 x 4 treated pine centered under treads using pneumatic framing nailer. Nail positions as shown. AZEK Deck Board (Typical) 7.50” 4.25” 24.0” 1.875” 3 AZEK Deck Tread Stair Stringer 49.
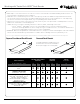
Trimming a TimberTech® AZEK® Deck TimberTech AZEK Deck Rim Joist Covers 12’ lengths – 1/2” thick by 11.
Care and Cleaning Considerations Storage & Handling • Depending on environmental conditions, TimberTech AZEK Deck, Porch, Rim Joist Covers, & Riser colors may appear to lighten over time as part of the natural weathering process. • Please be aware that excessive heat build on the surface of AZEK products from external sources such as, but not limited to, fire or reflection of sunlight can potentially lead to damage.
Care and Cleaning Care & Maintenance To keep your TimberTec AZEK Deck/Porch looking its best: • To remove rust stains, use a household cleaner such as Krud Kutter “the must for rust”. • Avoid the use of rubber-backed mats, tarps, pool toys, and other non-porous items on the deck/porch for any extended period of time as these items may cause discoloration to the decking surface.