
Installation Guide

Page 8
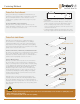
4
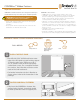
a.
b.
c.
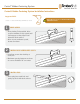
• Place the next plank into position against the fasteners.
Slightly raise the outer edge of the plank being installed
and slide it onto the fastener until the plank contacts the
spacer tab. When properly installed the inserted plank
should be in contact with the bent-forward spacer tab at
the left end of the clip. To achieve this use a scrap piece
of decking at least 24” in length and use it as a tamping
block to drive the plank further onto the clip and the
screw will fully engage the plank to the spacer tab if not
already in contact. Do not use a hammer or damage to
the edge of the plank may occur.
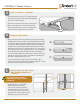
• The last plank will need to have the outside edge
attached using the method described in Step #1. It may
be necessary to rip the last plank to fit.
COMPLETE INSTALLATION
5
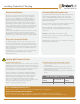
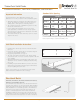
HOW TO INSTALL AT BUTT JOINTS
(UNLESS USING TIMBERTECH
L-BRACKET)
Offset 1/4”
From Center
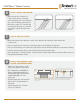
3
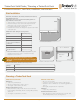
• Install provided screw at 45° angle through
the fastener and into the joist while applying
pressure on the fastener.
• Install one fastener and screw at each joist.
• Make sure fastener is in full contact with
edge of plank and the screw is holding the
fastener down tight to the deck board.
INSTALL CONCEALoc FASTENERS
CONCEALoc
®
Hidden Fastener
Joists at butt joints must be
doubled up for proper fastener
attachment.
•
Install fasteners as detailed
below. Note that the two
clips on the right are shifted
approximately 1/4” to the right
of center on the joists. If this is
not done the spacer tab may fall
within the gap of the butt joist.