Decking Installation & Maintenance Guide Installing TimberTech Decking....................................................................................... 2 Fastening Methods......................................................................................................... 4 TimberTech Square Shouldered Planks......................................................................... 5 Trimming a TimberTech Deck........................................................................................
Installing TimberTech® Decking TimberTech Deck should be installed using the same good building principals used to install wood or composite decking and in accordance with the local building codes and the installation guidelines included below. AZEK Building Products Inc. accepts no liability or responsibility for the improper installation of this product.
Installing TimberTech® Decking Extreme Heat Warning Be aware of excessive heat on the surface of TimberTech products from external sources, such as but not limited to, fire or reflection of sunlight from energy-efficient window products. Low-emissivity (Low-E) glass can potentially harm TimberTech products. Low-E glass is designed to prevent passive heat gain within a structure and can cause unusual heat build-up on exterior surfaces.
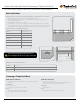
Fastening Methods 12" TimberTech Fascia and Riser Boards Using screws with proper installation of TimberTech Fascia provides the best long-term holding. TimberTech recommends the use of TimberTech TOPLoc Fascia Fasteners for best results. Refer to gapping requirements on page 3 for proper installation. For Use with TOPloc Fascia Fasteners: Using the TOPLoc Fascia Bit, pre-drill 2” from the top and bottom alternating a maximum of 12”. It is recommended that screws are evenly spaced for the best look.
TimberTech Square Shouldered Planks Terrain, Tropical, Legacy, Twin Finish®, Reliaboard®, and Docksider® Important Information To get information on other TimberTech products, visit timbertech.com or ask your dealer for these installation guides: • TimberTech planks are intended to be installed embossed side up. The unembossed surface is not to be used as a walking surface. This applies to all decking surfaces. • The serrated bottom side of TwinFinish is great for accents like benches and flower boxes.
Square Shouldered Planks/Trimming a TimberTech Deck Terrain, Tropical, Legacy, TwinFinish®, Reliaboard®, and Docksider® Stair Installation TimberTech does not recommend installing planks on steps without a riser board. • Stairs should be constructed per local code requirements. • Ensure the stringer step is at least the depth of two full planks plus a 1/8” to 3/16” gap between planks. • For gapping requirements, see page 3.
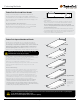
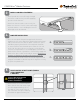
CONCEALoc® Hidden Fastener Important Information CONCEALoc Hidden Fasteners were designed exclusively to install TimberTech grooved and square shouldered planks. Always be sure to check and cut the factory cut ends of all boards to ensure they are square. • In areas with obstructed airflow such as roofs and on-grade applications, a minimum of 1-1/2”, sleeper system, is required. • Sleeper system must be supported by and connected to the substructure over which the deck is built.
CONCEALoc® Hidden Fastener 3 INSTALL CONCEALoc FASTENERS • Install provided screw at 45° angle through the fastener and into the joist while applying pressure on the fastener. • Install one fastener and screw at each joist. • Make sure fastener is in full contact with edge of plank and the screw is holding the fastener down tight to the deck board. 4 • • 5 COMPLETE INSTALLATION Place the next plank into position against the fasteners.
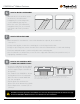
CONCEALoc® Hidden Fastener 6 HOW TO: INSTALL ON DIAGONAL • When the deck is located in a corner of the house, start with small triangular piece of decking in the corner and work your way out. • Offset the center 1/2” towards the long point of the joist, so screw will not exit the side of the joist when driven. 7 Incorrect Correct: Shift over 1/2” HOW TO: REPLACE A PLANK • Make two parallel cuts down the center of the board to be replaced, then remove the center piece.
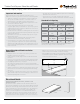
Cortex® Hidden Fastening System Cortex® Hidden Fastening System Installation Instructions Suggested Drills Impact Drivers are not recommended when using TimberTech Cortex. Corded or cordless (18V battery) drill with 1/2” chuck. Important Information Restricted Cortex Uses • Pre-drilling with a 3/16” drill bit is always required when installing Cortex in TimberTech decking. • The Cortex Setting Tool must be used to set the Cortex screw to the proper depth.
Cortex® Hidden Fastening System 1 • PRE-DRILL Pre-drill deck board with a 3/16” drill bit • Reference page 10 for fastener location requirements. 2 DRIVE SCREWS INTO JOISTS • Using Setting Tool provided, drive screw at medium or high speed until it disengages at the proper level below the deck surface. • Drive at one continuous speed, do not slow down or toggle the drill trigger in a start/stop manner. • Install two screws into decking at each joist.
Care and Cleaning With proper installation and care, TimberTech products will provide years of outdoor living pleasure. For most current recommendations or to download a PDF, visit http://www.timbertech.com/warranty-and-care/care-and-cleaning Recommended Products for Terrain, Tropical and Legacy Collections into the surface texture. DO NOT allow the treated area to dry before rinsing throughly as this will allow dirt residue to dry in the surface texture.
Care and Cleaning Maintaining a clean, dry surface is the best method for combating mildew. Ensure that water drains effectively from your deck. For TimberTech TwinFinish, DockSider, and ReliaBoard, be sure that gaps exist between planks to allow for drainage.
Notes Page 14
Notes Page 15
Decking Installation & Maintenance Guide AZEK Building Products 894 Prairie Avenue Wilmington, OH 45177 timbertech.com 1.800.307.