Joist Spacing and Blocking Quick Reference Guide
Joist Spacing and Blocking Quick Reference Guide Use this guide in conjunction with the proper TimberTech installation manual. Watch online at https://www. timbertech.com/ resources/deckbuilding/deck-joistspacing/ Decking Installation & Maintenance Guide TimberTech AZEK® Decking Installation Guidelines .................................................................................................. 2 Tools Required .........................................................................................
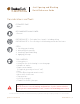
D Joist Spacing and Blocking Quick Reference Guide Considerations and Tools ESTIMATED TIME: 1 Hour* RECOMMENDED MAN-POWER: 1 Person* PRE-REQUISITE 1: Deck plan (size, layout) - including railing PRE-REQUISITE 2: Pre-existing secured framing attached to the house STEPS: 1. Checking your framing 2. Measuring joist spacing 3. Installing required blocking 4.
Joist Spacing and Blocking Quick Reference Guide Understand Your Framing Questions: 1.877.275.2935 TimberTech.
Joist Spacing and Blocking Quick Reference Guide STEP ONE Check Your Framing Before Laying the First Board Best practice is to ensure your deck framing is structurally sound; if you are unsure, call a professional.
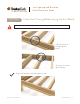
Joist Spacing and Blocking Quick Reference Guide STEP ONE Check Your Framing Before Laying the First Board STRING LINES Before installing any decking, run string line frequently to ensure that the tops of the joists are in plane, as TimberTech Decking will conform to the contour of the joists to which it is attached.
Joist Spacing and Blocking Quick Reference Guide STEP ONE Check Your Framing Before Laying the First Board Avoid! Uneven Joist Heights Top of joist may sit too high against beam Joist may sit too low against beam All joists/framing is even and in plane at top Questions: 1.877.275.2935 TimberTech.
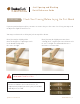
Joist Spacing and Blocking Quick Reference Guide STEP ONE Check Your Framing Before Laying the First Board If you are purchasing new joists, measure to ensure they are the same size. If not, you may need to adjust for slight inconsistencies. You may need to notch or shim your joist on top of the beam: New joist may be slightly wider than existing joists, requiring a notch in the board to align with the correct height.
Joist Spacing and Blocking Quick Reference Guide STEP ONE Check Your Framing Before Laying the First Board It may be necessary to shim, notch, plane, or replace joists due to size variations, crowning, reverse crowning, or improperly positioned joists/framing. Be sure to sort and exclude any extremely crowned and/or twisted joists/lumber material. PROBLEM: High Joist POTENTIAL SOLUTIONS: • Remove and replace • Cut fasteners and lower. Reattach.
Joist Spacing and Blocking Quick Reference Guide STEP ONE Check Your Framing Before Laying the First Board It may be necessary to shim, notch, plane, or replace joists due to size variations, crowning, reverse crowning, or improperly positioned joists/framing. Be sure to sort and exclude any extremely crowned and/or twisted joists/lumber material.
Joist Spacing and Blocking Quick Reference Guide STOP Always make sure your joist, blocking and any added framing are even and in plane with each other across the tops. Questions: 1.877.275.2935 TimberTech.
Joist Spacing and Blocking Quick Reference Guide STEP TWO Confirm Proper Joist Spacing Proper joist spacing is required for proper installation. Joist spacing should never exceed 16” on center unless using TT/AZEK Max board= 24" max. For a more rigid feel, 12” or less, may be preferred. If adding additional framing be sure to keep all boards even and in plane across tops. for more rigid feel Questions: 1.877.275.2935 TimberTech.
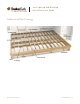
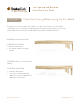
Joist Spacing and Blocking Quick Reference Guide STEP THREE Required Blocking RECOMMENDED MAN-POWER: 1 Person* TOOLS NEEDED: • Safety glasses • Appropriately sized solid wood blocking, typically "the same size as the joists • Drill • • • • • Hammer Level 4' or longer Miter saw/ circular saw Exterior grade screws Tape measure Place solid wood blocking between each joist, placed in rows at maximum every 4’ - 6’ within the structure.
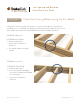
Joist Spacing and Blocking Quick Reference Guide STEP THREE Required Blocking Blocking must be equally spaced in rows, maximum of 4 to 6 feet apart. Blocking required every 4’ - 6'. Blocking: should be installed edge to edge to allow for fastening of the interior blocking. WHY IS BLOCKING NEEDED? Solid wood blocking will help reduce up or down movement and/or twisting of joists.
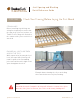
Joist Spacing and Blocking Quick Reference Guide STEP THREE STOP Required Blocking Stop!! Always make sure your joist, blocking and any added framing are even and in plane with each other . Complete your final framing checks. Double check that all blocking and joists are even and in plane across the tops.
Joist Spacing and Blocking Quick Reference Guide STEP FOUR Apply TimberTech ProTM Tac Joist Tape To extend the life of your decking substructure, apply joist tape. This will help prevent water penetration and will protect the joist lumber from rot. Select a tape width that allows for overhang on each side. Use 1.625” or 2.5” tape for single joists, and 3.25” tape for double beams for general flashing, use 4” and 12” tape.