
User guide

11
STARTING, STOPPING, AND SAVING A RIDE
Starting a riDe
• FromSpeedometermode,pressSTART.
If the GPS does not have a satellite fix, a message indicates this and asks if you want to start the timer
anyway. To do so, press tohighlightYES,andpressENTER.Thetimerbegins,butonlytimedataand
data from paired sensors is recorded.
Stopping a riDe
1. While the timer is running, press STOP to pause the timer.
2. Ifthetimerisstopped,buthasnotbeenreset,pressSTARTtoresumetiming.
Saving anD reSetting a riDe
1. Whilethetimerispaused,pressRESETtosavetherideandresetthetimer.
2. HighlightYES,andpressENTER.
All collected data is saved. See ReviewingRides for instructions on viewing saved data.
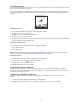
TAKING SPLITS
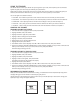
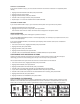
What are lap anD Split timeS?
Lap time is the length of an individual segment of your ride. Split time is the time elapsed from the beginning of
your ride through the current segment.
Whenyou“takeasplit”,youhavecompletedtimingonesegment(suchasonelap)oftherideandarenow
timing the next segment.
Thegraphbelowrepresentsthelapandsplittimesforarideinwhich4lapsweretaken.
LAP 1
7:11 MIN 7:50 MIN
15:01 MIN
SPLIT 2
SPLIT 3
SPLIT 4
7:08 MIN
22:09 MIN
7:30 MIN
29:39 MIN
7:11 MIN
SPLIT 1
LAP 2 LAP 3 LAP 4
taking a Split
• Whilethetimerisrunning,pressLAPtotakeasplit.
Data for the lap you just completed is displayed, and the Cycle Trainer begins timing the new lap.
Once you stop and save the ride, you can review route and ride data for each lap, as well as for the ride as
a whole.
VIEWING DATA DURING A RIDE
Thereareseveralscreensyoucanviewduringaridetoseereal-timedata.
• Press
to cycle through the display screens.
The screens display in this order:
• TimeofDay
• Map(ifactivated)
• Compass(ifactivated)
• CustomPage1
• CustomPage2
• CustomPage3
• CustomPage4
The four custom screens can be configured to show many different types of data. See Configuring Custom
Pages for data that can appear in custom screens and configuration instructions.