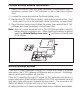
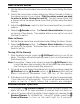
® NOAA Instant-Weather Triple Alarm Clock with Nature Sounds NOA A WEATHER ON/SLEEP SOUND ON/SLEEP OFF RESET SNOOZE TIME S ET ALARM SET WEATHER /DIMMER SOUNDS 7-5-2 BUZZER DAILY ALARM CAL. S ET POWER SLEEP FWD VOL.
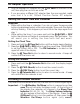
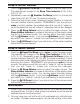
Weather On/Sleep button Sounds Button Snooze/Dimmer Bar Weather Button Alarm Set Button Buzzer Button Sound On/Sleep Button DC Jack Off/Reset Button NOA A WEATHER ON/SLEEP SOUND ON/SLEEP OFF RESET SNOOZE /DIMMER Time Set Button Calendar Set Button Sleep Volume Button TIME SE T ALARM SET WEATHER SOUNDS 7-5-2 BUZZER DAILY ALARM CAL. SE T POWER SLEEP FWD VOL.
Preparation for Use Preparation for Use 1. Remove the radio and all packing materials from the carton. You should save all the packing materials if the unit ever needs to be returned for service. If you do not wish to save the materials, please dispose of them properly. 2. Place the unit on a stable, level surface, close to an AC outlet, out of direct sunlight, and away from sources of excess dust, dirt, heat, water, moisture, vibration and strong magnetic fields.
Lithium Battery Backup Installation 1. Gently turn the unit over and open the battery compartment door. If necessary, remove the 3 “AA” batteries to get to the lithium battery door. 2. Loosen the screw and remove the lithium battery door. 3. Replace the CR-2032 lithium battery, while making sure that the + and – ends match up with the markings inside the battery compartment. 4. Place the door back on and tighten the screw, then reinstall the 3 “AA” batteries and close the battery compartment door.
AC Adapter Operation • Plug the supplied AC adapter into the DC Jack on the back of the unit, then plug the cord into an outlet. • If you are using a different AC adapter then the one supplied, make sure that it is a 6V, 300mA Positive Center AC adapter. Setting the Clock Time and Calendar Important • While setting the time or calendar, if you do not press the appropriate buttons (as explained below) within approximately 8 seconds the display will stop flashing.
1. Press the Weather On/Sleep button once to turn on the NOAA weather report. 2. Slide the Weather Band switch to find the number position that has the best reception for your area. They are as follows: 1 – 162.475MHz 2 – 162.450MHz 3 – 162.400MHz 4 – 162.425MHz 5 – 162.525MHz 6 – 162.500MHz 7 – 162.550MHz 3. Adjust the Volume control as desired. 4. Press the Off/Reset button to turn the weather report off.
Note: If you are going to wake to nature sounds, then the last nature sound you listen to will be the same nature sound you wake to when the alarm sounds, unless the controls are changed. Alarm Operation Important • While setting the alarm times, if you do not press the appropriate buttons (as explained below) within approximately 8 seconds the display will stop flashing. If this happens you must follow the steps again from step 1.
Wake to Nature Sounds 1. Set the Nature Sounds alarm time as indicated under Setting the Alarm Time(s). 2. Follow the instructions under Listening to Nature Sounds to listen to the nature sounds of your choice. Play the nature sound you wish to wake to before turning the unit off. The last nature sound that is played will be the same nature sound that will play when the alarm turns on. 3. Adjust the Volume control to find the volume level that you wish to wake to. 4. Press the Sounds button.
Sleep to Instant Weather 1. Press the Weather On/Sleep button twice to enter the sleep mode. The calendar will change to the Sleep Time Indicator (S-90, S-60, S-30, S-15). 2. Repeatedly press the Weather On/Sleep button to choose the sleep time in 90, 60, 30, and 15 minute increments. 3. Follow the instructions under Listening to Instant Weather to tune into the best weather station possible.
This device complies with part 15 of the Federal Communications Commission Rules. Operation is subject to the following two conditions: (1) this device may not cause harmful interference, and (2) this device must accept any interference received, including interference that may cause undesired operation. Important Radio FCC Information Warning: Changes or modifications to this unit not expressly approved by the party responsible for compliance could void the user’s authority to operate the equipment.
Limited 90 Day Warranty Timex Audio Products, Division of SDI Technologies Inc., warrants this product to be free from defects in workmanship and material under normal use and conditions for a period of 90 days from the date of original purchase. Should service be required by reason of any defect or malfunction, it is best to first return this product and all parts there of, to the store where it was originally purchased.
For additional information, online registration, and exclusive special offers visit our website: www.sdidirect.com For questions or comments regarding this or other products, please call our toll-free number 1-800-888-4491. Para instruccionese en Espanol, llame al 1-800-888-4491.