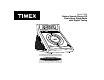
Model T609 Nature Sounds Stereo CD Dual Alarm Clock Radio with Digital Tuning For additional information, online registration, and exclusive special offers visit our website: www.timexaudio.com For questions or comments regarding this or other products, please call our toll-free number 1-800-888-4491. Para instruccionese en Espanol, llame al 1-800-888-4491.
CAUTION RISK OF ELECTRIC SHOCK DO NOT OPEN CAUTION: TO REDUCE THE RISK OF ELECTRIC SHOCK, DO NOT REMOVE COVER (OR BACK). NO USER-SERVICEABLE PARTS INSIDE. REFER SERVICING TO QUALIFIED SERVICE PERSONNEL. WARNING: TO REDUCE THE RISK OF FIRE OR ELECTRIC SHOCK, DO NOT EXPOSE THIS APPLIANCE TO RAIN OR MOISTURE.
Table of Contents A Consumer Guide to Product Safety ............................................................................................................................3 -6 Safety Instructions FCC Information Laser Safety Set up Installation and Maintenance ................................................................................................................................................................
A Consumer Guide to Product Safety IMPORTANT SAFETY INSTRUCTIONS This unit has been designed and manufactured to assure your personal safety. Improper use can result in potential electrical shock or fire hazards. Please read all safety and operating instructions carefully before installation and use. Keep these instructions handy for future reference. Take special note, and adhere to all warnings on the unit and in the instruction and service manual. 1.
A Consumer Guide to Product Safety 9. Object and Liquid Entry – Care should be taken so that objects do not fall and liquids are not spilled into the enclosure through openings. 10. Attachments – Do not use attachments not recommended by the product manufacturer as they may cause hazards. 11. Lightning – For added protection for this product during a lightning storm, or when it is left unused for long periods of time, unplug it from the wall outlet and disconnect the antenna or cable system.
A Consumer Guide to Product Safety FCC Information This device complies with part 15 of the Federal Communications Commission Rules. Operation is subject to following two conditions: (1) this device may not cause harmful interference and (2) this device must accept any interference received, including interference that may cause undesired operation. This equipment complies with the limits for Class B digital device as specified in Part 15 of the FCC rules.
A Consumer Guide to Product Safety Set Up 1. Remove radio and all packing materials from the carton. 2. It is a good idea to save all packing materials in case the unit ever needs to be returned for service. If you do dispose of the packaging, please do so properly. 3. Remove any feature labels, fact tags, or clear protective films from the front or top of the radio, if applicable. Do not remove any labels from the back or bottom of the radio. 4.
Installation and Maintenance Battery Backup Installation 1. Gently turn the unit over and open the battery compartment door. 2. Install 2 AA batteries. We recommend using an alkaline battery for longest dependable life. The battery will maintain the correct time in the event of power failure or accidental line cord disconnection, even though the display is darkened. 3. Close the battery compartment door, turn the unit right side up, and plug in the AC cord.
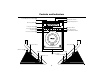
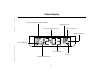
Controls and Indicators Set Alarm 1 Button Power Off/Alarm Reset Button POWER OFF On/ Sleep Button ON / SLEEP ALARM 1 ALARM 2 DISPLAY PLAY MODE PROG. ALARM RESET Set Alarm 2 Button Toggle Display Button Play/Pause Button Clock Adjust Button Stop Button Reverse/Hour Button CLOCK ADJ. HOUR MIN.
Clock Display Random/Repeat/Program Indicator Sleep Indicator Current Time/Alarm Time Alarm-1 Indicator Alarm-2 Indicator MP3 Indicator Track Number CD Icon FM/AM/PM Indicator 9
Setting The Clock Time 1. Press and hold the Clock Adj. Button until the display flashes. 2. Press the Forward/Minute Button and Reverse/Hour Button until the correct time is displayed. Watch the PM Indicator icon at the lower left of the display to set the correct AM or PM. 3. Press the Clock Adj. Button again or wait a few seconds to return to normal mode. Listening to Compact Discs 1. 2. 3. 4. Press OPEN on the CD door to open the CD player door.
Listening to Compact Discs Repeat Play • Press the Play Mode Button once to repeat the current track. The Repeat Indicator located on the left side of the display will flash for Repeat mode. The track that is playing will repeat continuously until cancelled. • Press the Play Mode Button twice for Repeat All mode. The Repeat indicator will stop flashing, indicting Repeat All mode, and the entire disc will repeat continuously until cancelled.
Listening to Radio and Nature Sounds Antenna Information FM – Fully extend the FM wire antenna and vary the direction to find its strongest signal. AM – The AM bar antenna is inside the cabinet, Rotate the cabinet until you find the strongest AM signal. 1. Press the On/Sleep Button to turn the radio on. 2. The display will show the current radio frequency. Slide the Function Switch to select AM, FM or Sounds. If you choose sounds, use the Sound Select Switch to choose the nature sound you like. 3.
Alarm Operation Important! • To wake to the CD Player or Buzzer you must set Alarm 1 to the desired wake time. • To wake to the Radio or Nature Sound, set Alarm 2. Wake to CD or Buzzer 1. Press and hold the Alarm-1 Button until the display flashes and the Alarm-1 icon appears in the upper right corner of the display. You have a few seconds to begin setting the alarm before the display reverts to the standard setting. 2. Press the Forward/Minute Button and Reverse/Hour Button to set the alarm time.
Alarm Operation 3. Use the Function Switch, Tuning Thumbwheel and Volume Thumbwheel to select your Alarm2 wake up sound settings. For more information, see the Listening to the Radio section of this manual. 4. When you’ve made your Radio or Nature Sound settings, press the Alarm-2 Button or wait a few seconds to return to the standard display. The Alarm-2 Indicator will appear on the display, showing that Alarm 2 is set. 5. To disarm the alarm, press the Alarm 2 Button once.
Snooze Operation To temporarily shut off the alarm, press the Snooze Button after the alarm sounds.The alarm will turn off then come back on in approximately 6 minutes. You may repeat this several times during the one-hour alarm cycle. Dimmer Switch Set the Dimmer Switch to HI or LO to adjust backlight brightness depending on the brightness in the room. Stereo Headphone Jack Connect a headphone (not included) to the headphone jack on the right of the unit for private listening.
Troubleshooting PROBLEM The alarm does not sound The alarm sounds at an incorrect time POSSIBLE CAUSE REMEDY • The alarm was not set correctly for AM/PM • Alarm icons are not on the display • Check the alarm time setting • Press the Alarm Button until the Alarm icon appears on the display • The wrong alarm icon was on the display • Make sure the alarm you wish to wake to is the only Alarm icon that appears on the display • The alarm was not set correctly for AM/PM Buzzer alarm is heard when waking t
Troubleshooting PROBLEM POSSIBLE CAUSE REMEDY Poor FM reception on certain stations • Weak or distant station • Try adjusting the direction of the FM wire antenna Poor AM reception on certain stations • Weak or distant station • Rotate the unit to try and gain better reception Unit is on but there is low volume or no volume at all • Main volume has been turned all the way down • Headphones are connected to Headphone Jack • Raise the volume with the volume dial Unit shuts off unexpectedly • Unit
Limited 90-Day Warranty Information Timex Audio Products, a division of SDI Technologies Inc. (hereafter referred to as SDI Technologies), warrants this product to be free from defects in workmanship and materials, under normal use and conditions, for a period of 90 days from the date of original purchase. Should this product fail to function in a satisfactory manner, it is best to first return it to the store where it was originally purchased.