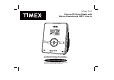
Model T612 Stereo CD Clock Radio with Nature Sounds and MP3 Line-In For additional information, online registration, and exclusive special offers visit our website: www.timexaudio.com For questions or comments regarding this or other products, please call our toll-free number 1-800-888-4491.
CAUTION RISK OF ELECTRIC SHOCK DO NOT OPEN CAUTION: TO REDUCE THE RISK OF ELECTRIC SHOCK, DO NOT REMOVE COVER OR BACK OF UNIT. NO USER-SERVICEABLE PARTS INSIDE. REFER SERVICING TO QUALIFIED SERVICE PERSONNEL. WARNING: TO REDUCE THE RISK OF FIRE OR ELECTRIC SHOCK, DO NOT EXPOSE THIS APPLIANCE TO RAIN OR MOISTURE.
IMPORTANT SAFETY INSTRUCTION 1. 2. 3. 4. 5. 6. 7. Read these Instructions. Keep these Instructions. Heed all Warnings. Follow all instructions. Do not use this apparatus near water. Clean only with a dry cloth. Do not block any of the ventilation openings. Install in accordance with the manufacturers instructions. 8. Do not install near any heat sources such as radiators, heat registers, stoves, or other apparatus (including amplifiers) that produce heat. 9.
IMPORTANT SAFETY INSTRUCTION 12. Use only with a cart, stand, tripod, bracket, or table specified by the manufacturer, or sold with the apparatus. When a cart is used, use caution when moving the cart/apparatus combination to avoid injury from tip-over. 13. Unplug this apparatus during lightning storms or when unused for long periods of time. 14. Refer all servicing to qualified service personnel.
A Consumer Guide to Product Safety FCC Information This device complies with Part 15 of the FCC rules. Operation is subject to the following two conditions: (1) this device may not cause harmful interference, and (2) this device must accept any interference received, including interference that may cause undesired operation. This equipment complies with the limits for a Class B digital device as specified in Part 15 of FCC Rules.
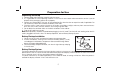
Preparation for Use Unpacking and set up 1. Remove radio and all packing materials from the carton. 2. It is a good idea to save all packing materials in case the unit ever needs to be returned for service. If you do dispose of the packaging, please do so properly. 3. Remove any feature labels, fact tags, or clear protective films from the front or top of the radio, if applicable. Do not remove any labels from the back or bottom of the radio. 4.
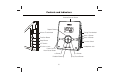
Controls and Indicators Snooze/Dimmer Button Repeat Button Tuning Thumbwheel Volume Thumbwheel Alarm-1 Button Time Set Button Alarm-2 Button Sleep Button Function Switch DST Switch MP3 line in Jack Headphone Jack Power On/Off/ Alarm Reset Button << Button Random Button 6 >> Button Play/Pause Button
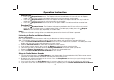
Operation Instruction Setting Clock Time and Calendar 1. Depending on the Daylight Saving Time (DST) status in your location, switch the DST Switch to +1 or -1 to add or subtract 1 hour to the current time. When the DST switch is set to +1, the DST Icon will appear on the lower right of the time display. 2. To adjust the time, press and hold the Time Set Button until the display flashes. 3. Press the >> Button or << Button to adjust the time (press and hold to adjust rapidly).
Operation Instruction Repeat Play • • • Press the Repeat Button once. The Repeat Indicator located below CD icon will flash for Repeat mode. The track that is playing will repeat continuously until the controls are changed. Press the Repeat Button once more for Repeat All mode (the Repeat Indicator will stay lit and the entire disc will repeat continuously until the controls are changed). Press the Repeat Button once more to turn off repeat mode. The indicator will be turned off too.
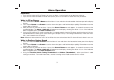
Alarm Operation Important! • • If you wish to wake to CD or Buzzer you must set Alarm 1 to the time that you desire to wake to. If you wish to wake to Radio or nature sound, then you must set Alarm 2 to the time that you desire. Wake to CD or Buzzer 1. Press and hold the Alarm-1 Button until the Alarm-1 icon and alarm time located on the lower part of the display flashes. 2. Press the >> Button or << Button to set the alarm time (press and hold to adjust rapidly).
Alarm Operation Arming and Disarming Alarm (Turn Alarm Function On and Off) 1. Press the Alarm 1 (or Alarm 2) Button once. The unit will show the current alarm time on the bottom part of the display . Press again to disarm the alarm. The alarm is set to go on when the alarm icon is displayed. Resetting the Alarm to come on the Next Day • After the alarm sounds, press the Power On/Off/Alarm Reset Button to turn off the alarm.
AUX-in/MP3 input Operation The unit comes with an AUX cord for you to connect the T612 with your MP3 player or other audio device. Just plug one end of the aux cable to your MP3 audio output or headphone jack and the other end of the cable to the unit MP3-in jack. Turn on your audio device to listen to it through the T612 (you may need to press the Power On/Off/Alarm Reset Button to turn on the unit). Adjust the volume on your audio device to a comfortable level.
Limited 90-Day Warranty Information Timex Audio Products, a division of SDI Technologies Inc. (hereafter referred to as SDI Technologies), warrants this product to be free from defects in workmanship and materials, under normal use and conditions, for a period of 90 days from the date of original purchase. Should this product fail to function in a satisfactory manner, it is best to first return it to the store where it was originally purchased.