T r i g ge r R i o t User Guide
Thanks for joining the Riot: get ready to sequence in a whole new way. The Trigger Riot is a deep machine that combines a great deal of functionality with an intuitive interface. In this manual we begin with a few simple “quick start” patch examples to get you used to working with the Riot, followed by a deeper function by function explanation.
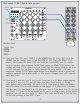
Riot patch 1: let’s play + Trigger Riot MODE DIVIDE STEPS PROBABILITY CLOCK SHIFT SPEED PULSE WIDTH TIME SHIFT + + ATK SLOPE Z4000 VC-EG SD808 BD808 LEVEL LEVEL TONE TONE SNAPPY DECAY ACCENT ACCENT ACCENT IN ACCENT IN OUT GATE IN GATE IN RETRIG SD OUT BD OUT VC MUTE/SEL1 P1 P2 P3 P4 B1 B2 B3 B4 beat sync loop start end CLEAR BUTTON BOSS BPM/ CYCLE 1 2 C D MUTE ROW 1 1 2 MUTE ROW 2 2 5 6 3 9 10 D MUTE ROW 3 R ATTENUVERTER - S + MUTE/SEL4 DEVI
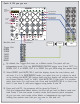
Riot patch 2: OK I like it, let’s go pro PRESETS AND BANKS + Trigger Riot MODE DIVIDE STEPS PROBABILITY CLOCK SHIFT SPEED PULSE WIDTH TIME SHIFT + SD808 BD808 LEVEL LEVEL TONE TONE SNAPPY DECAY ACCENT ACCENT ACCENT IN ACCENT IN GATE IN GATE IN SD OUT BD OUT MUTE/SEL1 P1 P2 P3 P4 B1 B2 B3 B4 beat sync loop start end INDEPENDENT /MATRIX MASTER KNOB CYCLE BUTTON BOSS TAP TEMPO 1 BPM/ CYCLE 2 A B C D 1 2 3 4 1 MUTE/SEL2 2 5 6 7 8 MUTE/SEL3 RST/CLR 3
Riot patch 2: OK I like it, let’s go pro PRESETS AND BANKS + Trigger Riot MODE DIVIDE STEPS PROBABILITY CLOCK SHIFT SPEED Continue...
Riot Patch 3: OK this thing is really crazy, give me more MODE SELECT BUTTON MODES + Trigger Riot MODE DIVIDE STEPS PROBABILITY CLOCK SHIFT SPEED PULSE WIDTH TIME SHIFT + + hats909 SD808 BD808 TUNE LEVEL LEVEL LEVEL CH DECAY OH DECAY TONE TONE source 909 modulation FM SNAPPY DECAY RAW CV IN AM ACCENT ACCENT ACCENT FM/AM ACCENT IN ACCENT IN ACCENT IN OH GATE VC-TUNE GATE IN GATE IN CH GATE HATS OUT SD OUT BD OUT MUTE/SEL1 P1 P2 P3 P4 B1 B2 B3 B4 beat sync
Riot Patch 3, OK this thing is really crazy, give me more MODE SELECT BUTTON Continued...
Lets take a break for a second to understand the nature of the pulse width of a clock divider, and how the Trigger Riot lets you use it creatively. Below are two drawings of the outputs of clock dividers: on the left are the independent clock dividers, each one set to a different value, and on the right are the sum of those dividers on the output of the Trigger Riot. The top drawing shows how the triggers would look like if the pulse width was set to 0.
Patch 4: OK you got me + Trigger Riot MATRIX INDEPENDENT BUTTON MODE STEPS PROBABILITY CLOCK SHIFT SPEED PULSE WIDTH TIME SHIFT + SD808 BD808 LEVEL LEVEL TONE TONE SNAPPY DECAY ACCENT ACCENT ACCENT IN ACCENT IN GATE IN GATE IN SD OUT BD OUT MUTE/SEL1 P1 P2 P3 P4 B1 B2 B3 B4 beat sync loop start end BOSS TAP TEMPO 1 BPM/ CYCLE B C D 1 2 3 4 5 2 MUTE/SEL2 6 7 8 MUTE/SEL3 9 3 MUTE/SEL4 4 RESET 4 10 OUT A B C D HOLD ON POWER-UP TO LOAD USB CLOC
This is the end of the quick start guide, from here on we go through a complete in-depth function by function description and theory of the Trigger Riot, so lets get started: Manual conventions: Buttons are in Bold and I/O Jacks are in Bold Italics. Text in single quotes (‘ ‘) denotes what is shown on the display. Overview: The Trigger Riot is an innovative trigger sequencer never seen before, therefore learning to use it might take a while and require an understanding of the internals.
Controls: Endless rotary knobs: TEMPO: This knob is under the LED screen. It is used to adjust Tempo in BPM, internal counter cycle start and end points, and other utility functions like clock source, rate, and beat sync. 4x4 MATRIX: These 16 knobs are used to set the various parameters for each clock divider and effects. There are two methods to use the 4x4 knobs: Matrix and Independent. In Matrix mode, the rows and columns affect the output of both sets of outputs 1-4 and A-D.
Loop (B2) - Loop On/Off (‘LOOP’) turns the looping on and off by holding this button and then using the Tempo knob. Loop Start (B3) - Loop Start (‘LPSt’). begin. Loop End (B4) - Loop End (‘LPEn’). the loop. Select the Bank and Preset for the loop to Select the Bank and Preset for the end of Note : Loops can run forward or backwards. Also note that the internal Cycle must be set to a non-zero value or the external Reset In must be triggered for the presets to change.
TAP TEMPO: Press the Tap Tempo button once and the display will show ‘tAP’ and enable tap tempo. Press the Tap Tempo button twice more in time to set the Tempo. The new tempo will show on the display. Tap Step: To enter Steps with the Mute/Sel buttons, hold the Tap Tempo button until 'tAPS' displays. Now single presses to the Mute/Sel button will place a Step at that beat when CYCE is not 0. The button taps are quantized to the previous 16th note, and the trigger is not fired until the next cycle.
Input/Output: CLOCK IN: Insert a 0-5V trigger or gate source to drive the Trigger Riot when the external clock is selected by holding the Start/Stop button. The rate for the incoming clock signal can be selected by the (‘DIN’) function. The two rates are 1/16th notes (‘16th’) or 24 PPQ DIN Sync (‘DIN’) based on the Roland specification. CLOCK OUT: Outputs each clock based on the BPM and Clock setting.
Use: The Trigger Riot boots up in Matrix Mode and Divide Mode as indicated by the LED on the left of the top LED row. In this mode the encoder knob in the upper left will set a clock division for both output 1 and A. The encoder knob to the right of it will set a value for outputs 1 and B, below it 2 and A and so on. The clock divisions range from 1 (every clock triggers output) to 255 (every 255 clocks triggers output) so very complex patterns are easy to program.
Setting a Cycle: Press the BPM button under the Tempo Knob until the Display reads ‘CYCE’ for Cycle End. A value of 0 turns off the reset and the internal counter runs for years before reset. Setting a value from 1 to 255 will return the count to 1 in that many clock ticks. The counter counts from 1 so setting 8 will give 8 clocks between resets. The internal count can be reset to a number other than 1 using the Cycle button and setting the Cycle Start (‘CYCS’) value.
Common speed settings are displayed as their notation value (t = triplet, d = dotted): DIN 64th 32t 32nd 16t 32d 16th 8t 16d 8th 4t 8d 4th 4 6 8 12 16 18 24 32 36 48 64 72 96 24 PPQN 4 PPQN 1 PPQN Clock Shift Mode: Clock Shift moves the trigger in time by whole clocks steps. The range is from 0 to Division-1 so a division of 4 can be shifted up to 3 clock ticks. Example: Divide 8, Clock Shift 0 triggers on counts 8, 16, 24, 32... Divide 8, Clock Shift 5 triggers on counts 13, 21, 29, 37...
Pulse Width: Pulse Width is the length of time the output pulse remains high (5V) and is a percentage of the division. Pulse Width is calculated based on the Division plus Clock and Time Shift, so shifted divisions will have proportionally shorter pulse widths. Setting the pulse width to 0 will set the pulse width to a single internal clock cycle no matter what the division which is useful for drum triggering. The default is 25%.
Set Loop End: - Press End/B4 until ‘LPEd’ displays - Press Bank and then Preset to select the loop end - Press Bank and then Preset to select the loop end Note: Loop End points can be before the Start point to reverse the direction of the loop. SyncBus: The SyncBus is a unique synchronization standard that we have developed for synchronizing our sequencers with amazing timing and intelligence.
Activating SyncBus is very simple. Once all SyncBus cables are connected, press and hold the start/stop button until the Clock Sources appear. Use the master knob to set it to (’SYNC’). Do that on all Trigger Riots that are connected on the bus. At this point all the Trigger Riots connected are waiting for one to take command, that is the Boss. The Boss sends information on the SyncBus setting up the BPM, preset to be played and resets.
Synchronization of the Trigger Riot to a computer DAW: The Trigger Riot can sync to a DAW application like Pro Tools or Ableton Live using a standard audio interface and no specialized software. Process: Tiptop have created example files to help demonstrate this process. them here: http://www.tiptopaudio.com/manuals/crcode/pulses.zip Download The files have two tracks: one channel is the 24 PPQN clock and the other a single reset pulse at the start of the clip.
Boot up Functions: To check the Riot firmware version hold the Mode button and power up the unit. The version will be displayed and would look something like that (‘1b00’). Firmware is released periodically as we find bugs, add new features, or just keep on improving performance of the machine. The latest firmware code is available to download at the Trigger Riot product page at www.tiptopaudio.com. A video demonstrating how to upgrade is included there. To upgrade your Trigger Riot do the following: 1.