Owner’s Manual Read this manual for complete instructions Français (page 25) / Español (página 49) Series 100 200 Contents 2 4 5 6 7 8 9 10 12 13 14 15 16 18 19 20 21 22 72 76 0712 Important Safety Information What’s in the Box? Proper Use and Functions Assembly Pressure Relief Procedure Load Material Getting Material to Flow Practice Spraying Clear the Spray Tip Clean the Spray Gun Filter Clean the Inlet Filter Short Term Storage Cleanup - latex materials Cleanup - oil-based materials Cleaning the Spr
Important Safety Safety Information Read all safety information before operating the equipment. Save these instructions Indicates a hazardous situation which, if not avoided, could result in death or serious injury. To reduce the risks of fire or explosion, electrical shock and the injury to persons, read and understand all instructions included in this manual. Be familiar with the controls and proper usage of the equipment. Grounding Instructions This product must be grounded.
8. Check hoses and parts for signs of damage, a leak can inject material into the skin. Inspect hose before each use. Replace any damaged hoses or parts. 9. This system is capable of producing 2800 PSI / 193 Bar (100) or 3000 PSI / 207 Bar (200). Only use replacement parts or accessories that are specified by the manufacturer and that are rated a minimum of 3000 PSI. This includes spray tips, nozzle guards, guns, extensions, fittings, and hose. 10. Always engage the trigger lock when not spraying.
What’s in the Box? Start Notice: This pump is available in a stand model (100) and cart model (200 shown below). All information given for the stand model applies to the cart model except where indicated. *Certain parts of the sprayer will not be assembled out of the box. Be sure to read Assembly instructions, page 6. Some of the graphics in this manual may not exactly match your sprayer and spray gun. All information and instructions given in this manual applies to all models except where noted.
Proper Use and Functions Start Capability: Sprays a variety of paints (oil-based and latex), primers, stains, preservatives and other nonabrasive materials. Do not use! This pump should not be used with textured materials, block filler, lacquers, industrial enamels, or asphalt sealer or materials containing HHC.
1. Assembly Start You will need: • Two adjustable wrenches important: Do not plug in the power cord until assembly is complete. Note: It will be much easier to attach the hose to the sprayer if you uncoil it first. 1 2 3 4 6 7 To Assemble: 1. Insert the ends of the hose bracket into the holes of the handle as shown (cart model only). 2. Remove the plug from inside the hose fittings and remove the cap on the outlet valve. Discard both. 3.
Pressure Relief Procedure* Start *Perform when instructed Important Safety Warnings You will need: • A waste bucket Be sure to follow the Pressure Relief Procedure when shutting the unit off for any purpose. This procedure is used to relieve pressure from the spray hose. Failure to do so could result in serious injury. Be careful when handling the spray gun so you don’t accidently spray yourself. The high pressure paint stream could pierce your skin causing serious injury.
2. Load Material Start • • • • • You will need: The material you plan to spray Flat blade screwdriver (cart models only) Piston Lube™ Extension cord Waste bucket 1a 1b (a) To Load Material: 2a 3 4 5 (a) (b) 6 7 ON English PRIME 2. Stand Model Only 2a. Squirt a teaspoon of Piston Lube™ (P/N 314-480 or 0516750, sold separately) into the indicated area. Light household oil can be substituted if necessary. 3. Fully depress the Sureflo™ valve to make sure the inlet ball is free. 4.
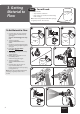
3. Getting Material to Flow You will need: Start • Waste bucket • Scrap material / cardboard • Drop cloths to protect floors and furnishings from overspray Note: Motor will cycle ON and OFF while spraying to regulate pressure. This is normal. 1 2 To Get Material to Flow: ON l O SPRAY PRIME 5 SPRAY 4 PRIME 1. Point the spray gun into a separate waste container. Unlock the spray gun trigger. Squeeze and hold trigger for steps 2-3. 2. Turn the power ON. Turn the PRIME/SPRAY knob to SPRAY.
4. Practice Spraying Start You will need: • Scrap material / cardboard Note: If the spray pattern becomes distorted or stops completely while the gun is triggered, follow any or all the procedures listed on pages 12-14. Note: If you plan to be away from your spray project for more than one hour, follow the Short Term Storage instructions on page 15. Note: If you have difficulty achieving a good spray pattern, your spray tip and gun filter may not be ideal for the type of material you are spraying.
Spray Technique correct Tip: Start stroke Pull trigger Move steadily correct Release trigger End stroke Flex your wrist as you move in order to keep gun parallel to the surface inCorrect Spray Pattern GOOD SPRAY PATTERN BAD SPRAY PATTERN: TAILING ! 8” - 10” (20 - 25 cm) Overlap Your Strokes 50% Overlap 11 English See page 12-14
Spraying Troubleshooting Start You will need: • Scrap material / cardboard Clear the Spray Tip Do not attempt to unclog or clean the tip with your finger. High pressure fluid can cause injection injury. To Clear the Spray Tip: 1. Lock the spray gun. 2. Rotate spray tip 180 degrees from its current position. 3. Make sure the PRIME/SPRAY knob is turned to SPRAY. Unlock the spray gun. 4.
Spraying Troubleshooting Start You will need: • • • • Clean the Spray Gun Filter Wrench Warm, soapy water for latex material Mineral spirits for oil based materials Replacement spray gun filter (if necessary) important: Never clean the filter by poking it with a sharp object. 1 SPRAY PRIME To Clean the Spray Gun Filter: 2 1. Perform the Pressure Relief Procedure, page 7. 2. Pull trigger guard from filter housing. 3. Tighten the wrench over the wrench flats (a).
Spraying Troubleshooting Start You will need: • Warm, soapy water for latex material • Mineral spirits for oil based materials Clean the Inlet Filter important: Make sure your floors and furnishings are covered with drop cloths to prevent accidental drips. To Clean the Inlet Filter: 1 2 1. Unscrew the inlet filter from the fitting on the end of the suction tube. 2.
Short Term Storage Start You will need: • • • • Water Plastic bag or bucket Rags Stir stick Instructions are for latex materials only! Note: If using oil based material follow instructions for Cleanup on page 16. This procedure should be used when taking a short term break or when ending your project for the day. If your break is longer than 16 hours follow Cleanup instructions, page 16. 1 SPRAY PRIME To Prepare for ShortTerm Storage 2 1. Perform the Pressure Relief Procedure, page 7. 2.
Cleanup MINERAL SPIRITS or Start • • • • You will need: A water source that can be delivered with a garden hose (latex materials only) Mineral spirits if using oil-based material Empty waste container A container with warm, soapy water Cleaning notes - read before cleaning • When using latex material, clean sprayer and components with warm, soapy water. For oil based material use mineral spirits. Never use mineral spirits with latex materials. • NEVER use gasoline to clean sprayer.
7 8 SPRAY 6 ON PRIME 5. Remove the inlet filter from the suction tube and place it into waste container. 6. Thread pump cleaning adapter onto garden hose. Thread suction tube fitting over the adapter. 7. Unclip the return tube from the suction tube and place it into the waste container. Turn the PRIME/SPRAY knob to PRIME. 8. Turn the water supply to the garden hose on. Turn the pump ON. Water will go into the suction tube and out through the return tube.
Cleanup Oil-based materials Start You will need: • Mineral spirits if using oil-based material • Warm, soapy water if using latex material • Waste container Follow these steps if you sprayed oil-based materials, or if you sprayed latex materials and do not have a garden hose available. Be sure to use the appropriate cleaning solution for the type of material sprayed. 1 To Clean: 2 SPRAY PRIME 1. Perform Pressure Relief Procedure (page 7). 2.
Cleaning the Spray Gun To Clean the Spray Gun: • • • • • Soft bristled brush Light household oil Warm, soapy water if using latex material Mineral spirits for oil based material Wrench 1 SPRAY 2 PRIME 1. Perform the Pressure Relief Procedure, page 7. 2. Pull trigger guard to separate from filter housing and unscrew housing using a wrench. Note: Tighten the wrench over the wrench flats (a). 3. Remove filter from spray gun.
Long-Term Storage Start You will need: • Light household oil / Piston Lube • Rags • Wrench HOUSEHOLD OIL important: Store the unit indoors with the power cord wrapped around the cart handle. To Prepare for LongTerm Storage: 1. Remove the suction tube. 2. Using a wrench, remove the spray hose. 3. Fill a cup or other container with two ounces of Piston Lube and submerge the Sureflo Valve (a) into the oil. Light household oil can be substituted. 4. Cover the outlet valve with a rag.
Cleaning the Sureflo Valve You will need: Start • Wrench Cleaning or servicing the Sureflo Valve may be required if the unit has priming problems. Priming problems may be prevented by properly cleaning the sprayer and following the long-term storage steps. If priming problems persist, you may need to replace the Sureflo Valve assembly. Call Technical Service (1-866-8482698) to order new Sureflo™ valve assembly. To Clean the Sureflo Valve: 1. Remove the suction tube. 2.
Troubleshooting Before servicing, always release system pressure by following Pressure Relief Procedure (page 7). Problem A: The sprayer does not start 1. 2. 3. Cause Sprayer is not plugged in ON/OFF switch is set to OFF The sprayer shuts off while under pressure 4. 5. 6.
Troubleshooting Problem G: The spray gun will not spray 1. 2. Cause The spray tip plugged The spray gun filter is clogged 3. The spray tip is in wrong position 4. PRIME/SPRAY knob not set on SPRAY Solution Refer to Clear the Spray Tip see page 12 Refer to Clean the Spray Gun Filter see page 13.
Parts List • Liste de Pièces • Lista de Piezas Sprayer • Pulvérisateur • Rociador 3 4 6 1 2 5 7 Item Art. Art. Part No. No de piéce Pieza No. English - Description Français - Description Español - Descripción Qty. Qté. Cant.
Parts List • Liste de Pièces • Lista de Piezas Suction set • Dispositif d’aspiration • Juego de succión 1 2 3a 3b 5 6 7 4 Item Art. Art. Part No. No de piéce Pieza No. English - Description Français - Description Español - Descripción 1 0516197 Suction set (100) Dispositif d’aspiration (100) Juego de succión 1 0516127 Suction set (200) Dispositif d’aspiration (200) Juego de succión (200) 1 0512371 Return tube (100) Tube de retour (100) Tubo de retorno (100) 1 2 73 Qty. Qté.
Parts List • Liste de Pièces • Lista de Piezas LX-50 Spray Gun • Pistolet de LX-50 • Pistola de LX-50 3 4 1 2 5 Item Art. Art. Part No. No de piéce Pieza No. English - Description Français - Description Español - Descripción Buse de TR2 tip, 515 Boquilla de TR2, 515 1 Filtre, maille 100 (jaune, trousse de 2) Filtro, malla 100 (amarillo, juego de 2) 1 1 692-515 TR2 tip, 515 2 0089959 Filter, 100 mesh (yellow, 2 pack) 3 0515228 4 ------ 5 0347706A Qty. Qté. Cant.
Accessories • Accessoires • Accesorios Part No. No de piéce Pieza No.
This product, manufactured by Titan Tool, is warranted to the original retail purchaser against defects in material and workmanship for: AIRLESS PAINT SPRAY EQUIPMENT Limited Warranty Ce produit, fabriqué par Titan Tool, est garanti, au bénéfice de l’acheteur au détail d’origine, contre tout vice de matières et toute malfaçon pour: MATÉRIEL DE PULVÉRISATION DE PEINTURE SANS AIR GARANTIE LIMITÉE Este producto, fabricado por Titan Tool, está garantizado ante el comprador original contra defectos de mater