
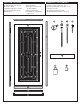
Installation Guide


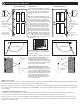


Determining Your Build Out Area (continued)Install the lock-side jamb
5
Gap between door (B) and
both side jambs (A & C)
should appear equal on
each side with a minimal
reveal of 1/8", up to a
maximum reveal of 1/4"
Hinge side
Lock side
Jamb Alignment
Align the lock holes, in the lock-side jamb (C), with the lock bolts
extended. Maintain a space between door (B) and the lock-side jamb (C)
equal or similar to the space between the door (B) and hinge-side jamb
(A), from top to bottom. Make sure the lock-side jamb is plumb, then mark
the location of mounting holes 5 & 6 of the jamb, by inserting a screw
through the jamb and either making a dent or scratching the mounting
surface. Set the lock-side jamb aside and, where marked, pre-drill the two
holes, using a 3/16" drill bit.
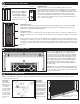
5
7
8
6
C
A
B
Temporary Screws
Return the lock-side jamb to position, verify again that it is plumb, and install two #10 3-1/2" dry wall screws (K)
supplied into holes 5 & 6 (see diagram at left), and temporarily mount the lock-side jamb (C). These screws are
inserted solely to temporarily hold the jamb plumb.
Permanent Screws
Pre-drill two 3/16" holes, 4" deep, into the entryway trim mounting surface, through holes 7 & 8 of the lock-
side jamb. Install two one-way screws (J) into holes 7 & 8, using your drill and the supplied one-way driver
tool (I).
Remove the two #10 3-1/2" dry wall screws (K) previously installed into the lock-side jamb (holes 5 & 6 in
the diagram). Pre-drill two 3/16" holes, 4" deep, into the entryway trim mounting surface through holes 5 &
6. Install two one-way screws (J) into holes 5 & 6 using your drill and the supplied one-way driver tool, being
careful to insure that the jamb does not move and maintaining the 1/8" to 1/4" gap between the door and
the jamb.
Determining Your Build Out Area (continued)Install the top header jamb
6
D
CA
B
Place the top head jamb (D) above the door (B) and between
the two side jambs (A & C). Take care to make sure that a
minimum of 1/8" reveal is consistent on both sides jambs (A
& C) as well as on the top head jamb (D). Spacing should be
equal from left to right and above the door. Mark the location
of the mounting holes. Set the top head jamb (D) aside and,
where marked, pre-drill 3/16" holes 4" inches deep. Return
top head jamb to position and fasten to mounting surface
using the provided one-way screws (J) and the supplied one-
way driver tool (I).
Optional: Caps are included to help fully seal the top header
jamb. Insert the caps into the top header jamb. Note: Caps
may be snug. Place a wood block over each end cap and
gently tap in with a hammer.
Determining Your Build Out Area (continued)Install the bottom bar
7
E
A
C
Insert bottom bar legs into the left
and right door jambs
Bottom Bar
Placement
The bottom bar
(E) will need to
be installed 1/8"
to 1/4" lower
than the existing
doorway so that
there is a slope
to the threshold.
This allows any
moisture to drain
away from the
door.
Bottom Bar
Installation
Insert bottom bar legs
into the left and right
door jambs. Adjust
the bottom bar to the
correct height. Install
bottom bar (E) using
two #8 self-tapping
screws (L) as shown.
Keep your drill on
a low speed so the
threads do not strip.
Note: If you will NOT be installing the bottom bar as determined in step 2, discard the bottom bar and skip to step 9, otherwise, remove
door from hinges and set aside.