User Manual OS6000
Thank you for purchasing the OS6000 Massage Chair. Before using your massage chair, please read the contents of this instruction manual and refer to it when needed. Table of Contents Features ...................................................................... 2 Safety Precautions ...................................................... 3-4 Chair Components ...................................................... 5-6 Chair installing ............................................................
01 Features The operation of massage chair is controlled by a microcomputer that performs various intelligent massage methods and combinations, like Kneading, Tapping, Clapping, Shiatsu, Rolling, Vibration and Air Massage. All these methods massage acupressure points accurately to effectively alleviate fatigue, promote metabolism and improve blood circulation. ● Designed with a set of S-track movable intelligent massage robot, special focus on the neck, shoulder and lumbar massage according to body curve.
02 Safety Precautions When using the massage chair, basic precautions should always be followed to reduce the risk of electric shock, burns, fire or injury to persons. Please read the following precautions before using the massage chair. * Make sure the power plug is securely inserted into a proper electrical outlet to reduce the risk of short-circuit and fire. * Always unplug the massage chair from the electrical outlet immediately after using and before cleaning.
* This massage chair is designed for household use and should not be used in non-residential settings. * Please consult your doctor if you are in doubt as to whether or not you should use this massage chair.
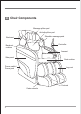
03 Chair Components Massage pillow pad Anti-slip pillow pad Shoulder massage pads Backrest Controller Backrest cushion Armrest Side panel Seat cushion Power switch / Power jack Leg rest Castor wheels 5 Footrest
Massaging Position 8 air bags 10 air bags 2 hammer 6 air bags 1 hammer 10 air bags 14 air bags 6
04 Chair installing When installing the chair, please leave 31.5” of space behind the back-rest to allow free reclining. Unplug from outlet when installing parts of the massage chair. Before installing, please check all the parts in the following list.
Step 1: Remove the chair parts out of the two cartons: 1) Massage chair part 3) Side panel Note: The parts and the serial number of them in the below installation are corresponding to the parts list. Step 2: Connect pipes and terminals between the side panels and seat part as demonstrated in PIC 1. LED jack Valve jack Air pipe colour label: white PIC 1 3 1 Step 3: Install side panels. 1) Insert the side panels along the hook D to the holder C (on the seat) at 90 degrees as demonstrated in PIC 2.
4) Please fix the back screw prior to the front screw while you assemble one of the side panels. C PIC 2 C D X D B A 15 16 17 PIC 3 X Step 4: Repeat step 2 and step 3 to install the other side panel. Step 5: ● Use the diagonal pliers to cut off the cable tie which binds the stopper of the backrest and take off the packing material of the backrest actuator, where both of them are located underneath the seat pad.
Step 6: Install the backrest. Lift the backrest, then lower the backrest into the seat brackets. Securely lock the flat head bolts (A) into both sides (B) of the seat as demonstrated in PIC 5. A. Flat Head Bolt(on the backrest) B.
Step 8: Insert the wire plugs into the seat as demonstrated in PIC 7. Note: Insert black to black and grey to grey, otherwise damage to the chair may happen. grey black PIC 7 Step 9: Attach the backrest pad and the pillow pad. 1) Attach the backrest pad and the pillow pad using the magic tape. 2) Attach the backrest pad with the zipper and magic tapes. Magic tapes Zipper PIC 8 Step 10: Attach the outer coat of the massage pillow that is easy to take off and could be cleaned by water.
Step 11: Install the controller. Adjust the positioning holes of controller to match with the ones in the side panel as demonstrated in PIC 11. Lock the screws which are with flat pad when holes C’, D’, E’, F’ are corresponding to hole C, D, E, F. Note: 1. The A and B in PIC 11 are corresponding to PIC 10’s A and B. 2. The screws and the gaskets used in this step are packed in a small bag marked “3”. A 7 C B F D E A PIC 10 D' C' E' F' B PIC 11 Step 12: Connect the wire plugs.
Step 13: Put the instruction manual into the small pocket on the backrest pad. The small pocket’s position is shown in PIC 13. small pocket PIC 13 Step 14: Music player can be put inside the remote controller’s holder as demonstrated in PIC 14. Music player equipment storage place PIC 14 Note: Please use the nylon spacer (put in small bag marked “4”) for proper adjustment if the gaps between the side panels and the backrest are different.
05 Preparation For Use ● To set up the chair 1. To avoid obstruction to the back and front of the chair, please ensure when the chair reclines, there will be excess space free from any obstacles. 2. There should be at least 10” for the leg rest and 31.5” for the backrest. 3. To avoid damage to the floor, it is advisable to place a carpet or cushion under the chair. 31.5” 10” ● To move the chair 1. Lift up the leg rest. 2. Recline the chair to approximately 45 degrees. 3.
06 Operation Guide 1 3 2 5 10 6 7 15 17 4 8 9 11 16 12 18 13 14 20 19 21 22 23 25 24 27 26 28 29 31 30 35 33 32 36 34 37 41 38 15 39 42 40
The Remote Control is divided into 4 main sections with different functional purposes. The pages that follow describe the functions of the various buttons within these sections.
3. ● ● ● ● Pause The Pause button will allow all massage functions to stop temporarily. Press once and the Pause icon will start blinking on the LED Display. Massage functions and timer will be stopped temporarily. Press again to resume the massage session. Shoulder Section 4/5/6 Shoulder position ● The Shoulder Position button adjusts the position of the massage rollers to best fit the user’s body. ● The product is equipped with an auto-scan function.
It is recommended that the Music Sync function should not be used for more than 30 minutes. Please stop for at least 30 minutes after half an hour of use. To import music, connect the audio cable into the remote control jack. Select your preferred music, and adjust the volume on the music device. You can choose to enjoy the music from the massage chair speakers or by plugging in your own headset into the remote control audio jack.
● This program stretches the back muscles, hands, hamstrings and the full body. ● Use this program after a workout to relax sore muscles. ● The default massage session is 15 minutes. 13. Upper B ● This button engages the Upper Body Auto Program. ● Press once to start. ● This program focuses the massage on the upper body, particularly on the shoulders and head with Air, Kneading, Rolling and Tapping massage modes. ● The default massage session is 15 minutes. 14.
● The program will deliver a light, stimulating Tapping massage throughout the whole body. This will enable your body to feel refreshed and stimulated, ready to start a new day. ● The default massage session is 15 minutes. 18. Recovery ● This button engages the Full Body Recovery Auto Program. ● Press once to start. ● The program combines different massage modes to effectively massage the neck, back and lower back. It is particularly effective as a massage to end a tiring day.
intense massage experience. For some users, a Zero Gravity position allows them to feel weightlessness. ● Press once to activate Zero Gravity Position 1. Press again to activate Zero Gravity Position 2. ● Press again to stop. 26. Kneading ● This button activates the Kneading massage modes. There are 2 Kneading modes. ● Press once to activate the full back massage of Kneading Mode 1; press again for Kneading Mode 2. ● Press again to stop.
30. Kneading and Tapping ● This button activates the Kneading and Tapping massage mode. ● Kneading and Tapping massage can be adjusted to fit 5 speeds and intensity levels. ● Press once for a continuous full back massage. Press again to enter Kneading and Tapping Mode 2 for an interval massage. ● Press again to stop. 31. Rolling ● This button activates the Rolling massage mode. ● Rolling massage can be adjusted to fit 3 widths. ● Press once to activate the Rolling massage mode for a full back massage.
36. Zone ● This button allows you to limit the massage to a particular body zone. ● Press once to activate Zone massage. This will keep the original massage mode working on a range of 8 cm. ● Press again to resume full back massage. Air Massage Functions 37. Neck This button allows you to activate the air pressure massage mode at your Neck. Press once to start, press again to stop. 38. Shoulder This button allows you to activate the air pressure massage mode at your Shoulders.
Usage Tips 1. Massage angle The Anti Gravity button (25) allows you to quickly adjust your massage angle to a Zero Gravity position. There are 2 Zero Gravity positions. Zero Gravity Position 1 lifts the user off the ground to provide a more comfortable massage angle than common massage chairs. Zero Gravity Position 2 provides a full zero gravity position that raises the lower body even higher. This allows the product to deliver a more intense massage experience. 2.
If you prefer the massage to be stronger still, you can remove the inner cushion from the backrest cover. The backrest inner cushion can be replaced to reduce the massage intensity. Note: When you receive the chair, the inner cushion has already been placed inside the backrest cover. 3. Head massage Small and big pillows have been provided with the massage chair to provide a comfortable head massage.
Figure A: By removing the small pillow pad and leaving just the big pillow pad, you can experience a stronger neck massage. Figure B: By removing both the small and big pillow pads, you can experience the strongest neck massage. 5. Stretching When you start the Stretching button (12), be sure that you are in the correct seating position. In particular, tuck your hands into the armrest air bags. 6. Operations First connect the chair power plug to a power supply, then turn the switch on.
07 Grounding Instructions This product must be grounded. If it should malfunction or break down, grounding provides a path of least resistance for the electric current to reduce the risk of electric shock. This product is equipped with a cord with an equipment-grounding conductor and a grounding plug. The plug must be plugged into an appropriate outlet that is properly installed and grounded in accordance with all local codes and ordinances.
08 Product Specifications Description Specifications Model No. OS6000 Rated Voltage 110-120V~ Rated Frequency 50/60Hz Rated Power Consumption 210W Timer 5/10/15/25/30 minutes Import sound source MP3, MP4, mobile phone The power of loudspeaker 2W(one side) Dimension(L x W x H) Weight Product carton: 54.3” x 29" x 38.4" Side panel carton: 25.8" x 15.7" x 39.4" Product gross weight: 266.8 lbs Product net weight: 231.
09 Troubleshooting This chapter summarizes the most common problems you could encounter with the massage chair. If you are unable to solve the problem with the information below, contact immediately. If the problem encountered is not listed here, please first try the following steps: 1. Unplug the product for 60 minutes. 2. After 60 minutes, plug in the product again 3. Turn on the Power Switch. Problem The massage chair does not work. The appliance is warm. Sound can be heard during massage.
10 Warnings ● Do not use water and other cleaning detergents on the massage chair. ● Do not stack, stab, slit or harshly pull on the surface of the massage chair. ● Gently press the buttons during operation and avoid hitting the buttons with hard objects. ● Pull out the power supply plug after each use. ● Do not use the massage chair for more than 30 minutes at a time.