
Instructions / Assembly


RAILING DYNAMICS, INC.
FOR HOME, FOR LIFE
®
135 STEELMANVILLE ROAD
EGG HARBOR TOWNSHIP, NJ 08234
TEL: (877) 420-7245
FAX: (866) 277-5160
E-MAIL: CS@RDIRAIL.COM
URL: WWW.RDIRAIL.COM
TPABKS2 BRACKET - STAIR RAIL
INSTALLATION INSTRUCTIONS
NOTE: Check with your local building code ofce for design load requirements for guard rails and bottom space
requirements. All supporting structures should be built in accordance with applicable building codes. Always use
proper safety precautions and wear safety goggles.
1.
Prepare all posts and mounting surfaces
before installation.
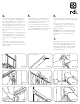
Rest a plank on the noses of the stairs
between the mounting surface to which
you are installing the stair rail (Fig. 1). The
thickness of the plank will determine the
space between the stairs and bottom rail.
2.
Place the bottom rail, baluster holes facing
up, on the plank with the label reading,
“This end top of stair.” at the top stair post.
Slide the rail up or down until the baluster
hole spacing is even at each end (Fig.
2). A minimum of 2
5
/
8
" from each post or
mounting surface to the rst baluster hole is
required.
Trace the post onto each rail and mark
1
/
8
"
short to allow for expansion. The rail can
now be cut at these marks.
3.
Slide a bracket onto each end of the bottom
rail as shown in Figure 3. Position the rail
in place and slide the brackets against the
mounting surface. Check for proper t and
attach to the post or mounting surface using
the appropriate mounting hardware for your
application (Fig. 4). For wood surfaces, use
wood screws (A) and for steel posts or steel
mounting surfaces, use self-drilling metal
screws (B).
Pre-drill using a
1
/
8
" drill bit and install a
supplied rail set screw through the side of
each bracket to secure the rail in place
(Fig. 5).
(Fig. 1)
(Fig. 3)
(Fig. 2)
(Fig. 5)
(Fig. 4)
TMPSI2 01.13
Tip: If using a power saw, a carbide tipped
blade of at least 60 teeth is recommended.
TPABKS2 Hardware
(A) - 8 wood screws
(B) - 8 steel screws
(C) - 4 rail set screws
(D) - 8 bracket
plugs
(E) - 4 button caps