I N S TA L L AT I O N & O P E R AT I O N M A N U A L AORCS Atlas Operating Room Ceiling System
AORCS Atlas Ceiling System IOM I N S TA L L AT I O N & O P E R AT I O N M A N U A L Ta b l e of Contents Inspection......................................................................................3 Examination.........................................................................................3 Preparation.......................................................................................3 Installation........................................................................................
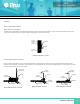
AORCS Atlas Ceiling System IOM I N S TA L L AT I O N & O P E R AT I O N M A N U A L INSPECTION Unpack grid members and blank-off panels, check for shipping damage. If damaged do not install; report damage to the delivering carrier, and contact Titus for replacement components.
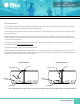
AORCS Atlas Ceiling System IOM I N S TA L L AT I O N & O P E R AT I O N M A N U A L Installation Perimeter Grid Member Installation Wall to wall and Soffit Installations Install the half-tee grid members at the determined height given on the reflected ceiling documents. Unless a specific benchmark is given in each room by the construction engineer, install the ceiling at the high point of the floor in each room.
AORCS Atlas Ceiling System IOM I N S TA L L AT I O N & O P E R AT I O N M A N U A L Trim the tees as necessary to ensure a tight fit and seal to the ceiling components connected to each other. A fine tooth carbide tip miter saw is recommended for cutting ceiling tees. Proper Personal Protection Equipment (PPE) is required for cutting and installing the ceiling components. A full face shield, ear protection and proper gloves should be worn for this procedure.
AORCS Atlas Ceiling System IOM I N S TA L L AT I O N & O P E R AT I O N M A N U A L Interior Grid Member Installation Setup string lines to aid in the installation of the main runners and cross tees. This will serve to keep the ceiling system square during installation. Determine which walls will be the starting point for the string lines. • For wall to wall installations this will also give the ceiling border blank-off panels their permanent size.
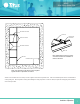
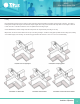
AORCS Atlas Ceiling System IOM I N S TA L L AT I O N & O P E R AT I O N M A N U A L Perimeter Cross Tees Cross Tee "Quick Snap" Connector Interior connectors Perimeter connectors Main Tee Main Tee Perimeter Tees Note: Hand tighten screws on interior connectors to allow for installation of interior cross tees. Note: Trim perimeter cross tees to ensure a tight fit. Tighten screws on perimeter connectors. Trim the cross and main tees as necessary to ensure a tight fit and seal to the perimeter tees.
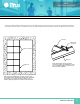
AORCS Atlas Ceiling System IOM I N S TA L L AT I O N & O P E R AT I O N M A N U A L Continue to install remaining main and cross tees to the initial string line layout. All tee to tee connections are made with the same quick snap connecters. There is no difference in the connecters except how the quick snap connecters are placed on top of the tees.
AORCS Atlas Ceiling System IOM I N S TA L L AT I O N & O P E R AT I O N M A N U A L Leveling Finish the leveling procedure once the ceiling is in place, locked into perimeter members, and properly secured to each connection. Use a laser or leveling device to adjust the hangers to the laser and wrap the support wires using no less than three full wraps within a 3 inch length on main tee to wire connection. Local kinks or bends are not an acceptable means for leveling the grid.
AORCS Atlas Ceiling System IOM I N S TA L L AT I O N & O P E R AT I O N M A N U A L Blank-off Panel Installation Cut and install the ceiling tiles using all the proper PPE. Start with the border panels. Cutting tiles will require a fine tooth blade on a table saw. It is recommended that you protect the panels from getting scratched while cutting. Install the border panels and hold down ceiling clips.