
Manual


INSTALLATION & OPERATION MANUAL
FFD, FFDR, FFDRA Models
Fan Filter Unit IOM
Installation & Operation
WARNING
DISCONNECT THE UNIT FROM THE ELECTRICAL
POWER SOURCE BEFORE ATTEMPTING
ANY SERVICE
WARNING
THE STANDARD FILTER IS PROTECTED WITH AN
EXTENDED METAL FACE SCEEN. THIS IS NEVER TO
BE USED TO HANDLE THE FILTER. IT IS ONLY FOR
PROTECTION AGAINST AN ACCIDENTAL TOUCH
OF THE FILTER. ONLY HANDLE THE FILTER BY THE
FRAME
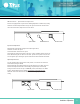
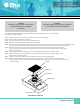
Service: Removal and Replacement of FFDR & FFDRA Filters
Note: All filters should be visually inspected for freight damage before installation. It is necessary to use two workers when
removing the filter and for installation to avoid twisting or separation of the media seals. Handle the filter only by the frame
and never place anything on the upstream filter side of the filter. Additionally, it is important to keep the filter level to prevent
any shearing force on the media itself.
For FFDR & FFDRA Filters:
Tools Required: Phillips Head Driver, Battery Operated Drill, 3/16” hex head ball driver (2ea)
Step 1. With the power off, remove the diffuser screen by removing the 6 each 10-32x1/2 screws, then carefully place in a
safe location.
Step 2. Loosen the six 1/4x12 socket head screws far enough to rotate the eight filter clips 90°. The filter may be loose
enough to drop during this operation. If not, slowly pull the filter away from the knife-edge seal, taking care not to touch the
filter face during this operation. It is important to pull the filter slowly away from the seal, so that the gel remains in the filter
gel track.
Step 3. Carefully clean plenum assembly knife edge surface of residual gel material.
Step 4. Inspect filter for visible damage, if damaged set aside for replacement or repair.
Step 5. Inspect the gel seal, if reinstalling the removed filter. Determine if the gel has lost its ability to seal (i.e. the gel should
reform to cover the track without voids or openings), if so repair the gel material or consider replacement of filter.
Step 6. Place the filter evenly against the filter-sealing surface of the unit. Reposition filter clips and screws. The clips
should be rotated and angled into place. It is recommended that four workers work on each corner of the filter
simultaneously, holding the filter seated into the track. Hand tighten clips from opposite corners evenly until all clamps are
tightened.
Step 7. Reinstall diffuser screen by hand-tightening the screws.
Step 8. Determine if recertification or testing of replacement is required.
Step 9: Restore power to FFU and verify proper operation of FFU.
9
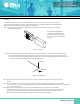
FFDR & FFDRA Filter Change FFDR & FFDRA Filter Replacement
Fan Filter Unit
Filter
Filter
Filter Clip
Gel Track
Knife- Edge
Seal
Diffuser
Screen
2-Piece Welded
Plenum Housing
Filter Clip and
Screw (typ 6)
Diffuser Screen
Screws (typ 6)
10-32
PHP
Screws
¼ -20
Cap
Screw