
Owner`s manual


10
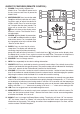
MENU
(Press the Menu/Select button briefly. Use the arrow buttons to navigate through the menu
pages and the pq buttons to change the items within the menu.)
1. TREBLE: Use pq to adjust the treble and press Select to proceed to the next menu item.
2. BASS: Use pq to adjust the bass and press Select to proceed to the next menu item.
3. BALANCE: As the balance control has no effect when the Model 10 is set to Mono, this setting
should remain in the center position, except when the optional Model 10 Speaker is connected
and Stereo mode is selected via the remote control’s “Mono” button. Though we still recom-
mend the center balance setting in Stereo mode, you may use the pq buttons to adjust the
balance to your liking, and press the Select button.
4. EQ: The equalizer acts as a Loudness control at low volume levels. Use pq to select between
having the EQ on, having the EQ always off, or the EQ off until the Model 10 is turned off (when
it is turned on again the EQ will be on again). Press Select to proceed to the next menu item.
5. DISPLAY OFF: Use the pq and Select buttons to set the display on or off. Setting the display off
will turn the backlight off when the Model 10 is turned off. This may be desirable when sleeping.
While the display is off, pressing a button on the remote will turn the display on for 10 seconds.
6. BACKLIGHT: Use pq to make the backlight brighter or dimmer.
7. CONTRAST: Use pq to increase or decrease the display contrast.
8. CLOCK SET: Use pq to set/change the hour (the hour will determine AM or PM), then press
Select. Repeat this process to set/change the minutes, then press Select to proceed to the
next menu item. Use pq to set the year and press Select to proceed to the next menu item.
Use pq to set the month and press Select to proceed to the next menu item. Use pq to
set the day and press Select to complete the process and return to the source screen.
HOW TO SET THE ALARM
9. With the Model 10 powered on, access the alarm menu by briefly pressing the Alarm button on
the remote control.
10. Alarm 1 is shown first. Press the Alarm button or use the pq and Select buttons to choose
between Alarm 1 and Alarm 2. Note: At any point you can navigate through the alarm menu
by using the buttons.
11. Use the pq buttons to set/change the hour, then press Select. Repeat this process to set/
change the minutes. AM/PM will automatically be determined by the hour.
12. Use the pq and Select buttons to set the alarm on or off.
13. Use the pq and Select buttons to set the alarm schedule (how often you want the alarm to
wake you up).
14. Use the pq and Select buttons to set the source you wish to wake to. If you choose FM or AM,
use the tune +/- buttons to tune a station, or press one of the preset buttons if you have set stations
to the presets. Be sure to set a station that will be broadcasting during the time you wish to wake.
15. Lastly, use the pq buttons to set the volume level of the alarm. The alarm icon will show on
the display if the alarm is set to wake
16. Repeat this process for Alarm 2 if desired.
If you make a mistake at any point in the process, press the button on the remote and begin again.