
Owner`s manual


8
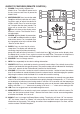
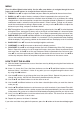
GUIDE TO FEATURES (REAR PANEL)
1. 12VDC/1000mA: This input is for use
with an optional 1A fused, 12VDC adapt-
er. The adapter must be 5.5mm/2.1mm
center positive.
2. 75 OHM “F” CONNECTOR: A tele-
scoping FM antenna is attached to this
input. Adjust for best reception. For
more, see the section marked “FM/AM
Reception”.
3. HEADPHONE OUT: Connect a headset
(not included) to this variable stereo
output for private listening. The head-
set will mute the primary speaker. The
headset’s volume is adjusted using the
control wheel or the remote control. The
remote’s “Mono” button also affects this
output. This stereo output accepts a 1/8"
stereo male mini connector. Avoid using
headphones at high volume levels to
prevent possible hearing damage.
4. PRESETS 1-5: Press and hold to store the currently tuned station. Press briefly to recall the
station associated with that specific preset. The preset number will be indicated on the display.
There are 5 presets for the FM band and 5 presets for the AM band.
5. R-SPR: Connect the male RCA cable from the optional Tivoli Audio Model 10 Speaker to this
female RCA output. Make sure the Stereo/Mono setting is set to Stereo by using the Mono
button on the remote control.
6. SUB OUT: Connect the audio cable from the optional Tivoli Audio Model Subwoofer (or other
compatible subwoofer) to this output. This jack accepts a 1/8" stereo male mini connector.
7. REC OUT: Connect a cassette deck’s audio input (or other recording device) to this fixed
level stereo output to record the audio. The primary speaker will not be muted when using
this output. This jack accepts a 1/8" stereo male mini connector.
8. MIX IN: Connect the audio output of another device, such as a computer, to this input to hear
the audio mixed in with the FM or AM tuner. With the Model 10 in Auxiliary mode, this input
acts as a second Auxiliary input. This stereo input accepts a 1/8" stereo male mini connector.
The volume level is controlled by the source device.
9. AUX IN: To hear audio from another device, such as Tivoli Audio’s Model CD, a MP3 player, or
TV, connect said device’s audio output to this stereo input and change the source to Auxiliary.
This stereo input accepts a 1/8" stereo male mini connector. Note you may need to adjust the
volume level differently for an auxiliary device than the level used for radio listening.
10. POWER CORD INPUT: Firmly insert the included power cord. When unplugging the power
cord from the wall outlet, always grasp it by the plug and not the cord. We recommend the
use of a power strip with surge protection. Be sure your region’s voltage is consistent with the
voltage indicated on the rear panel under the power cord input. Tivoli Audio is not responsible
for damaged caused by incorrect voltage.
4
8
7
6
9
2
5
1
10
3