OWNER’S MANUAL AM/FM Travel Radio
Important Safety Instructions 1. Read these instructions. 2. Keep these instructions. 3. Heed all warnings. 4. Follow all instructions. 5. WARNING – To reduce the risk of fire or electric shock, do not expose this apparatus to rain or moisture. 6. Clean only with a dry cloth. 7. Do not block any ventilation openings. Install in accordance with the manufacturer’s instructions. 8.
this device does not cause harmful interference. However, there is no guarantee that interference will not occur in a particular installation. If this equipment does cause harmful interference to radio or television reception, which can be determined by turning the product on and off, the user is encouraged to try to correct the interference by one or more of the following measures: • Reorient or relocate the receiving antennas. • Increase the separation between the equipment and the receiver.
SongBook Instructions Congratulations on your purchase of Tivoli Audio’s SongBook portable FM/AM radio. We believe the SongBook to be one of the most sensitive and finest sounding portable digital radios on the market. It’s convenient Alarm, Sleep, and Clock features make it perfect for both travel and home use. In order to take full advantage of what your new radio is capable of, please take a moment to read this owner’s manual and the Safety Instructions.
Guide to features (front panel): 5 8 3 6 4 7 1 2 1. VOLUME KNOB: Rotate the volume knob to the right to increase the volume or to the left to decrease the volume. This knob also controls the volume of the headphone output. 2. OFF/FM/AM/AUX KNOB: Turn the source knob one click to the right to hear the FM band, two clicks to the right to hear the AM band, or three clicks to the right for the auxiliary input. When the SongBook is switched to FM or AM the display will show the station which was last tuned.
5. LIGHT: When operating using the external power supply the backlight will remain softly lit at all times. Press button briefly to engage backlight to full brightness for 10 seconds, or press again to cancel the backlight. If a function key is selected within the 10 second period the backlight will remain on for an additional 10 seconds. Backlight will then return to softly lit state. When operating using battery power the backlight will turn off completely to preserve battery life.
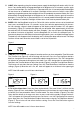
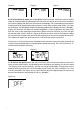
Figure 5 Figure 6 Figure 7 B. To set the Alarm to wake: Set the SongBook to the FM or AM station you wish to wake to and that will be broadcasting during the time you wish to wake (or set to Off or Aux to wake to an increasing beep) and adjust the volume level accordingly. Press and hold the Alarm button. A beep tone will be heard confirming the Alarm is set to wake and the word “Alarm” will show on the display. The SongBook will go into Standby mode and the display will show “Standby”.
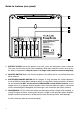
Guide to features (side panel): 3 2 1 1. 12VDC/500mA: Connect the included external power supply to this input, or use an optional 1A fused 12VDC adaptor for operation in a boat or camper. The connector must be 5.5mm/2.1mm center positive. When disconnecting the power supply from the wall outlet, never pull it by the cord. Do not plug the SongBook into a wall outlet controlled by a switch. It is normal for the power supply to become warm during use.
Guide to features (rear panel): 1. BATTERY COVER: Loosen the bottom screw with a coin until the battery cover is released. The screw will not come off the cover completely. Slide down and lift the cover up to access the battery compartment. Note the cover is on hinges and cannot be removed completely. 2. AM STEP SWITCH: Select 10k for AM reception in the USA or 9k for use outside North and South America. 3.
Charging: The SongBook’s internal charger will charge the six NiMH or NiCAD batteries if the adapter is connected, the Batteries/Charger switch is correctly set, and the SongBook is switched Off. All six NiMH/NiCAD batteries must be correctly installed for charging to take place. While charging, the LCD will show the battery icon with the signal bars cycling. This will disappear from the display once the batteries have fully charged.
Limited Warranty: Tivoli Audio manufactures its products to very high standards and we are confident our products will perform well. Accordingly, we provide a limited warranty on this product against manufacturing defects in material and workmanship to the original owner, for a period of one year from the original date of purchase. This warranty is non-transferable. This Limited Warranty covers the functionality of the product for its normal, intended use as specified in this Owner’s Manual.
This Limited Warranty is void if the label bearing the serial number has been removed or defaced. For service outside the USA, please contact your local distributor. If you purchased an extended service contract from your dealer and service is required after the term of this Limited Warranty has expired, please contact your extended service contract provider to obtain service. For your convenience, you may register your product for warranty service online at our website www.tivoliaudio.com.
This manual was written by Peter Skiera and cannot be reproduced in whole or in part without the permission of Tivoli Audio. The information included within this owner’s manual was accurate at the time of printing. Tivoli Audio shall not be held liable for operational, technical, or editorial errors/omissions. Visit our website for the latest version of the owner’s manual.