
Owner's Manual


7 – ENGLISH
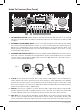
4.
SOURCE: Briefly press to cycle through the sources: FM, AM, CD, and Bluetooth/AUX. To
activate Bluetooth, go to the Bluetooth/AUX source position and follow the steps outlined in
the "Blutooth Operation" section. The source can’t be changed while the alarm is sounding. If
the source is changed during CD playback and the source is changed back to CD again, the
CD will start playback from the first track.
5. SLEEP: With the Music System BT playing FM, AM, CD, or an auxiliary device, briefly press to
begin the 20 minute Sleep timer. The corresponding green LED will illuminate while the Sleep
timer is active and the display will countdown the remaining Sleep time. The Music System BT
will power off automatically at the end of the Sleep cycle. Sleep cannot be activated in CD mode
unless a CD is loaded. Note RDS and CD Text will not be displayed in Sleep mode.
6.
/ TUNE +/–: Press the Tune +/- buttons briefly to Auto Scan to the next station detected.
See “Auto Scan” under “Menu” on how to disable Auto Scan and tune stations manually.
CD: Briefly press to advance to the next track on a disc or back to a previous track if the track
has been playing for under 10 seconds. If the track has been playing for more than 10 seconds,
pressing the button will re-start the currently playing track. Using these buttons during shuffle
play may cause tracks to repeat.
7. STOP: Press to stop CD playback and return to the first track.
8. PLAY/PAUSE: With a CD loaded, briefly press to initiate disc playback. Press during playback
to Pause playback and press again to resume playback. If the CD is paused for more than 5
consecutive minutes it will revert to Stop.
9. : Briefly press to fast forward or fast reverse in approximately 10 second intervals. Press
again to resume normal playback or press Play. These functions are not on the remote control.
Due to the nature of MP3 CDs, using the fast reverse will cause the CD to stop playback once
it reaches the start of the track. Also note fast forward and fast reverse will not operate during
CD Intro mode. Pressing the fast scan buttons ( ) during shuffle play may cause tracks
to repeat.
10. EJECT: Press to Eject a CD. The display will show “Ejecting”. This button is to eject only and
should NOT be used to load a CD. Always remove the disc in a straight position with-out bending
the disc. In the unlikely event you experience an error or a disc remains stuck inside, disconnect
the power cord for 60 seconds and reconnect firmly.
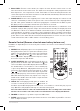
11. CLOCK: Press and hold to set the hour first. A beep will confirm you are in the clock set mode.
Use the volume knob to select the hour (Figure 6) and then press the volume knob in to set and
cycle to the minutes (Figure 7). The hour determines AM or PM. Adjusting the hour does not affect
the minutes and vise-versa. Repeat this process to set the year, month and the day (Figure 8, 9
and 10). Once set, press the Clock button briefly to recall the date and time whenever RDS or
CD text is displayed. When the date is shown, only the month and day will show (not the year).
12. VOLUME/MENU/TREBLE: Rotate clockwise to increase the volume or counter-clockwise to
decrease the volume. The volume level is represented in numbers from 0 (no output) to 30
Fig 6, 7, 8, 9, 10