
Owner's Manual


8 – ENGLISH
(maximum output). If the volume ever sounds distorted, reduce the level immediately. In any
mode, push and hold the knob to access the menu. See section marked "Menu". Push in and
rotate counter-clockwise to reduce the treble or clockwise to increase the treble. Press the
volume knob in to set or the setting will store automatically and the display will return to its pre-
vious state. This knob is also used to adjust and enter selections (by pushing the knob in) when
setting the Clock and Alarms. Adjusting the volume during Snooze will cancel the Snooze mode.
13.
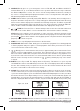
AUDIO: Push briefly to cycle through Stereo, SpacePhase™ Wide mode, or Mono audio settings.
The SpacePhase™ Wide mode setting is designed to create a more expansive soundstage, while
the Mono setting reduces multiplex noise on weak FM stations, making otherwise unlistenable
stations listenable. Regardless of the previous audio setting, the SpacePhase™ Wide mode will
automatically engage each time the Music System BT is turned on.
EQ: To temporarily turn the EQ off, press and hold the Audio button. The display will show “EQ
Off” and a confirmation beep will sound. The EQ will engage again automatically the next time
the Music System BT is turned on. To keep the EQ off, press and hold the Audio button and the
display will show “EQ Always Off” and a confirmation beep will sound. The EQ will remain off until
“EQ On” is selected. The EQ differs from Audio in that it enhances lower frequencies primarily at
lower volume levels. We suggest the rear Bass level be set to the center detent position. Should
the bass ever sound distorted, immediately lower the bass level and/or volume. For more, see
the section marked “Getting the most from your Music System BT.”
14. DISPLAY: When in FM mode, briefly press repeatedly to select between RDS Scrolling Text,
(Figure 11), Static Text, or RDS Off. If a station is not broadcasting in RDS or the RDS signal is
too weak, no RDS text will be shown. In cases where the signal is weakly received the text may
be scrambled. Note the AM band does not utilize RDS text. For more, see “Reception/RDS”. RDS
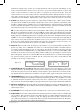
text will not be shown in Sleep mode. When playing a CD, press repeatedly to select between
CD Scrolling Text, Static Text, or CD Text Off. If the inserted CD does not contain CD text (Figure
12), then this feature cannot be enabled. Not all commercial music CDs contain CD Text. CD
text will not be shown in Sleep mode.
15. SNOOZE/MUTE (Top of Cabinet): When the Alarm activates, press this button to silence the
alarm for 7 minutes. The display will count down the remaining Snooze time. Adjusting the volume
level will cancel the Snooze mode. During normal operation, press this button to mute the audio.
The display will show “Muted”. Press again to restore the audio output or adjust the volume level.
16.
HEADPHONE OUT: Connect a set of headphones (not included) to this variable stereo output for pri-
vate listening. Plugging in the headphones will mute the primary speakers. The headphone’s volume
is adjusted using the front panel volume knob. This stereo output accepts a 3.5 mm stereo male
mini connector. Avoid using headphones at high volume levels to prevent possible hearing damage.
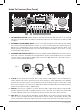
17. OPTICAL SENSOR: Automatically adjusts the display brightness based on ambient lighting con-
ditions. The display will dim in darker environments and brighten in brighter conditions. Do not
obstruct this sensor.
18. IR SENSOR: Receives signals from the included remote control. Do not obstruct this sensor.
19. SLOT-LOAD: Insert a disc (with printing side facing up) until it is drawn inside. The display will
say “Loading”. Disc functions will not work while the disc is loading. Playback will begin auto-
matically once the table of contents is read. The display will show “No Disc” when the unit is
set to CD mode and there is no CD inside. When ejecting a CD the display will show “Ejecting”.
For more, see “Important Notes About the CD Player.”
Fig 11, 12