
Install Instructions


• The AireShare™ may not be used to exhaust hazardous or explosive materials or vapors.
• The AireShare™ may not be used in kitchens or move moisture-laden air from sources such as bathrooms and kitchens.
• The AireShare™ may not be used to move air from from a utility room containing gas or oil fuel heating equipment.
WARNING: Disconnect power to the ASLL before servicing. To reduce the risk of fire, electrical shock and injury to persons, the
AireShare™ must be installed with the ASLL Floor grille that was provided with the ASLL.
WARNING: To reduce the risk of fire or electrical shock, do not use this fan with any solid state speed control devices.
WARNING: To reduce the risk of fire, electric shock, or injury to persons, observe the following:
a. Use this unit only in the manner intended by the manufacturer. If you have questions, contact the manufacturer.
b. Before servicing or cleaning unit, switch power off at service panel and lock the service disconnecting means to prevent power
from being switched on accidentally. When the service disconnecting means cannot be locked, securely fasten a prominent
warning device, such as a tag, to the service panel.
c. Installation work and electrical wiring must be done by qualified person(s) in accordance with all applicable codes and standards,
including fire-rated construction.
d. When cutting or drilling into floor, wall or ceiling areas, do not damage electrical wiring and other hidden utilities.
Disrupt power at circuit breaker to outlets near the joist/truss area you will be working in.
When sawing through sheetrock or floor, immediately stop if you detect the saw blade coming in contact
with any wiring or plumbing. Investigate further to determine if it is possible to safely continue to use this
joist/truss cavity. Switch to another joist/truss cavity if necessary.
BEFORE YOU START:
Determine the joist/truss cavity mounting location. If you are wiring to an existing outlet it is best to select a
joist/truss section that contains an electrical outlet for wiring. IMPORTANT: Direction of joist/truss might
determine which direction the ASLL can be installed. Review ASLL dimensions and minimum and
maximum expansion of sleeve before installing, (See Diagram A). Use a stud finder to verify joist/truss
location and direction.
TOOLS REQUIRED
Sheetrock Saw • Phillips Screwdriver • Drill • Tape Measure • Utility Knife • Wire Stripper • Stud Finder (required if ceiling is finished)
3/8” drill bit & 1/4” drill bit 2” longer than joist/truss thickness (long bit not required if ceiling is unfinished) • Jig Saw / Reciprocating Saw
INSTALLATION
PRE-INSTALLATION INSPECTION
IMPORTANT: An in depth investigation of the floor joist/truss layout is required prior to installa-
tion. Avoid a section that is a path for plumbing supply lines, drains, vents or ductwork. Also con-
firm foundation block or upstairs walls do not obstruct installation. If wiring to an existing outlet
using surface wiring, it is best to select a joist/truss section that contains an electrical outlet to
wire into.
Determine if the installation is a downflow or upflow application. If ASLL will discharge air up to
the level above it is upflow. If ASLL will discharge air down to a lower level it is downflow.
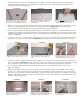
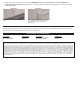
1. Proceed to step 2 if ceiling is unfinished. If ceiling is finished use a stud finder to locate the inside edges of the joist/truss ASLL will
be installed between. Apply masking tape on ceiling along joist/trusses in the desired location ASLL will be installed in. Make sure a
proper analysis as noted above has taken place before cutting hole in ceiling. In the center of the tape cut a 3” x 3” inspection hole
to review the intended installation area using a flashlight and small mirror if necessary, (See Diagram B).
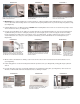
NOTE: The following installation illustrations show the upper level floor with carpeting.
2. If floor above has carpeting it may be desirable to pull carpeting back if possible. If it is a good installation area, slowly drill a small
pilot hole with a 1/4” drill bit through the 3” x 3” inspection hole or center of joist/truss area up through subfloor. Drill bit might cause
carpet to unravel so be cautious. Once you go through subfloor reverse out of the hole. Use an extended screw driver or scratch awl
to push through the carpet above.
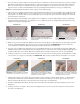
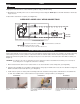
DIAGRAM A
UPFLOW
INSTALLATION
DOWNFLOW
INSTALLATION
THE FOLLOWING STEPS ARE FOR AN UPFLOW INSTALLATION