
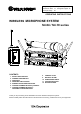
User's Manual


10
7. CHANNEL NUMBER
SETTING by
INFRARED SYNCHRONIZATION
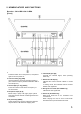
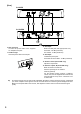
Step 1. Confirm that the receiver is set to the correct channel number and the
transmitter is turned on, then open the battery case on the transmitter.
Step 2. Bring the IR port in the transmitter within 20cm of IR port on the receiver.
Step 3. Press the SYNC key on the receiver for about 3 seconds. When the
channel data has transmitted successfully from the IR port on the receiver,
the displayed channel number flashes.
Step 4. When the channel number is synchronized
successfully between the receiver and the
transmitter, the displayed channel number in
the transmitter blinks for about 3 seconds,
Note On the transmitter side, even if the channel
number display light turns off, the display turns
on again when IR synchronization has
succeeded.
8. CHANNEL
SCAN
Step 1. Press the SET key and the SYNC key at the same time for about 3 seconds.
Channel scan begins, and an idle channel number is indicated blinking on
the channel number display.
Step 2. After channel scan finishes, the idle channels are displayed in turn.
Step 3. Press the SET key and the SYNC key at the same time, the receiver sets the
idle channel automatically.
Note Before starting the channel scan, turn off all transmitters and any other
equipment that could cause interference during the setting or it may be detected during the channel
scan.
If there are no idle channels, the channel number is displayed blinking as a “-“.
And then the channel before starting the channel scan is set again.
Multiple System Setup
Set up each system one at a time, confirm each system is assigned a different
channel, and leave the transmitter powered on. Otherwise, the channel scan from the other receiver will
not detect as the occupied channel.
9.
BATTERY ALARM INDICATON
• When the battery capacity in the corresponding transmitter becomes low, the dot LED of the numerical LED
on the receiver and the transmitter blinks. Replace the transmitter battery.