
User's Manual


5
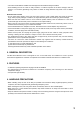
Step 1. Turn the power on, and the Channel number display lights to indicate the channel number.
Step 2. Set the wireless microphone switch to the ON position.
The reception lamp lights when the tuner receives the same frequency signal.
Step 3. Adjust the volume control.
The output level increases as the volume is turned clockwise, and decreases as turned
counterclockwise.
Microphone Sensitivity Adjustment
Although the audio level is preset by the factory, it can be adjusted depending on the user's voice level.
Step 1. Holding the microphone body, rotate the microphone grip counterclockwise to remove it in the case of
the hand-held microphone, or slide the battery cover down to open it in the case of the lavaliere
microphone.
Step 2. Turn on the power of the tuner and microphone.
Step 3. Adjust the microphone's audio level control using a screwdriver. The sensitivity increases as the
control is rotated clockwise, and decreases as rotated counterclockwise.
Step 4. Set the volume control so that its knob points to the 2 o'clock position. If the AF peak lamp remains lit,
readjust the microphone's audio level control so that the lamp only flashes when the signal reaches its
highest peak.
Step 5. Replace the microphone grip (hand-held type) or the battery cover (lavaliere type).
The tuner's AF peak lamp lights when the tuner output level reaches the point of about 3 dB below the clipping
level. The Peak lamp operates in response to the volume control position.
13
Reception lamps Channel number display
6. OPERATION