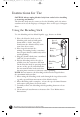
Grace_TMR_1750&CAN_IB_Cover 11/30/04 1:58 PM Page 1 All-In-One Food Preparation System USE AND CARE GUIDE MODEL 1750 AND 1750CAN • 2 1 • C 0 Wa t o • D nver t Mot o t u s • B al ac easi r tion ly f len r • S d tai s, m on/ om B bea nless ixes, off sa lende rt • In ters steel chop fety cho s an swit o Cho clu , do u d ch d p ppe con g e r tain s blen h hoo ping b puree ks a lad s er a din es, g ja nd nd min r, ta wire wire i-ch ll ch whi opp o s er c pper k ont ain er ? Questions Call toll free 1-800-947
TMR_1750&CAN_IB_18-11-04 11/18/04 11:49 PM Page 1 READ AND SAVE THESE INSTRUCTIONS WARNING: A risk of fire and electrical shock exists in all electrical appliances and may cause personal injury or death. Please follow all safety instructions. IMPORTANT SAFEGUARDS When using electrical appliances, basic safety precautions should always be followed, including the following: ◆ Read all instructions before using appliance.
TMR_1750&CAN_IB_18-11-04 11/18/04 11:49 PM Page 2 ◆ Do not let cord hang over edge of table or counter, or touch hot surfaces, including the stove. ◆ Blades are sharp, handle with care. ◆ When mixing liquids with the blending stick, use a tall container or make small quantities at a time to reduce spillage. Do not mix hot liquids. ◆ Do not immerse the blending stick in food or liquid above the maximum indicator line.
TMR_1750&CAN_IB_18-11-04 11/18/04 11:49 PM Page 3 CAUTION: A short power supply cord is provided to reduce the risk of personal injury resulting from becoming entangled in or tripping over a longer cord. Extension cords are available from local hardware stores and may be used if care is exercised in their use. If an extension cord is required, special care and caution is necessary. Also the cord must be: (1) marked with an electrical rating of 125 V, and at least 10 A., 1250 W.
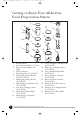
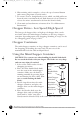
TMR_1750&CAN_IB_18-11-04 11/18/04 11:49 PM Page 4 Getting to Know Your All-In-One Food Preparation System 16. 6. 1. 2. 12. 17. 7. 3. 8. 13. 18. 4. 9. 5. 10. 14. 15. 1. 19. 11. 1. Blender Body 2. Speed Control Button “I” Low 3. Speed Control Button “II” High 4. Release Button 5. Blending Stick (P/N 70584) 6. Mixing/Measuring Beaker Lid (P/N 70586) 7. Mixing/Measuring Beaker (P/N 70587) 8. Mini-Chopper Container Lid (P/N 70588) 9. Low Speed Chopper Drive (P/N 70589) 10.
TMR_1750&CAN_IB_18-11-04 11/18/04 11:49 PM Page 5 Introduction Congratulations on your purchase of the Toastmaster® All-In-One Food Preparation System. This versatile appliance quickly converts from blender to mixer to chopper by removing and replacing attachments with the push of a button. The durable stainless steel wire beaters, dough hooks and wire whisk will provide years of use. Before First Use CAUTION: Use extreme care when handling the double blade knives.
TMR_1750&CAN_IB_18-11-04 11/18/04 11:49 PM Page 6 Instructions for Use CAUTION: Always unplug blender body from outlet before installing or removing attachments. The blender body may be connected to the blending stick, the mixer attachment head, the high speed chopper drive or low speed chopper drive. Using the Blending Stick Use the blending stick to blend liquids, eggs, batters or drinks. 1.
TMR_1750&CAN_IB_18-11-04 11/18/04 11:49 PM Page 7 Mixer/Blending Guide Speed I I II II II Task / Procedure Blend liquid ingredients together Stir dry ingredients into liquids, instant puddings Mix cake mixes and batters Cream sugar and butter Whip egg whites, whipping cream or potatoes Using The Mixer Attachment Head Use the stainless steel beaters for general mixing needs, such as preparing cake and cookie batters or to mash potatoes.
TMR_1750&CAN_IB_18-11-04 11/18/04 11:49 PM Page 8 6. When mixing task is complete, release the speed control button and remove plug from electrical outlet. 7. To remove beaters, dough hooks or wire whisk, carefully pull stem from the mixer attachment head. Push down on release button to release the mixer attachment head from the blender body. 8. Clean unit and attachments as instructed in “User Maintenance Instructions.
TMR_1750&CAN_IB_18-11-04 11/18/04 11:49 PM Page 9 5. Plug blender body into a standard 120V AC electrical outlet. 6. Hold the unit firmly and press the desired high or low speed control button. 7. When chopping task is complete, release the speed control button and remove plug from electrical outlet. 8. Carefully remove the chopper drive by pushing down on the release button. Using The Large Chopper Container CAUTION: Use extreme care when handling the double blade knife.
TMR_1750&CAN_IB_18-11-04 11/18/04 11:49 PM Page 10 Chopping/Blending Guide Your All-In-One Food Preparation System features a mini and large chopper container and a low and high speed chopper drive. While you may select either container depending on the amount of food to be blended or chopped, the following list will help you determine which drive to use for various items. Do not exceed the maximum levels for liquid or solid food. Times are approximate, continue blending or chopping to desired consistency.
TMR_1750&CAN_IB_18-11-04 11/18/04 11:49 PM Page 11 Chopping/Blending Guide Cont. Drive Foods Mixing Procedures Chop Fruits & Low Vegetables Speed Chopper Nuts Drive Ice Cut into 1/2” pieces and fill to the maximum line. Add water or other liquid. Chop 5 seconds. Drain. (To chop dry, use pulse.) Fill to the solid maximum line. Chop until desired consistency. Fill Large Container up to the solid maximum line. Pulse on Speed I.
TMR_1750&CAN_IB_18-11-04 11/18/04 11:49 PM Page 12 User Maintenance Instructions This All-In-One Food Preparation System requires little maintenance. It contains no user-serviceable parts. Contact qualified personnel if the product requires servicing. CAUTION: Never immerse the blender body, mixer attachment head, blending stick past the maximum indicator line, or chopper drives in water or any other liquid. 1. Always unplug the unit before cleaning. 2. Remove attachments from blender body. 3.
TMR_1750&CAN_IB_18-11-04 11/18/04 11:49 PM Page 13 Recipes Following are recipes that demonstrate the versatility of your All-In-One Food Preparation System. Strawberry Shake 1 cup vanilla ice cream 1 cup milk 1 cup frozen strawberries, slightly thawed 3 tablespoons powdered sugar 1. Attach high speed chopper drive to blender body. 2. Place ingredients into large chopper container. 3. Blend on speed “II” for 20-25 seconds or until smooth. Makes 2 shakes.
TMR_1750&CAN_IB_18-11-04 11/18/04 11:49 PM Page 14 Basil Vinaigrette Dressing 2 cloves garlic 1 ⁄2 cup packed fresh basil leaves 1 cup olive oil, preferably extra virgin 1 ⁄2 cup white balsamic or white wine vinegar 11⁄2 teaspoons sugar 1 ⁄2 teaspoon salt 1 ⁄2 teaspoon fresh ground black pepper 1. Attach low speed chopper drive to blender body 2. Place all the ingredients into the large chopper container. 3. Blend the ingredients together on speed “I” for 20-25 seconds or until thoroughly mixed. 4.
TMR_1750&CAN_IB_18-11-04 11/18/04 11:49 PM Page 15 Vegetable Party Strudel Crust: 8 ounce can crescent dinner rolls 8 ounces cream cheese, softened 2 tablespoons milk 1 ⁄2 envelope dry vegetable soup mix 4 ounces Feta cheese, 1-inch cubes Topping: 1⁄4 cup fresh parsley 1 ⁄4 small sweet onion, 1-inch cubes 1 ⁄4 small green pepper, 1-inch cubes 1 ⁄4 small red pepper, 1-inch cubes 2 ounces slices pepperoni 2 ounces Cheddar cheese, 1-inch cubes 2 ounces Monterey Jack cheese, 1-inch cubes 4 ounces mushrooms,
TMR_1750&CAN_IB_18-11-04 11/18/04 11:49 PM Page 16 Foccacia Bread Crust: 1 Jiffy® pizza crust mix Topping: 2 cloves garlic 1 small onion, 1-inch pieces 1 ⁄4 cup fresh oregano leaves 1 ⁄4 cup olive oil 15 black olives 4 ounces Feta cheese, 1-inch cubes 1 ⁄4 teaspoon salt 1. 2. Preheat oven to 425°F. Place Jiffy® pizza mix into a small bowl. Follow package directions by adding 1⁄2 cup HOT tap water and stir until moist. Stir vigorously by hand about 25 strokes.
TMR_1750&CAN_IB_18-11-04 11/18/04 11:49 PM Page 17 Apple Cinnamon Waffles 1 cup dried apple slices 1 ⁄2 cup pecan halves 3 eggs 11⁄2 cups milk 1 ⁄3 cup vegetable oil 13⁄4 cups all-purpose flour 2 teaspoons baking powder 1 tablespoon sugar 1 ⁄2 teaspoon salt 1 teaspoon cinnamon 1. Attach low speed chopper drive to the blender body. Place the dried apples and pecans into the large chopper container. Chop on speed “II” for 5-10 seconds, or until coarsely chopped, set aside. 2.
TMR_1750&CAN_IB_18-11-04 11/18/04 11:49 PM Page 18 Vegetable and Cheese Omelet 1 green onion with tops 2 small mushrooms 2 eggs 1 tablespoon water dash of salt dash of pepper 1 tablespoon butter 1 ounce shredded Cheddar cheese 1. Attach low speed chopper drive to blender body. 2. Add onion and mushrooms to mini-chopper container and pulse on speed “I” for 3-5 seconds or until chopped. 3. Add eggs, water, salt and pepper to mixing/measuring beaker.
TMR_1750&CAN_IB_18-11-04 11/18/04 11:49 PM Page 19 Meat Loaf 2 slices sourdough or white bread, torn into 1-inch pieces 2 cloves garlic 1 small onion, 1-inch cubes 8 ounces tomato sauce 1 ⁄3 cup brown sugar 2 tablespoons Worcestershire sauce 1 tablespoon soy sauce 1 egg 3 ⁄4 teaspoon salt 1 ⁄2 teaspoon black pepper 2 pounds ground beef 1. Attach high speed chopper drive to blender body. Place 1 slice of bread in large chopper container and process bread on speed “II” for 5-10 seconds.
TMR_1750&CAN_IB_18-11-04 11/18/04 11:49 PM Page 20 German Chocolate Fudge Pie Filling: 4 ounces German’s® sweet chocolate bar, break into pieces 11.5 ounces milk chocolate chips 1 cup sour cream 8 ounces cream cheese, softened 1-inch cubes 1 small box instant chocolate pudding & pie filling 11⁄2 cups milk 1 ⁄2 cup pecan halves Crust: 16 chocolate sandwich cream filled cookies 1 ⁄3 cup butter, melted Topping: 1 ⁄4 cup pecan halves 1.
TMR_1750&CAN_IB_18-11-04 11/18/04 11:49 PM Page 21 21.
TMR_1750&CAN_IB_18-11-04 11/18/04 11:49 PM Page 22 LIMITED ONE-YEAR WARRANTY Warranty Coverage: This product is warranted to be free from defects in materials or workmanship for a period of one (1) year from the original purchase date. This product warranty is extended only to the original consumer purchaser of the product and is not transferable.
TMR_1750&CAN_IB_18-11-04 11/18/04 11:49 PM Page 23 Keep Dated Sales Receipt for Warranty Service. Keep this booklet. Record the following for reference: Date purchased _______________________________________________ Model number _______________________________________________ Date code (stamped on bottom)________________________________ EVERYBODY EATS. It’s a fact of life. But sometimes preparing meals can become a chore.
Grace_TMR_1750&CAN_IB_Cover 11/30/04 1:58 PM Page 1 All-In-One Food Preparation System USE AND CARE GUIDE MODEL 1750 AND 1750CAN • 2 1 • C 0 Wa t o • D nver t Mot o t u s • B al ac easi r tion ly f len r • S d tai s, m on/ om B bea nless ixes, off sa lende rt • In ters steel chop fety cho s an swit o Cho clu , do u d ch d p ppe con g e r tain s blen h hoo ping b puree ks a lad s er a din es, g ja nd nd min r, ta wire wire i-ch ll ch whi opp o s er c pper k ont ain er ? Questions Call toll free 1-800-947