Lightwave Oven USE AND CARE GUIDE AND RECIPE BOOK MODELS TLWTOB6 AND TLWTOB6CAN •C om pro bina • 6- vide tion o sf sli f wit ce To aster, Infra red h a m st •N C o p ur ve er-Ov ore un and •E dG Ha reh enifo l l • 2- ectron eat re lass D Broile r m co ogen q hou r o o i uir cP or kin Light •O g ne r time ush B ed utto pre touc r nC • S pare h pro ont lide d it g r rols am •E e o m u m nam t C s i n r g Wir el B umb for ake eR fre T r /Br ay ack que o ntly and il P Cru an, B mb Tra roil In y ser t, ? Ques
IMPORTANT SAFEGUARDS When using electrical appliances, basic safety precautions should always be followed including the following: ◆ Read all instructions. ◆ Do not touch hot surfaces. Use handles or knobs. ◆ To protect against electrical shock do not immerse cord, plugs, or appliance in water or other liquid. ◆ Close supervision is necessary when any appliance is used by or near children. ◆ Unplug from outlet when not in use and before cleaning. Allow to cool before putting on or taking off parts.
◆ Do not store any materials, other than manufacturer's recommended accessories, in this oven when not in use. ◆ Do not place any of the following materials in the oven: paper, cardboard, plastic and the like. ◆ Do not cover Crumb Tray or any part of the oven with metal foil. This will cause overheating of the oven. ◆ Use extreme caution when removing tray or disposing of hot grease. ◆ To turn oven Off during use, press and hold the Stop Button until beep is heard.
◆ Do not store any materials, other than manufacturer's recommended accessories, in this oven when not in use. ◆ Do not place any of the following materials in the oven: paper, cardboard, plastic and the like. ◆ Do not cover Crumb Tray or any part of the oven with metal foil. This will cause overheating of the oven. ◆ Use extreme caution when removing tray or disposing of hot grease. ◆ To turn oven Off during use, press and hold the Stop Button until beep is heard.
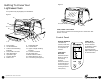
Figure 2 Getting To Know Your Lightwave Oven Your product may vary slightly from illustration. Figure 1 11. 12. 10. 13. 16. (P/N 22319) 4. 14. 9. 15. 8. 3. 1. 1. Door Handle 2. Curved Glass Door 3. Lower Infrared Heating Elements 4. Time/Toast Color Dial 5. Start/Stop Button 6. Operation Light 7. Function Button 8. Power Cord 4. Lightwave Oven Use and Care Guide 2. 4. 5. 6. TIME/TOAST COLOR DIAL Turn to set the minutes of the Cooking Time or Toast Color after function is chosen.
Figure 2 Getting To Know Your Lightwave Oven Your product may vary slightly from illustration. Figure 1 11. 12. 10. 13. 16. (P/N 22319) 4. 14. 9. 15. 8. 3. 1. 1. Door Handle 2. Curved Glass Door 3. Lower Infrared Heating Elements 4. Time/Toast Color Dial 5. Start/Stop Button 6. Operation Light 7. Function Button 8. Power Cord 4. Lightwave Oven Use and Care Guide 2. 4. 5. 6. TIME/TOAST COLOR DIAL Turn to set the minutes of the Cooking Time or Toast Color after function is chosen.
Bake/Broil Pan, Broil Insert, Wire Rack and Crumb Tray (cont.) Control Panel (cont.) Default Function Time/Min. 30 Basic -Toast 20 25 15 15 30 60 30 Food Biscuit, Casseroles Bread, Bagels, Toaster Pastries Broil Meats, Poultry, Seafood Cake Cake/Muffin Mixes Pastry Crescent Rolls, Danish Rolls Conv.
Bake/Broil Pan, Broil Insert, Wire Rack and Crumb Tray (cont.) Control Panel (cont.) Default Function Time/Min. 30 Basic -Toast 20 25 15 15 30 60 30 Food Biscuit, Casseroles Bread, Bagels, Toaster Pastries Broil Meats, Poultry, Seafood Cake Cake/Muffin Mixes Pastry Crescent Rolls, Danish Rolls Conv.
Cooking Containers ◆ ◆ ◆ ◆ ◆ ◆ The Bake/Broil Pan included with the Lightwave Oven is suitable for items such as cookies, rolls and biscuits. A variety of standard baking dishes, such as an 8" round or square cake pan, a 6-cup muffin pan, and a 1 & 2 quart round, square, or rectangular casserole dish may be used for other foods. Choose bakeware made of metal, or glass/ceramic without lids.
Cooking Containers ◆ ◆ ◆ ◆ ◆ ◆ The Bake/Broil Pan included with the Lightwave Oven is suitable for items such as cookies, rolls and biscuits. A variety of standard baking dishes, such as an 8" round or square cake pan, a 6-cup muffin pan, and a 1 & 2 quart round, square, or rectangular casserole dish may be used for other foods. Choose bakeware made of metal, or glass/ceramic without lids.
Lightwave Oven Tips Preset Functions (cont.) ◆ The Lightwave Oven has preset temperatures for each function to cook frequently prepared foods. The temperature can not be adjusted. 4. Open the Glass Door and place your food in the Lightwave Oven. Close Glass Door. ◆ The Lightwave Oven has a 2 hour timer. 5. Press the Start/Stop button. The Timer will begin to count down and “min.” will flash in the Display Window. ◆ The Operation Light on the Control Panel will be on while the unit is plugged in.
Lightwave Oven Tips Preset Functions (cont.) ◆ The Lightwave Oven has preset temperatures for each function to cook frequently prepared foods. The temperature can not be adjusted. 4. Open the Glass Door and place your food in the Lightwave Oven. Close Glass Door. ◆ The Lightwave Oven has a 2 hour timer. 5. Press the Start/Stop button. The Timer will begin to count down and “min.” will flash in the Display Window. ◆ The Operation Light on the Control Panel will be on while the unit is plugged in.
Toast Function 1. Plug unit into a 120 V outlet. Open the Glass Door. Place Wire Rack into Shelf Position #3. Place Bread on Wire Rack. Close the Glass Door. The Operation Light and Display Window will illuminate while the Unit is plugged in. 2. Press the Function Button until the arrow is pointing toward the Toast Function. The default setting of medium (Med.) toast color will appear in the Display Window under Color. 3.
Toast Function 1. Plug unit into a 120 V outlet. Open the Glass Door. Place Wire Rack into Shelf Position #3. Place Bread on Wire Rack. Close the Glass Door. The Operation Light and Display Window will illuminate while the Unit is plugged in. 2. Press the Function Button until the arrow is pointing toward the Toast Function. The default setting of medium (Med.) toast color will appear in the Display Window under Color. 3.
Clean-Up Of Lightwave Oven Glass Door And Exterior 1. Unplug oven and allow to cool before cleaning. 2. Wipe exterior with a damp cloth after each use. 3. To clean the Glass Door, use a glass cleaner or mild detergent and a damp cloth or plastic scouring pad. Do not use an abrasive cleaner or pad as they might scratch the finish. 4. Rinse and dry thoroughly with a clean cloth. Allow to dry before closing the Glass Door. Time and Temperature Charts (cont.
Clean-Up Of Lightwave Oven Glass Door And Exterior 1. Unplug oven and allow to cool before cleaning. 2. Wipe exterior with a damp cloth after each use. 3. To clean the Glass Door, use a glass cleaner or mild detergent and a damp cloth or plastic scouring pad. Do not use an abrasive cleaner or pad as they might scratch the finish. 4. Rinse and dry thoroughly with a clean cloth. Allow to dry before closing the Glass Door. Time and Temperature Charts (cont.
Marinades Time and Temperature Charts Broil (Broil Function) When broiling, place the food on the Broil insert inside the Bake/Broil Pan. Place on Wire Rack in Shelf Position # 1, # 2 or # 3. Food should be 2 to 3 inches from top element. Turn food halfway through cooking time. FOOD Poultry Pork Beef Misc. TYPE OF CUT AMOUNT/ WEIGHT TEMPERATURE ˚F ON MEAT THERMOMETER AT END OF COOKING TIME TOTAL COOKING TIME FOR FRESH MEATS, POULTRY Turkey Burgers 6 4-oz. each 165˚F 10-14 min.
Marinades Time and Temperature Charts Broil (Broil Function) When broiling, place the food on the Broil insert inside the Bake/Broil Pan. Place on Wire Rack in Shelf Position # 1, # 2 or # 3. Food should be 2 to 3 inches from top element. Turn food halfway through cooking time. FOOD Poultry Pork Beef Misc. TYPE OF CUT AMOUNT/ WEIGHT TEMPERATURE ˚F ON MEAT THERMOMETER AT END OF COOKING TIME TOTAL COOKING TIME FOR FRESH MEATS, POULTRY Turkey Burgers 6 4-oz. each 165˚F 10-14 min.
Recipes FIESTA CORN BREAD 1 cup all-purpose flour 1/2 cup corn meal 1/4 cup sugar 1-1/2 teaspoons baking powder 1/4 teaspoon salt 3/4 cup milk 3 tablespoons oil 1 egg, beaten 4 ounce can diced in shelf #4 green chilies, drained 2 ounce jar, diced pimento, drained Combine dry ingredients, set aside. Mix wet ingredients together and stir into dry ingredients until moist. Pour batter into a greased 8x8-inch pan. Bake on Basic, using Shelf Position # 4, for 15-25 minutes or until done.
Recipes FIESTA CORN BREAD 1 cup all-purpose flour 1/2 cup corn meal 1/4 cup sugar 1-1/2 teaspoons baking powder 1/4 teaspoon salt 3/4 cup milk 3 tablespoons oil 1 egg, beaten 4 ounce can diced in shelf #4 green chilies, drained 2 ounce jar, diced pimento, drained Combine dry ingredients, set aside. Mix wet ingredients together and stir into dry ingredients until moist. Pour batter into a greased 8x8-inch pan. Bake on Basic, using Shelf Position # 4, for 15-25 minutes or until done.
BRIE KISSES 1 pound Brie cheese 1 can Hungry Jack Flaky Layer Biscuits hot pepper jelly Cut Brie into 1/2 inch squares (leave the rind on if you like). Spray a mini-muffin pan with non-stick spray. Separate each biscuit into 3-4 layers pressing each layer into one section of a mini-muffin pan. Place a dab of pepper jelly in each cup, then top with a chunk of cheese. Bake on Basic in Shelf Position # 4 for 3-5 minutes or until cheese is melted and crust golden in color.
BRIE KISSES 1 pound Brie cheese 1 can Hungry Jack Flaky Layer Biscuits hot pepper jelly Cut Brie into 1/2 inch squares (leave the rind on if you like). Spray a mini-muffin pan with non-stick spray. Separate each biscuit into 3-4 layers pressing each layer into one section of a mini-muffin pan. Place a dab of pepper jelly in each cup, then top with a chunk of cheese. Bake on Basic in Shelf Position # 4 for 3-5 minutes or until cheese is melted and crust golden in color.
Index MARINADES Curry Yogurt . . . . . . . . . . . . . . . . . . . . . . . . . . . . . . . . . . . . . . . . . . . . 17 Lemon Oriental . . . . . . . . . . . . . . . . . . . . . . . . . . . . . . . . . . . . . . . . . 17 Mexicali . . . . . . . . . . . . . . . . . . . . . . . . . . . . . . . . . . . . . . . . . . . . . . . 17 Red Wine . . . . . . . . . . . . . . . . . . . . . . . . . . . . . . . . . . . . . . . . . . . . . . 17 Spicy Herb . . . . . . . . . . . . . . . . . . . . . . . . . . . . . . . . . . . .
Index MARINADES Curry Yogurt . . . . . . . . . . . . . . . . . . . . . . . . . . . . . . . . . . . . . . . . . . . . 17 Lemon Oriental . . . . . . . . . . . . . . . . . . . . . . . . . . . . . . . . . . . . . . . . . 17 Mexicali . . . . . . . . . . . . . . . . . . . . . . . . . . . . . . . . . . . . . . . . . . . . . . . 17 Red Wine . . . . . . . . . . . . . . . . . . . . . . . . . . . . . . . . . . . . . . . . . . . . . . 17 Spicy Herb . . . . . . . . . . . . . . . . . . . . . . . . . . . . . . . . . . . .
Keep Dated Sales Receipts for Warranty Service. Keep this booklet.
Keep Dated Sales Receipts for Warranty Service. Keep this booklet.
26.
26.
Lightwave Oven USE AND CARE GUIDE AND RECIPE BOOK MODELS TLWTOB6 AND TLWTOB6CAN •C om pro bina • 6- vide tion o sf sli f wit ce To aster, Infra red h a m st •N C o p ur ve er-Ov ore un and •E dG Ha reh enifo l l • 2- ectron eat re lass D Broile r m co ogen q hou r o o i uir cP or kin Light •O g ne r time ush B ed utto pre touc r nC • S pare h pro ont lide d it g r rols am •E e o m u m nam t C s i n r g Wir el B umb for ake eR fre T r /Br ay ack que o ntly and il P Cru an, B mb Tra roil In y ser t, ? Ques