Getting Started Guide TD Speech Case Mini
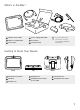
What’s in the Box? 2 3 1 5 4 6 1 TD Speech Case Mini 4 Power Supply (dual USB) 2 USB-C to USB-A Cable 5 Screwdriver 3 Power Cable 6 Shoulder Strap If you purchased any accessories, look for the separate installation instructions.
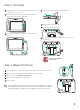
Step 1: Assembly 1 Separate the Speech Case Mini front plate and body by pulling the two pieces apart. 4 Squeeze around the edges to click it together. 2 Press the iPad into the front plate, aligning the iPad camera with the cutout in the plate. 5 Flip the whole assembly over. 6 Tighten the top two screws. 3 Press the iPad/plate assembly into the Speech Case Mini body. 7 Lift up the foldable leg and tighten the two screws at the bottom.
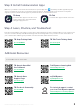
Step 3: Install Communication Apps Make sure your iPad is connected to the Internet, then open the App Store and install your AAC apps. Most people only use one AAC app. Users who need symbol support should use TD Snap. Literate users who don’t need symbol support may want to download both apps to try and decide which one works best for them. TD Snap TD Talk Communication app for users who need symbol support. Free to try, full features through in-app purchase. Communication app for literate users.