
Installation Guide
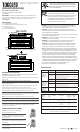

INSTALLATION INSTRUCTIONS
(A211 / A314 / A416 / A418 / A423)
Conversion from ballast to direct AC power
11-01634-AB
164 Indusco Court Troy, Michigan 48083-4641 USA
1-844-TOGGLED info@toggled.com toggled.com
• WARNING – Risk of re or electric shock. LED Retrot Kit installaon
requires knowledge of luminaires electrical systems. If not qualied, do
not aempt installaon. Contact a qualied electrician.
• WARNING – Risk of re or electric shock. Install this kit only in the
luminaires that have the construcon features and dimensions shown in
the photographs and/or drawings.
• Do not make or alter any open holes in an enclosure of wiring or electrical
components during kit installaon.
• WARNING – To prevent wire abrasion, do not expose wiring to edges of
sheet metal or other sharp objects.
• WARNING – To avoid potenal re or shock hazard, do not use this
retrot kit in luminaires employing shunted bi-pin lampholders.
• WARNING – This xture must be grounded and installed in accordance
with local and naonal electrical codes, by a person familiar with the
construcon and operaon of the product and the hazards involved.
• Note: Shunted lampholders are found only in uorescent luminaires with
Instant-Start ballasts. Instant-Start ballasts can be idened by the words
“Instant Start” or “I.S.” marked on the ballast. This designaon may be in
the form of a statement pertaining to the ballast itself or may be combined
with the marking for the lamps with which the ballast is intended to be
used, for example F40T12/IS. For more informaon, contact TOGGLED.
• Installers should not disconnect exisng wires from lampholder terminals to
make new connecons at lampholder terminals. Instead installers should cut
exisng lampholder leads away from the lampholder and make new electrical
connecons to lampholder lead wires by employing applicable connectors.
• This device is not intended for use with emergency exits.
• This device is not intended for use with dimmers.
IMPORTANT! Installaon of TOGGLED LED tubes requires modicaon of the
wiring within the exisng uorescent xture. Please follow the specic instrucons
below. If you have any quesons or comments, please feel free to contact
1-844-TOGGLED.
THIS KIT INCLUDES:
(1) Installaon Instrucon Booklet
(1) TOGGLED LED lamp (A211, A314, A416, A418, or A423)
(2) UL listed wire nuts
(1) UL listed G13 lampholder
(1) Fixture modicaon label
This device complies with part 15 of the FCC rules. Operaon
is subject to the following two condions: (1) This device
may not cause harmful interference, and (2) this device must
accept any interference received, including interference
that may cause undesired operaon. Unauthorized changes
or modicaons to this device may result in a void in
compliance of part 15 of the FCC rules.
4XB9
LED RETROFIT CONVERSION: FOR USE ONLY WITH THE
PRODUCTS DESCRIBED AND INSTALLED IN ACCORDANCE
WITH THESE INSTALLATION INSTRUCTIONS PROVIDED
WITH THIS RETROFIT KIT.
TOGGLED is an company
FIXTURE RETROFIT INSTRUCTIONS
WARNING - To avoid shock or re hazard, turn o power to the xture at
the appropriate breaker or fuse panel.
STEP 1: Verify the voltage rang of the lamp (120-277VAC) matches the voltage of the
xture circuit.
STEP 2: Remove old uorescent lamps and remove the ballast cover.
STEP 3: Cut all wires aached to the ballast(s) as close to the ballast(s) as possible.
Leave the ballast(s) in place.
Note: TOGGLED lamps are powered from a single-end (designated with the product
label or markings) and require the use of non-shunted lampholders.
If the lampholders are shunted, replace them with the non-shunted lampholders
supplied with the lamp(s). See "Shunted Lampholder Replacement" below.
STEP 4: Connect one wire from each lampholder at one end of the xture to line
(black) and separately connect the other wire to neutral (white). At the opposite end
of the xture, cut all wires from the lampholders.
Note: Ensure the xture is and remains grounded aer the retrot process.
STEP 5: Reinstall any removed wiring covers and ballast covers.
STEP 6: Ax the included xture-modicaon label to the newly retroed xture. To indi-
cate which end is powered, place the label on the ballast cover nearest the powered end.
STEP 7: Install the new TOGGLED lamp(s). Be sure to install the lamp in the proper
orientaon (the end with the product labels/markings should be connected
to the AC wired lampholders).
SHUNTED LAMPHOLDER REPLACEMENT
STEP 1: Remove any brackets or covers holding
the shunted lampholders in place.
STEP 2: Cut any wires aached to the shunted
lampholders. Be careful to cut the wires as close to
the shunted lampholders as possible. You will need
to reuse this wire.
STEP 3: Strip wires according to the strip gauge on the
new lampholders. If a gauge is not available, strip wires
3/8" [9.5mm].
STEP 4: Insert 1 wire on each side of each lampholder
as indicated below.
STEP 5: Reinstall the lampholders and any removed
covers or brackets.
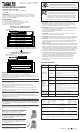
Catalog
Number
Lamp
Length
Lamp Power Fixture Type Min. Fixture
Dimensions
Max. Qty.
Lamps
A416 48" 16W Recessed (IC)*
Surface*
Surface Wet (Sealed Lens)
24" x 48"
24" x 48"
14" x 51"
4
4
6
A418 / A423
48" 18W / 23W Recessed (IC)*
Surface*
Surface (No Lens)
24" x 48"
24" x 48"
16" x 48"
4
4
8
A211
24" 11W Recessed (IC)*
Surface*
24" x 24"
24" x 24"
4
4
A314
36" 14W Surface* 36-⅛" x 6-¾" 2
* Lamps are rated for both open and closed xtures
Symptom Cause Remedy
No light from
LED tube(s)
when powered
on
LED Tube installed
backwards
Ensure lamp is installed with label nearest the wired (powered)
end of the xture
Fixture wired
improperly or
loose connecons
exist
• Check wiring with schemac in provided installaon instrucons
• Check wire-nuts for loose connecons
• Check lampholder(s) at powered end of fxture to ensure both
lamp pins are recieving 120-277VAC
Faulty LED tube Contact TOGGLED (1-844-864-4533)
Circuit breaker
detects a fault
condion when
light switch
turned on
Shunted Lamp-
holders installed
Replace exisng lampholders with included replacement non-
shunted lampholders. Follow above installaon instrucons.
Fixture wired
improperly
• Check wiring with schemac in provided installaon instrucons
• Check wire-nuts for loose connecons
• Check lampholder(s) at powered end of fxture to ensure both
lamp pins are recieving 120-277VAC
Only half of
the LED tube is
lighng up
Faulty LED tube Contact TOGGLED (1-844-864-4533)
All other issues Unknown Contact TOGGLED (1-844-864-4533)
Fixtures may contain one or more lamps. See the table
below about intended retrofit fixtures and quantities
TROUBLESHOOTING