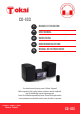
CD-103 2 MANUEL D’UTILISATION 20 USER MANUAL 37 HANDLEIDING 56 BEDIENUNGSANLEITUNG Da 72 MANUAL DE INSTRUCCIONES nk u voo r uw aan koo p van de TO KA I CD -1 03: MI Lire attentivement la notice avant d’utiliser l’appareil CR Before operating this product, please read user manual completely OS Lees de handleiding voordat u deze apparaat YS Lesen Sie die Bedienungsanleitung bevor Sie das Gerät gebrauchen TE EM del usuario antes de utilizar el aparato Lea atentamente el manual BL UE Français – Engl
AVANT DE COMMENCER Merci d'avoir acheté notre Micro Chaîne CD TOKAI modèle CD-103 Bluetooth dotée d’une radio digitale FM avec mémorisation jusqu’à 30 stations. Ce produit a été fabriqué en utilisant des composants de qualité et en respectant des normes de fabrication. Il est une garantie de qualité et de performance. Nos ingénieurs ont inclus dans ce produit de nombreuses fonctionnalités utiles et pratiques. Veuillez lire ce manuel d'instructions entièrement afin de profiter un maximum de chaque fonction.
MISE EN GARDE AFIN D’ÉVITER LES RISQUES D’INCENDIE ET D’ÉLECTROCUTION, NE PAS EXPOSER CET APPAREIL À LA PLUIE NI À L’HUMIDITÉ. ATTENTION ! DANGER D΄ÉLECTROCUTION NE PAS OUVRIR ATTENTION: Risque d΄électrocution, ne pas ouvrir la partie arrière de l’appareil, ne pas démonter l’appareil. Aucune pièce á l’intérieur ne doit être réparée par l΄utilisateur. Pour toute réparation s΄adresser à un technicien qualifié.
MESURES DE SECURITE IMPORTANTES 1. Lisez les instructions - Toutes les instructions les orages ou au cours des longues périodes de non utilisation. 10. Surcharge - Ne surchargez pas les sorties murales, les cordons d'extension, ou les récipients de convenance comme ça peut causer un risque d'incendie ou de choc électrique. 11.
PRISE CASQUE Pour une écoute en privé, brancher un casque (non fourni) à la prise casque (PHONES) située sur la façade de l'appareil. Les enceintes sont coupées lorsqu'un casque est branché, vous pourrez ainsi profiter de votre écoute en privée. REMARQUES: 1. Baissez le volume avant de brancher les écouteurs. 2. Le haut-parleur est automatiquement déconnecté lorsque vous branchez des écouteurs à la prise casque. 3.
BRANCHEMENTS BRANCHEMENT AU SECTEUR 1. Branchez le cordon secteur sur la prise d’entrée secteur (AC-IN) à l’arrière de l’appareil et branchez la fiche secteur à l’autre extrémité à la prise secteur murale. L’appareil est sous tension et prêt à être utilisé. 2. Pour éteindre complètement l’appareil, débranchez le cordon d'alimentation de la prise murale. Si l'appareil n’est pas destiné à être utilisé pendant une longue période, veuillez débrancher le cordon d'alimentation de la prise murale.
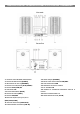
DESCRIPTION DE L’APPAREIL & IDENTIFICATION DES COMMANDES Vue avant Vue arrière 1. CAPTEUR TELECOMMANDE INFRA-ROUGE 13. PRISE CASQUE (PHONES) 2. BOUTON ALIMENTATION (POWER) 14. FENTE POUR CARTE MEMOIRE SD/MMC 3. INDICATEUR DE VEILLE (STANDBY) 15. PORT COMPATIBLE USB 4. BOUTON LECTURE/PAUSE (PLAY/PAUSE) 16. ENCEINTES GAUCHE ET DROITE 5. BOUTON STOP/USB/SD 17. FIL ANTENNE FM 6. AFFICHAGE LCD 18. BORNES DE CONNEXION ENCEINTES GAUCHE et 7. BOUTON PRECEDENT (BACK) DROITE 8.
FONCTIONNEMENT DE BASE 1. CAPTEUR INFRAROUGE 2. BOUTON POWER (Alimentation) - Appuyez sur le bouton d'alimentation pour mettre l’appareil sous tension / hors tension 3. Indicateur de Veille (Standby) 4. BOUTON PLAY/PAUSE - Pour lire ou mettre en pause en mode lecture MP3/CD/USB/BLUETOOTH. - En mode Radio, appuyez longuement sur le bouton pour activer le mode de balayage automatique des stations. 5. BOUTON STOP/USB/SD - Pour arrêter la lecture en mode CD/MP3/USB/SD. - Efface une programmation CD.
TELECOMMANDE 1.TOUCHE POWER (MARCHE) 2.TOUCHE TIME (HEURE) 3.TOUCHE INTRO 4.TOUCHE MUTE (SOURDINE) 5.TOUCHE RANDOM (LECTURE ALEATOIRE) 6.TOUCHE P-UP 7.TOUCHE REPEAT (REPETITION) 8.TOUCHE PROGRAM (PROGRAMMATION) 9.TOUCHE BACK (PRECEDENT) 10.TOUCHE FONCTION 11.TOUCHE NEXT (SUIVANT) 12.TOUCHE EQ 13.TOUCHE LECTURE/PAUSE (PLAY/PAUSE) 14.TOUCHE P-DOWN 15.TOUCHE BBS 16.TOUCHE STOP 17.TOUCHES NUMERIQUES 18.TOUCHE VOL19.
MODE HORLOGE Pour régler l’heure : 1. Branchez l’appareil sur le secteur, les réglages de l’horloge se font en mode Veille (Standby). 2. Appuyez brièvement sur la touche TIME, les chiffres de l’heure clignotent sur l’afficheur LCD. 3. Appuyez sur les touches BACK, NEXT (Précédent/Suivant) pour régler le format d’affichage de l’heure : 12h ou 24h. 4. Appuyez de nouveau sur la touche TIME pour confirmer le réglage. 5. Réglez ensuite les chiffres de l’heure et des minutes selon les étapes 3 et 4.
UTILISATION DU MODE BLUETOOTH * La portée opérationnelle entre cet appareil et un périphérique Bluetooth est d’environ 10 mètres. * Avant de connecter un périphérique Bluetooth à cet appareil, familiarisez-vous avec les fonctionnalités Bluetooth de ce périphérique en consultant sa notice. * La compatibilité avec tous les périphériques Bluetooth n’est pas garantie. * Tout obstacle présent entre cet appareil et un périphérique Bluetooth peut réduire la portée opérationnelle.
MODE USB / CARTE SD Fonctionnalités port compatible USB / carte mémoire SD L'appareil est conçu pour lire des fichiers audio MP3 contenus dans une clé USB, ou sur une carte mémoire SD, si les fichiers ne sont pas au format MP3, les fichiers ne peuvent pas être lus correctement. 1) Insérez une clé USB dans le port compatible USB ou une carte mémoire dans la fente SD/MMC. 2) Appuyez sur la touche FUNCTION de la télécommande ou sur le bouton STOP/USB/SD pour sélectionner le mode USB ou carte SD.
MODE LECTEUR CD / MP3 Lecture d’un CD Ce lecteur peut lire des CD audio, CD-MP3, CD-R, CD-RW. Ne pas essayer de lire des CD-Rom, CDi, VCD, DVD ou CD d'ordinateur. 1. Appuyer sur la touche FUNCTION et sélectionner le mode CD. 2. Ouvrir le couvercle du compartiment CD en appuyant sur OPEN/CLOSE sur le dessus du couvercle en 3. 4. 5. 6. bas à droite. Insérer un disque (CD, CD-MP3 ou CD-R) dans le logement face imprimée vers le haut, et refermer le couvercle en appuyant doucement dessus.
Modes de lecture avec la touche Répétition 1) Appuyez une fois sur la touche REP. pour répéter la lecture de la piste en cours. L’afficheur LCD indique : 2) Appuyez une 2ème fois sur la touche REP. pour répéter la lecture du disque entier, l’afficheur LCD indique : 3) En appuyant une 3ème fois sur la touche REP., toutes les plages du dossier l’album (mode MP3) seront lues, l’afficheur LCD indique : 4) Appuyez une 4ème fois sur la touche REP.
d) Une fois la programmation terminée, appuyez sur la touche LECTURE pour lire les plages programmées, l’afficheur LCD indique : e) Appuyez sur la touche STOP une fois pour arrêter la lecture de la programmation, appuyez une deuxième fois sur STOP pour effacer toute la programmation. 2) Lors de la lecture d’un CD MP3 : a) Appuyez sur la touche PROG.
Pour effacer une programmation Vous pouvez effacer le contenu de la programmation : - En appuyant sur la touche STOP deux fois pendant la lecture de la programmation. - En ouvrant le couvercle du compartiment CD. - En sélectionnant une autre source audio. ENTRETIEN ET SECURITE Précautions et Manipulation Placer l'appareil sur une surface plate et dure de manière à ce qu'il ne soit pas penché et ne puisse pas se renverser.
GUIDE DE DEPANNAGE Si une panne survient, vérifiez d'abord les points énumérés ci-dessous avant de prendre votre appareil pour réparation. Si vous ne parvenez pas à remédier à un problème en suivant ces conseils, consultez votre revendeur ou centre de service. AVERTISSEMENT: En aucun cas vous ne devez essayer de réparer l'appareil vous-même, car cela annule la garantie.
SPECIFICATIONS TECHNIQUES Modèle Alimentation Consommation électrique Consommation en mode Standby CD-103 AC 100~240 V, 50/60 Hz 18 W 0.6 W Puissance audio totale Température de fonctionnement Impédance Casque 40 W (2x20W) = 2 x 5 W RMS +5°C - + 35°C 4 – 32 Ohms Section CD Laser optique 3 faisceaux laser Fréquence de réponse 100Hz – 16KHz Radio : Gammes de fréquences Mémorisation des stations FM 87.
MISE AU REBUT EN FIN DE VIE Attention ! Ce logo apposé sur le produit indique qu’il s’agit d’un appareil dont le traitement en tant que déchet rentre dans le cadre de la directive 2002/96/CE du 27 janvier 2003, relative aux déchets d’équipements électriques et électroniques (DEEE). Ce symbole signifie que les produits électriques et électroniques usagées ne doivent pas être mélangés avec les déchets ménagers généraux. Un système de collecte séparé est prévu pour ces produits.
BEFORE WE BEGIN Thank you for purchasing the TOKAI CD-103 a Bluetooth Micro system with a digital FM RADIO with auto scanning and until 30 FM presets. This is your assurance of quality, performance and value. Our engineers have included many useful and convenient features in this product. Please be sure to read this instruction Manual completely to make sure you are getting the maximum benefit from each feature.
WARNINGS TO PREVENT FIRE OR SHOCK HAZARD DO NOT EXPOSE THIS APPLIANCE TO RAIN OR MOISTURE. CAUTION: TO REDUCE THE RISK OF ELECTRIC SHOCK, DO NOT REMOVE COVER (OR BACK). NO USER- SERVICEABLE PARTS INSIDE. REFER SERVICING TO QUALIFIED SERVICE PERSONNEL.
SAFETY INTRUCTIONS 1. READ INSTRUCTIONS --- All the safety and 8. NON-USE PERIODS --- The power cord of the operating instructions should be read before the product product should be unplugged from the outlet when left is operated, followed and retained for future reference. unused for long periods of time. 2. CLEANING --- Unplug this product from the wall 9. LIGHTNING --- For added protection for this product outlet before cleaning.
HEADPHONE JACK If you don’t want to disturb other people during your listening, you can plug your earphones/headphone into the PHONE jack. The audio from the speaker will be muted and you can enjoy your listening from your earphones/headphone. Establish a safe sound level : Pay attention! Over time your hearing will adapt to continuous loud sounds and will give the impression that the volume has in fact been reduced. What seems normal to you may in fact be harmful.
POWER SUPPLY CONNECTING TO AC POWER 1.Connect the power cord to the AC mains inlet and the wall outlet. The power supply is now connected and ready for use. 2.To switch off completely, unplug the power cord from the wall outlet. Unplug the power cord from the wall outlet to protect your set during heavy thunderstorms. SPEAKER CONNECTIONS Connect the Left and Right speakers (16) to the left and right speaker wire connectors (18) at the back of the unit, before connecting the unit to AC Power.
DESCRIPTION OF THE UNIT Front View Rear View 1. REMOTE SENSOR 11. FUNCTION BUTTON 2. POWER BUTTON 12. AUX IN JACK 3. STANDBY INDICATOR 13. PHONE JACK 4. PLAY/PAUSE BUTTON 14. SD/MMC SLOT 5. STOP/USB/SD BUTTON 15. USB Compatible PORT 6. LCD DISPLAY 16. LEFT & RIGHT SPEAKER BOXES 7. BACK BUTTON 17. FM ANTENNA WIRE 8. NEXT BUTTON 18. SPEAKER WIRE CONNECTORS (L/R) 9. VOLUME BUTTON 19. CD DOOR 10. REPEAT/PROG./TIME BUTTON 20.
BASIC OPERATIONS 1. REMOTE SENSOR 10. REPEAT/ PROGRAM/ TIME BUTTON 2. POWER BUTTON - Repeat a track CD/MP3/USB program. -Press POWER button to turn on/off power. - Repeat mode: normal->repeat 1->repeat all-> 3. STANDBY INDICATOR repeat album ->normal. 4. PLAY/PAUSE BUTTON - for CD/MP3/USB status, when the unit is in the - Start or pause MP3/CD/USB/BLUE play.
REMOTE CONTROL 1. POWER BUTTON 2. TIME BUTTON 3. INTRO BUTTON 4. MUTE BUTTON 5. RANDOM BUTTON 6. P-UP BUTTON 7. REPEAT BUTTON 8. PROGRAM BUTTON 9. BACK BUTTON 10. FUNCTION BUTTON 11. NEXT BUTTON 12. EQ BUTTON 13. PLAY/PAUSE BUTTON 14. P-DOWN BUTTON 15. BBS BUTTON 16. STOP BUTTON 17. NUMBER KEY 18. VOL- BUTTON 19. VOL+ BUTTON * Please pull out the plastic paper from the battery door before use the remote control.
USE CLOCK USE CLOCK To setup the time of the unit 1. Connect the AC ON (The following operation must be in standby mode). 2. Short press on the TIME button, the time digits will be flashing on the LCD display. 3. Press BACK, NEXT buttons to select the time format display by 12h or 24h. 4. Press TIME button to confirm. 5. Then you can set the hour and the minute with the same method of steps 3-4.
BLUETOOTH MODE * The operational range between this unit and a Bluetooth device is approximately 10 meters, different BLUETOOTH devices may be slightly different operation, * Before you connect a Bluetooth device to this unit, familiarize yourself with the Bluetooth capabilities of the device (IPHONE, IPAD, MOBILE PHONE,etc.) by reading the device instructions. * Compatibility with all Bluetooth devices is not guaranteed.
PLAYING USB / SD MEMORY CARD The unit is designed to play MP3 audio files contained in a USB key, if the files are not in MP3 format, the files cannot be read correctly. -USB/Memory Card audio functions 1) Insert one USB key in the USB compatible port (15) or one SD/MMC memory card in the SD/MMC Slot (14). The unit will read the USB and playback automatically if no CD disc loaded. 2) Press FUNCTION button or STOP/USB/SD button to choose the USB or SD state.
Selecting a different track During playback you can use BACK or NEXT button to select a particular track. if you have selected a track number in the stop or pause position, press PLAY/PAUSE to start playback. Press NEXT once briefly for the next track, or press repeatedly until the desired track number appears in the LCD display. Press BACK once briefly to return to the beginning of a current track. Press BACK more than once briefly for selecting a previous track. Finding a passage within a track 1.
Different play modes: Program Program- using main unit, program function can be operated when the unit is in stop position. 1>> when the unit is playing a CD DISC: A>press“program”key of remote control one time in stop position, the LCD display will show: B>Press BACK or NEXT to select your favorite track No.
PROGRAM METHOD (1)Press the [PROG.] key at STOP mode, system will go to PROGRAM mode. -The PRG icon and P01 will blink at 2Hz. This prompts the user to enter the first song in the program PLAY list. (2)The user can select the desire tracks by using [NEXT], [BACK] keys. Once these keys are pressed, the Display will show the selected track. (3)After select the desired track, press [PROG.] key again and it will be stored in the memory.
TROUBLE SHOOTING If a fault occurs, first check the points listed below before taking the set for repair. Do not open the set as there is a risk of electric shock. If you are unable to remedy a problem by following these hints, consult your dealer or service center. WARNING: under no circumstances you should try to repair the set yourself, as this will invalidate the warranty.
TECHNICAL SPECIFICATIONS S CARACTERISTIQUES Model Power supply Power consumption Standby mode consumption Output power Operation temperature Headphone impedance CD-103 AC 100~240 V, 50/60 Hz 18 W 0.6 W 40 W (2x20W) = 2x5 W RMS +5°C - + 35°C 4 ~ 32 Ohms CD section Optical pick-up 3-Beam Laser Frequency response 100Hz – 16KHz Radio Frequency range Preset stations FM 87.5 ~ 108 MHz up to 30 stations Connections AUXILARY 3.5MM USB COMPATIBLE PORT MMC/SD/SDHC/SDXC memory card reader EARPHONE 3.
END OF LIFE DISPOSAL Warning! This logo set on the product means that the recycling of this apparatus comes within the framework of the Directive 2002/96/CE of January 27, 2003 concerning the Waste of Electrical and Electronic Equipment (WEEE). This symbol means that used electrical and electronic products should not be mixed with general household waste. There is a separate collection system for these products.
Dank u voor uw aankoop van de TOKAI CD-103: MICROSYSTEEM BLUETOOTH met DIGITALE FM-tuner compatibel met CD MP3 – USB – SD. Dit is uw garantie voor kwaliteit, prestatie en waarde. Onze ingenieurs hebben meerdere handige functies in dit product verwerkt. Zorg ervoor dat u deze Handleiding volledig leest zodat u de maximale waarde uit elke functionaliteit kunt halen. Dit product is gemaakt met componenten van de beste kwaliteit en vakmanschapnormen.
ALGEMENE VEILIGHEIDSVOORSCHRIFTEN 1. Alle veiligheid en bedieningsinstructies moeten worden gelezen, moeten worden opgevolgd, voordat het apparaat wordt bediend. Bewaar de bedieningsinstructies voor latere naslag. 2. SCHOONMAKEN — Trek de stekker van dit product uit het stopcontact voordat u het schoon gaat maken. Gebruik geen vloeibare schoonmaakmiddelen of sprays. Gebruik een vochtige doek om het toestel schoon te maken. 3.
ALGEMENE VEILIGHEIDSVOORSCHRIFTEN 15. VOORWERPEN EN VLOEISTOFFEN — Druk in geen geval voorwerpen via de openingen in het toestel. De voorwerpen zouden anders punten waarop hoogspanning staat kunnen raken of interne onderdelen van het toestel kort kunnen sluiten met brand of een elektrische schok tot gevolg. Mors nooit vloeistoffen van welke aard dan ook op het product. 16.
VOORBEREIDING VOOR GEBRUIK Uitpakken en opzetten CD-103 Afstandsbediening Gebruiksaanwijzing • Plaats uw Bluetooth Micro systeem CD-103 op een vlakke en stabiele ondergrond, zodat het niet kan omvallen. • Verwijder voorzichtig alle onderdelen uit de doos en verwijder alle verpakkingsmateriaal van de componenten. • Zorg ervoor dat elk onderdeel is in goede staat en niets wordt per ongeluk met het verpakkingsmateriaal weggegooid.
BESCHRIJVING VAN EENHEID EN BEDIENING VOORAANZICHT ACHTERAANZICHT 1. SENSOR AFSTANDSBEDIENING 11. FUNCTIE-KNOP(FUNCTION) 2. AAN-UIT KNOP (POWER) 12. AUX. AANSLUITING (AUX IN) 3. STANDBY-indicator 13. KOPTELEFOONAANSLUITING (PHONES) 4. AFSPELEN/PAUZE-KNOP (PLAY/PAUSE) 14. GEHEUGENKAART-SLOT (SD/MMC) 5. STOP/USB/SD KNOP 15. COMPATIBEL USB-POORT (USB) 6. LCD DISPLAY 16. LINKS&RECHTS LUIDSPREKERS 7. TERUG KNOP (BACK) 17. FM ANTENNE 8. VOLGENDE KNOP (NEXT) 18.
BASISHANDELINGEN 1. AFSTAND SENSOR 2. POWER Knop (AAN/UIT) - Om het product aan/uit te zetten. 3. Standby Indicator 4. PLAY/PAUSE-Knop - Start of pauzeer het afspelen van MP3/CD/USB/BLUETOOTH. - Druk op de afspelen/pauze-knop in de radiomodus om de automatische scanmodus van de kanalen te starten. 5. STOP/USB/SD-Knop - Stopt het afspelen van de CD/MP3/USB/SD; - Wissen van een CD-programma, - Druk en houd meer dan 1,5 sec. in om USB / SD kaart te wijzigen. 6.
AFSTANDSBEDIENING 1. POWER KNOP (AAN/UIT) 2. TIME KNOP (KLOK/TIJD) 3. INTRO KNOP 4. MUTE KNOP 5. RANDOM-KNOP (willekeurige knop) 6. P-UP KNOP 7. REPEAT KNOP (HERHAAL) 8. PROG. KNOP (PROGRAMMA) 9. BACK KNOP (TERUG) 10. FONCTION KNOP (FUNCTIE) 11. NEXT KNOP (VOLGENDE) 12. EQ KNOP 13. PLAY/PAUSE KNOP 14. P-DOWN KNOP 15. BBS KNOP 16. STOP KNOP 17. NUMMER-TOESTEN 18. VOL- KNOP 19. VOL+ KNOP * Uw afstandsbediening is al met 1 kleine lithiumbatterij type CR-2025 in het compartiment geleverd.
KLOK MODUS DE KLOK INSTELLEN : 6. Stel het apparaat op de Stroom de klok instellingen zijn in de standby-modus. 7. Druk kort op de TIME knop, het uur knippert op het LCD-display. 8. Druk op de BACK, NEXT knoppen (Vorige / Volgende) om de tijd weer te geven: 12u of 24u. 9. Druk op de TIME knop om te valideren. 10. Stel dan de cijfers voor de uren en minuten in de stappen 3 en 4.
GEBRUIK VAN BLUETOOTH Bluetooth is een systeem van draadloze transmissie, zodat u kunt luisteren naar uw MICRO SYSTEM de MP3-muziek opgeslagen op uw mobiele telefoon, MP3-speler, enz. ... Deze functie kan alleen werken, indien het externe apparaat is uitgerust met Bluetooth-functie. * De effectieve ontvangstafstand van Bluetooth is ongeveer 10 m. * Voordat u een Bluetooth-apparaat op dit apparaat, uzelf vertrouwd met de Bluetooth-mogelijkheden van het apparaat door het controleren van de handleiding.
AUXILLIAIRE BEDIENING Het toestel kan gebruikt worden om de muziek af te spelen van vele soorten van externe apparaat Naar muziek te luisteren vanaf extern apparaat zoals MP3, discman, walkman: 1. Aansluiten op de AUX een 3,5 mm stereo-kabel (niet meegeleverd) om het externe apparaat op de AUX-IN (12) aansluiting van het apparaat. 2.
OPMERKING: als er geen extern apparaat of de inhoud van het externe apparaat niet kan worden gelezen door de apparaat, wanneer u schakelt van USB-modus naar de SD-modus met de STOP-knop, de pictogram "NO" wordt weergegeven, en het systeem in de STOP-modus. LET OP: - Wanneer er geen disc is geladen in het apparaat, leest het systeem automatisch de USB/Kaart bij het invoegen van de USB of SD-kaart. Het leest eerst de USB als deze is aangesloten.
Selecteren van een anders nummer: Gedurende de playback kunt u drukken op BACK (VORIGE) of NEXT (VOLGENDE) om een specifiek nummer te selecteren. STOP of PAUSE modus kunt u het nummer selecteren met de cijfertoetsen op de afstandsbediening en directe toegang tot het nummer van uw keuze. Draaien (of druk op de afstandsbediening) de NEXT knop eenmaal kort voor het volgende nummer, of druk herhaaldelijk op totdat het gewenste nummer in het display verschijnt.
4. Druk voor een vierde keer op HERHAAL-toets om het continu herhalen te beëindigen. De repeat-indicator gaat uit en de display toont: Let op: - Als er geen folder (album) is, druk op de HERHAAL-toets voor de derde keer, het zal rechtstreeks naar de 4de stap gaan. - Als het formaat van de muziek niet MP3 is, zal het LCD-scherm MP3 niet weergegeven. - Als een USB wordt afgespeeld, zal het LCD-scherm USB weergegeven. INTRO-FUNCTIE Met deze functie kunt u de eerste 10 sec. van elk nummer op de disc spelen.
2) Wanneer een MP3-disc wordt geladen: a. Druk op de PROGRAMMA-toets in STOP-stand, de display toont "P01".: b. Draai de VORIGE of VOLGENDE knop om uw favoriete nummer te programmeren in het eerste geheugen (P01) en dan zal de display het volgende tonen: Druk dan weer op de PROGRAMMA-toets om opnieuw te bevestigen. c. Herhaal de bovenstaande procedure om het volgende favoriete nummer te programmeren, totdat u klaar bent. U kunt VORIGE of VOLGENDE (BACK/NEXT) kiezen om uw favoriete nummer te selecteren. d.
VERZORGING EN ONDERHOUD Voorzorgsmaatregelen en algemeen onderhoud Plaats het apparaat op een harde en vlakke ondergrond zodat het niet om kan vallen. Het apparaat, de batterijen of cd's tegen vocht, regen, zand of extreem hoge temperaturen zoals bij verwarmingsapparatuur of direct zonlicht. De mechanische delen van het apparaat zijn voorzien van zelfsmerende lagers en mogen dus niet gesmeerd of geolied worden. Om het apparaat schoonmaken met een zachte, droge doek.
PROBLEEMOPLOSSING Als uw apparaat niet naar behoren werkt, raadpleeg deze lijst voor een mogelijke oplossing alvorens met een reparateur contact op te nemen. Neem contact op met een gekwalificeerde persoon, zoals uw handelaar, als onderstaande tips het probleem niet oplossen of het apparaat fysiek beschadigd is. WAARSCHUWING: onder geen omstandigheden proberen het toestel zelf te repareren, anders vervalt de garantie.
PROBLEEM OORZAAK OPLOSSING BLUETOOTH Er kunnen geen handelingen Uw Bluetooth-apparaat is worden uitgevoerd. gekoppeld niet goed Koppel het apparaat los en vervolgens opnieuw aan op basis van de "Bluetooth". Het Bluetooth-apparaat Het volume van uw Bluetooth-apparaat is Verhoog het volume van uw Bluetooth-apparaat. wordt niet afgespeeld laag.
TECHNISCHE SPECIFICATIES Model Voeding Stroomverbruik Stroomverbruik Standby modus CD-103 AC 100~240 V, 50/60 Hz 18 W 0.6 W Uitgaand vermogen Bedrijfstemperatuur Impedantie van de hoofdtelefoon 40 W (2x20W) = 2 x 5 W RMS +5°C - + 35°C 4 – 32 Ohms CD-SPELER Optiek laser 3 laserstralen Frequentiebereik 100Hz – 16KHz SECTIE RADIO: Frequentiegebieden Voorkeurzenders FM 87.
Wegdoen na het einde van de levensduur Let op : Dit symbool geeft aan dat elektrische en elektronische apparatuur, aan het eind van hun levensduur, niet mag worden gedeponeerd bij het normale huishoudelijk afval Uw product is van dit merkteken voorzien. Dit betekent dat en elektronische apparatuur niet samen met afgedankte elektrische het normale huisafval mogen worden weggegooid. Er bestaat een afzonderlijk inzamelingssysteem voor deze producten. (Afgedankte Electrische & Electronische Apparatuur (WEEE).
BEVOR WIR BEGINNEN Vielen Dank für Kaufen von TOKAI CD-103 Bluetooth Mikro System. Das ist Ihre Versicherung von Qualität, Leistung und Wert. Unsere Ingenieure haben viele brauchbare und praktische Eigenschaften in dieses Produkt eingeschlossen. Stellen Sie bitte sicher, diese Anleitung vollständig zu lesen, um sicherzustellen, dass Sie maximalen Nutzen von jeder Eigenschaft bekommen. Dieses Produkt ist mit Komponenten höchster Qualität und Standard von Arbeitsausführung hergestellt.
WARNHINWEISE WARNUNG: UM DAS FEUERRISIKO ODER EINEN ELEKTRISCHEN SCHLAG ZU VERMEIDEN, SETZEN SIE DAS PRODUKT NIEMALS REGEN ODER NÄSSE AUS. ACHTUNG! STROMSCHLAGGEFAHR Nicht öffnen! GEFAHR ! ENTFERNEN SIE NICHT DAS GEHÄUSE DIESES GERÄTES, DA SONST EINE ERHÖHTE STROMSCHLAGGEFAHR BESTEHT. IM INNEREN DES GERÄTES BEFINDEN SICH KEINE TEILE, DIE VOM NUTZER SELBST REPARIERT WERDEN KÖNNEN. LASSEN SIE REPARATUREN VON QUALIFIZIERTEN REPARATURFACHLEUTEN DURCHFÜHREN.
SICHERHEITSHINWEISE 1. Alle Hinweise die Sicherheit und die Benutzung des Gerätes betreffen, sollten unbedingt gelesen werden. 10. NETZKABELSCHUTZ - Stromversorgungskabel 2. Bitte bewahren Sie alle Unterlagen für später auf, die sollten so gelegt werden, das man möglichst nicht darauf die Sicherheit und den Betrieb betreffen. treten kann oder das Kabel durch daraufgestellte oder 3. Achtung, alle Warnungen und Sicherheitshinweise auf dagegengestellte Gegenstände beschädigt werden kann.
KOPFHÖRERBUCHSE Für ungestörtes Hören Schließen Sie ein Paar Kopfhörer an die Buchse PHONE (13) auf der Vorderseite des Hauptgeräts an. Jetzt kommt kein Ton mehr von den Lautsprechern. Stellen Sie die Lautstärke immer niedrig, bevor Sie Kopfhörer anschließen oder aufsetzen. Stecken Sie die Kopfhörer/Ohrhörern (nicht enthalten) ein und justieren Sie das Lautstärkeniveau auf das gewünschte Niveau. ANMERKUNG: Wenn externe Kopfhörer/Ohrhörern angeschlossen sind, sind die Lautsprecher stumm.
PACKUNGSINHALT Auspacken und Einstellung CD-103 Fernbedienung Bedienungsanleitung Stellen Sie das Gerät auf einer ebenen und stabilen Oberfläche, so dass sie nicht umkippen können. Entnehmen Sie sorgfältig alle Komponenten aus dem Karton und entfernen Sie alle Packungsmaterialien aus den Komponenten. Stellen Sie sicher, dass Nichts zufällig mit den Packungsmaterialien abgeworfen ist.
ODUKTÜBERSICHT Vorderansicht Hinteransicht 1. Sensor Fernbedienung 11. FUNCTION (Funktion-Taste) 2. Ein/Aus-Taste POWER 12. AUX IN Eingang -Buchse 3. STANDBY Anzeiger 13. PHONE (Kopfhörer-Buchse) 4. PLAY/PAUSE-Taste 14. SD/MMC-Kartenbuchse 5. STOP/USB/SD Taste 15. USB Kompatiblen Buchse 6. LCD ANZEIGE 16. Linken und rechten Lautsprecherboxen 7. BACK Taste (Rücktaste) 17. FM-Antennen Draht 8. NEXT Taste (Nächste) 18. Lautsprecher Ausgangsanschlüsse (L/R) 9. VOLUME (Lautstärketaste) 19.
GRUND FUNKTIONEN 1. Fernbedienungssensor 2. POWER Taste (EIN/AUS) - Drücken Sie die POWER-Taste, um das Gerät ein- / 10. REPEAT/ PROGRAM/ TIME Taste auszuschalten. - Wiederholung von CD/MP3/USB –Titel und Program. 3. STANDBY Anzeiger - Wiederholung-Modus : normalen Wiedergabe->1 4. PLAY/PAUSE Taste wiederholen->Alle wiederholen-> - Starten oder Anhalten der MP3 / CD / USB / Bluetooth Ordner wiederholen ->normalen Wiedergabe. spielen.
FERNBEDIENUNG 1. POWER Taste 2. TIME Taste 3. INTRO Taste 4. MUTE Taste 5. RANDOM Taste 6. P-UP Taste 7. REPEAT Taste 8. PROGRAM Taste 9. BACK Taste 10. FUNCTION Taste 11. NEXT Taste 12. EQ Taste 13. PLAY/PAUSE Taste 14. P-DOWN Taste 15. BBS Taste 16. STOP Taste 17. NUMMERNTASTEN 18. VOL- Taste 19. VOL+ Taste Erster Einsatz: Das Gerät verfügt über einen vorinstallierten CR2025-Lithium-Batterie. Entfernen Sie den Schutzstreifen von der Batterie der Fernbedienung.
EQ Taste -Im CD/MP3/USB/BT/AUX/RADIO-Modus, drücken Sie die EQ-Taste der Klang kann durch Auswahl von einem der 5 voreingestellten Equalizerprofilen eingestellt werden. - Beim Spielen des Musik, drücken diese Preset EQ Taste mehrmals, um durch folgende Wahlmöglichkeiten zu blättern : klassic-rock-popular-jazz-FLR. MUTE Taste -Im CD/MP3/USB/BT/AUX/ RADIO-Modus, drücken Sie die MUTE-Taste um den Ton stummzuschalten. Drücken Sie die MUTE-Taste wieder oder VOL + / -, um wieder normales Hören.
RADIO BETRIEB RADIO 1. Drücken Sie die "FUNKTION"taste, bis das Display RADIO zeigt. 2. Tune den gewünschten Sender unter Verwendung BACK oder NEXT-Tasten. Manuelles Einstellen: drücken Sie und sofort loslassen (innerhalb 1 Sek.) die BACK oder NEXT-Tasten. Auto Einstellen: drücken Sie die PLAY/PAUSE-Taste, das Gerät speichert alle FM Sender automatisch und setzen diese automatisch ein. Um einen voreingestellten FM-Radiosender zurückzurufen, drücken Sie die PLAY/PAUSE-Taste. Speichern von Sendern :(Max.
Drücken Sie die FUNCTION Taste und wählen Sie BLUE Modus. Suchen Sie BLUETOOTH Gerät Modell“CD-103" für Verbindung. Aktivieren Sie die Bluetooth-Funktion Ihres Bluetooth-Audiogerät, damit es erkennbar (siehe Bedienungsanleitung des Geräts, um eine Bluetooth-Gerät hinzufügen oder einstellen). “ CD-103” in der Koppelungsliste auswählen. Falls nötig, das voreingestellte Passwort “0000” eingeben. WIEDERGABE 1. Drücken Sie PLAY/PAUSE, um die Wiedergabe zu starten oder anzuhalten. 2.
USB / SD-SPEICHERKARTE VERWENDUNG Ihr Gerät ist mit einem USB-Anschluss und SD-Speicherkartenleser ausgestattet. - Nach dem Einstecken eines USB-Stick oder SD-Card (mit MP3-Song-Dateien) innerhalb von 1 Minute, das Gerät zeigt dann kurzzeitig die Gesamtzahl der MP3-Songs es gefunden hat, und dann sofort anfangen zu spielen den ersten Song (# 001) wenn keine CD eingelegt ist. Wenn die Dateien nicht in das MP3-Format, können die Dateien nicht korrekt gelesen werden.
PFLEGE & WARTUNG Vorsichtsmaßnahmen und Betriebshinweise * Stellen Sie das Gerät auf eine harteebene Oberfläche, damit das System waagerecht steht. * Setzen Sie das Gerät, Batterien oder CDs nicht Feuchtigkeit, regen, Sand oder extremer Hitze durch Wärmequellen oder direkter Sonneneinstrahlung aus. * Setzen Sie das Gerät nicht ab. Für ausreichende Lüftung mit einem Mindestabstand von cm zwischen den Lüftungslöchern und umgebenden Flächen notwendig, um von Erwärmung zu vermeiden.
FEHLERBEHEBUNG Um die Garantie verfällt, niemals versuchen, das System selbst zu reparieren. Wenn Sie Probleme mit diesem Gerät, überprüfen Sie die folgenden Punkte, bevor Sie ihn bis zum After Sales Service.
TECHNISCHE SPEZIFIKATIONEN S CARACTERISTIQUES Modell Stromversorgung Verbrauch im Betrieb Verbrauche im Standby Ausgangsleistung Betriebstemperatur Gesamtimpedanz CD-103 AC 100~240 V, 50/60 Hz 18 W 0.6 W 40 W (2x20W) = 2x5 W RMS +5°C - + 35°C 4 ~ 32 Ohms CD Bereich optische Aufnehmer 3- Strahl-Laser Frequenz Ansprechen 100Hz – 16KHz FM Frequenzbereich Voreingestellte Sender FM 87.5 ~ 108 MHz bis zu 30 Senders Anschlüsse AUXILARY 3.
ENTSORGUNG AM ENDE DER LEBENSDAUER Achtung ! Ihr Produkt trägt dieses Symbol. Es besagt, dass Elektro- un Elektronikgeräte nicht mit dem Haushaltsmüll entsorgt, sondern einem getrennten Rücknahmesystem zugeführt werden sollten. Dieses Symbol auf dem Produkt bedeutet, dass die Wiederverwendung dieses Apparates innerhalb des Gerüstes der Direktive 2002/96/CE vom 27. Januar 2003 bezüglich der Vergeudung der Elektrischen und Elektronischen Ausrüstung (WEEE) kommt.
ANTES DE COMENZAR Gracias por comprar Tokai CD-103 MICRO CADENA. Esta es su garantía de calidad, rendimiento y valor. Este producto ha sido fabricado utilizando componentes de alta calidad y estándares de mano de obra. Nuestros ingenieros han incluido muchas características útiles y convenientes en este producto. Por favor, asegúrese de leer este manual de instrucciones para asegurarse de que está recibiendo el máximo beneficio de cada función.
ADVERTENCIA PARA PREVENIR INCENDIOS O ELECTROCUCIONES NO EXPONER EL APARATO A LA LLUVIA O HUMEDAD. SÍMBOLO DE RAYO Este “Rayo” indica que dentro de su unidad hay material sin aislamiento que puede causar una descarga eléctrica. Para la seguridad.de todos en su hogar, por favor, no retire el producto que lo cubre.
INSTRUCCIONES DE SEGURIDAD 1. LEER LAS INSTRUCCIONES --- Todas las cuidado en las conexiones del cable y las salidas del instrucciones de seguridad y funcionamiento deben ser aparato. leídas antes de usar el aparato; seguir dichas 8. PERIODOS DE NO-USO --- El cable de alimentación instrucciones y conservar dicho manual para futuras debe ser desconectado de la toma de corriente cuando el consultas. dispositivo no vaya a ser usado por largos periodos de 2.
CONEXION DE AURICULARES Para no molestar a un tercero mientras está disfrutando del dispositivo, puede conectar sus auriculares al terminal de AURICULARES. Los altavoces serán silenciados y podrá disfrutar del sonido sin causar molestias. Ajustar un volumen saludable : ¡Preste especial atención! Con el paso del tiempo, su oído se adaptará a la exposición continuada a sonidos a volúmenes elevados y le dará la impresión de que el volumen ha sido reducido. Lo que le parece normal puede resultar perjudicial.
FUENTE DE ALIMENTACIÓN Uso de corriente CA 1. Conecte el cable de alimentación a la entrada de la toma CA y al enchufe de pared. La fuente de alimentación está conectada y lista para su uso. 2. Para desconectar por completo el aparato, desenchúfelo de la toma. INSTALACIÓN DE LOS ALTAVOCES Antes de conectar el dispositivo a la corriente (AC), conectar los altavoces Izquierdo y Derecho (16) a los terminales izquierdo y derecho ubicados en la parte trasera del aparato (18).
DESCRIPCIÓN DEL DISPOSITIVO Vista de frente Vista posterior 1. SENSOR DEL MANDO A DISTANCIA 17. CABLE ANTENA FM 2. BOTÓN DE ENCENDIDO 18. TERMINALES DE LOS CABLES DE LOS 3. INDICADOR DE ESTADO DE REPOSO ALTAVOCES (I/D) 4. BOTÓN DE REPRODUCCIÓN/PAUSA 19. BANDEJA DE CD 5. BOTÓN DE STOP/USB/SD 20. TOMA DE CORRIENTE AC 6. PANTALLA LCD 7. BOTÓN ANTERIOR 8. BOTÓN DE SIGUIENTE 9. BOTÓN DE VOLUMEN 10. BOTÓN DE REPETICIÓN/PROG./RELOJ 11. BOTÓN DE FUNCIÓN 12. Terminal AUX IN 13. Conexión AURICULARES 14.
FUNCIONAMIENTO BASICO 1. SENSOR DEL MANDO A DISTANCIA 2. BOTÓN DE ENCENDIDO/APAGADO 10. BOTÓN DE - Pulsar el botón de ENCENDIDO/APAGADO para REPETICIÓN/PROGRAMACIÓN/RELOJ - Repite un conjunto de pistas de CD/MP3/USB. - Modo de repetición: normal ->repetir 1->repetir todo-> repetir recopilatorio ->normal. - En estado CD/MP3/USB, cuando el dispositivo esté en modo de parada, pulsar un breve periodo de tiempo para acceder a la sección de programación CD/MP3/USB.
CONTROL REMOTO 1. BOTÓN DE ENCENDIDO/APAGADO 2. BOTÓN TIEMPO 3. BOTÓN INTRO (ACEPTAR) 4. BOTÓN MUTE (SILENCIO) 5. BOTÓN RANDOM (ALEATORIO) 6. BOTÓN P-UP (PREVIO-ARRIBA) 7. BOTÓN REPEAT(REPETIR) 8. BOTÓN PROGRAM(PROGRAMACIÓN) 9. BOTÓN BACK (ATRAS) 10. BOTÓN FUNCTION(FUNCIÓN) 11. BOTÓN NEXT (SIGUIENTE) 12. BOTÓN EQ(ECUALIZADOR) 13. BOTÓN PLAY/PAUSE (REPRODUCCIÓN/PAUSA) 14. BOTÓN P-DOWN(PREVIO-ABAJO) 15. BOTÓN BBS (REFUERZO DE GRAVES) 16. BOTÓN STOP (PARADA) 17. TECLAS NUMERICAS 18. BOTÓN VOL19.
USO DEL RELOJ Uso del reloj Para configura la hora de la unidad: 1. Conecte la correiene ( el moda de funcionmaiento debe ser standby). 2. A continuación la bora parpadeara en la pantalla LCD. 3. Gire BACK, NEXT para seleccionar las cifra de la hora, puede configurar el formato de la hora en 12 0r 24 hores. 4. Pulse el botón TIME para confirmar. 5. Después de configurar la Hora de La unidad mantenga pulsado el botón TIME para configurar la hora de inicio de funcionamiento de la unidad.
MODO BLUETOOTH * El radio de funcionamiento del dispositivo es de aproximadamente 10 metros; cada dispositivo BLUETOOTH tiene rendimientos diferentes. * Antes de conectar al dispositivo Bluetooth, estudie las características de dicho dispositivo (IPHONE, IPAD, TELÉFONO MÓVIL,etc.) leyendo sus instrucciones. * No se asegura la compatibilidad con todos los dispositivos Bluetooth. * Cualquier obstáculo entre los aparatos puede reducir el radio de funcionamiento.
REPRODUCIR USB / TARJETA DE MEMORIA SD El dispositivo puede reproducir archivos MP3 almacenados en un pendrive USB; si los archivos no están en formato MP3, no serán reproducidos correctamente. Funciones de audio USB/Tarjeta de memoria 1) Insertar el pendrive USB en el puerto compatible con USB (15) o introducir una tarjeta de memoria SD/MMC en la ranura SD/MMC (14). El dispositivo leerá el USB y reproducirá su contenido de forma automática si no existe un CD cargado en el sistema.
Nota: La reproducción del CD/MP3 irá a parar cuando: - abre el compartimiento del CD; - selecciona la fuente de sonido de radio; - el CD/MP3 ha finalizado. Seleccionando una pista diferente. Durante la reproducción, puede usar anterior o siguiente para escoger una determinada pista. Se seleccionó un número de pista en la posición de parada o pausa, pulse play para iniciar la eproducción.
Diferentes modos de juego: programa Programa- Puede utilizar el mando a distancia para la programación,solamente si no hay reproducción alguna o si la reproducción se encuentra pausada. 1-- Mientras el equipo reproduce un CD A>Interrumpa la reproducción del CD,y luego presione sobre la recla PROGRAM en elmando a distancia. B>Presione sobre BACK o NEXT para buscar el tema deseado:luego presione sobre PROGRAMA para confirmar. C>Repita el procedimiento mencionado en B>para seleccionar otro Tema.
MÉTODO DE PROGRAMACIÓN (1) Pulse la tecla (PROGRAMA) en el modo STOP, el sistema pasará para al modo PROGRAMA. - Los iconos PRG y P01 parpadearán. Esto indica al usuario que puede introducir las primeras canciones de la lista de reproducción programada. (2) El usuario puede seleccionar las pistas deseadas usando las teclas [NEXT] y [BACK]. Una vez pulsadas estas teclas, el visor mostrará la pista seleccionada.
RESOLUCION DE PROBLEMAS Si existe un fallo del sistema, primero proceder a verificar los puntos que se especifican a continuación antes de enviar el producto a ser reparado. No abrir el aparato; existe riesgo de electrocución. Si una vez seguidos estos pasos no puede reparar el producto, contacte con su distribuidor o servicio de atención al cliente. ADVERTENCIA: bajo ninguna circunstancia intente reparar el producto por sí mismo, la garantía dejará de ser válida.
ESPECIFICACIONES TÉCNICAS S CARACTERISTIQUES Modelo Alimentación Consumo energético Consumo en reposo Potencia de salida Temperatura de funcionamiento Impedancia auriculares CD-103 AC 100~240 V, 50/60 Hz 18 W 0.6 W 40 W (2x20W) = 2x5 W RMS +5°C - + 35°C 4 ~ 32 Ohms CD Cabezal Óptico 3-Beam Laser Respuesta en Frecuencia 100Hz – 16KHz Rango de Frecuencias (Radio) Almacenamiento de emisoras FM 87.5 ~ 108 MHz hasta 30 emisoras Conexiones AUXILIAR 3.
Desecho del producto ¡Advertencia! Este logo en el producto significa que el reciclaje de este aparato está dentro del margen de la Directiva de Residuos de Aparatos Eléctricos y Electrónicos (Waste Electrical and Electronic Equipment, WEEE), 2002/96/CE de 27 de enero de 2003. Este símbolo significa que los productos eléctricos y electrónicos usados no deben mezclarse con los desechos domésticos, existe un sistema de recogida selectiva para este tipo de productos.
CD-103 www.tokai.