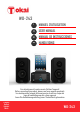
WO-243 1 MANUEL D’UTILISATION 11 USER MANUAL 21 MANUAL DE INSTRUCCIONES 30 HANDLEIDING Lire attentivement la notice avant d’utiliser l’appareil Before operating this product, please read user manual completely Lea atentamente el manual del usuario antes de utilizar el aparato Lees de handleiding voordat u deze apparaat Lesen Sie die Bedienungsanleitung bevor Sie das Gerät gebrauchen Français English Español Dutch WO-243
AVANT DE COMMENCER Merci d'avoir acheté notre TOKAI WO-243 MICRO CHAINE BLUETOOTH – PORT COMPATIBLE USB TUNER DIGITAL & ENTREE AUXILAIRE Ce produit a été fabriqué en utilisant des composants de qualité et en respectant des normes de fabrication. Il est une garantie de qualité et de performance. Nos ingénieurs ont inclus dans ce produit de nombreuses fonctionnalités utiles et pratiques. Veuillez lire ce manuel d'instructions entièrement afin de profiter un maximum de chaque fonction.
MESURES DE SÉCURITÉ IMPORTANTES 1. Lisez les instructions - Toutes les instructions 10. Surcharge - Ne surchargez pas les sorties murales, les cordons d'extension, ou les récipients de convenance comme ça peut causer un risque d'incendie ou de choc électrique. 11.
PREPARATION AVANT UTILISATION Déballage et mise en place WO-243 Adaptateur secteur Notice d’emploi Placer l'appareil sur une surface plate et stable de manière à ce qu'il ne puisse pas se renverser. Sortir l’appareil et ces accessoires de son emballage avec précaution. S’assurer de ne rien jeter par inadvertance avec les papiers d’emballage & que chaque pièce est en bon état. Délier complètement le cordon d'alimentation et connecter le cordon à l'appareil.
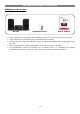
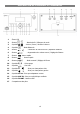
DESCRIPTION DE L’APPAREIL ET COMMANDES 1 : Écran LCD 2 : Bouton 3 : Symbole 4 : Symbole 5 : Bouton 6 : Bouton 7 : Bouton 8 : Bouton 9 : Bouton - Marche-Arrêt / Sélecteur de mode - Lecture / Pause / Arrêt de la lecture - Mode Bluetooth - Diminution du volume sonore / Répétition d’alarme - Augmentation du volume sonore / Réglage de l’alarme - Retour rapide - Avance rapide - Mode sommeil / Réglage de l’heure 10 : Symbole - Prise casque 11 : Symbole - Port USB 12 : Symbole - Prise po
CONNEXION & MISE EN SERVICE INSTALLATION DES PILES (SAUVEGARDE DE L’HEURE) - Retirer le couvercle du compartiment des piles (17). - Insérer 2 piles LR3 (AAA) en respectant la polarité indiquée. - Replacer le couvercle. INFORMATIONS CONCERNANT LES PILES - Pour la sauvegarde de l’heure, l’horloge doit être équipée des piles prévues à cet effet. - Seules les piles du type recommandé doivent être utilisées.
REGLAGES DE BASE Marche/Arrêt/Sélection de mode Presser successivement le bouton (2) pour mettre l’appareil en marche et sélectionner un mode. Pour arrêter l’appareil, presser longuement le bouton (2). NOTE : Le dernier mode actif avant l’arrêt de l’appareil est sélectionné par défaut au démarrage. Réglage du volume Presser les boutons (5) et (6) pour régler le volume sonore de 0 à 16. Régler l’heure L’appareil doit être en mode Arrêt.
REGLAGES DE BASE Répétition d’alarme Après déclenchement de l’alarme, presser le bouton minutes plus tard. (5) : l’alarme retentira à nouveau environ 9 REGLER LA MISE EN VEILLE (SLEEP) En mode veille, presser successivement le bouton (2) jusqu’à la source désirée. Presser longuement le bouton (9), ‘90’ s’affichera à l’écran. Presser successivement le bouton (9) pour choisir la durée d’écoute : 90, 80, 60, 50, 40, 30, 20, 10 minutes. L’appareil s’éteindra automatiquement à la fin de la durée programmée.
FONCTIONNEMENT BLUETOOTH Cet appareil peut recevoir un signal audio à partir d’un périphérique source audio Bluetooth. Vérifier dans la notice d’utilisation du périphérique que le profil de distribution A2DP est pris en charge pour une compatibilité parfaite. Afin d’éviter toute interférence, il est fortement recommandé d’éteindre le Wi-Fi sur votre périphérique lors de la lecture audio Bluetooth.
SPECIFICATIONS TECHNIQUES TRES - Alimentation par adaptateur secteur : - Ce modèle est destiné à être utilisé avec un adaptateur AC/DC Entrée : 100-240V~ 50Hz, 0,5A. Sortie : 5V 1,5A - Puissance haut-parleurs : 20 W - Radio FM - fréquences FM : 87,5 à 108MHz - Port USB : 5V 500mA - Connexion Bluetooth (2.
MISE AU REBUT EN FIN DE VIE Attention ! Ce logo apposé sur le produit indique qu’il s’agit d’un appareil dont le traitement en tant que déchet rentre dans le cadre de la directive 2002/96/CE du 27 janvier 2003, relative aux déchets d’équipements électriques et électroniques (DEEE). Ce symbole signifie que les produits électriques et électroniques usagées ne doivent pas être mélangés avec les déchets ménagers généraux. Un système de collecte séparé est prévu pour ces produits.
BEFORE WE BEGIN Thank you for purchasing the TOKAI WO-243 a BLUETOOTH MICRO SYSTEM with Digital FM tuner USB compatible & auxiliary input. This is your assurance of quality, performance and value. Our engineers have included many useful and convenient features in this product. Please be sure to read this instruction Manual completely to make sure you are getting the maximum benefit from each feature. This product was manufactured using the highest quality components and standards of workmanship.
SAFETY INTRUCTIONS 1. READ INSTRUCTIONS --- All the safety and operating instructions should be read before the product is operated, followed and retained for future reference. 2. CLEANING --- Unplug this product from the wall outlet before cleaning. Do not use liquid cleaners or aerosol cleaners. Use a damp cloth for cleaning. 3.
PREPARATION FOR USE Unpacking and set up WO-243 Power adaptor User manual Place your Bluetooth Micro system WO-243 on a flat and stable surface so that it cannot fall over. Carefully remove all the components from the carton and remove all packing materials from the components. Make sure that each part is in good condition & noting is accidentally discarded with the packing materials. Unwind the AC power cord on the back of the main unit and extend it to its full length.
DESCRIPTION OF UNIT AND CONTROLS 1 : LCD screen 2 : 3 : 4 : - Standby / Function button - Play / Pause / Stop button - Bluetooth mode 5 : - Volume - / Snooze button 6 : - Volume + / Alarm set button 7 : - Backward button 8 : - Forward button 9 : - Sleep / Time set button 10 : - Earphone jack 11 : - USB port 12 : - Speaker jack right side 13 : - Speaker jack left side 14 : - AC/DC adaptor jack 15 : 16 : - AUX IN jack - Radio antenna 17 : Batteries compartment 14
CONNECTION & SETTING UP Installing batteries (backup for the clock in case of a power outage) - Open the battery compartment on the back of the appliance (17). - Insert 2 LR3 1.5V batteries, respecting the indicated polarity. - Close the battery compartment. INFORMATION ABOUT THE BATTERIES (not supplied) - The clock must be equipped with the appropriate battery in order to function properly. - Only the recommended batteries should be used. - Polarity must be respected when inserting the batteries.
BASIC SETTINGS ON/Off /Mode Selection - Press the button repeatedly (2) to turn the unit on and select a mode. - To switch off, long press the button (2). NOTE: The last active mode before stopping device is selected by default at startup. Volume adjustment Press the buttons (5) and (6) to adjust the volume from 0 to 16. To set the clock time - In Standby off mode Press and hold the (9) button, the alarm1 icon and the TIME display will blink.
BASIC SETTINGS Shut off alarm (2) button to turn off alarm, the alarm will reset for next day When alarm goes off, press the Snooze function If you want to snooze a few more minutes press the SNOOZE button sound for approximately 9 minutes. (5) will deactivate the Sleep function - In standby on mode - Press the button to select the desired source. - Press and hold the (9) button. The “90” will appear on the display.
BLUETOOTH OPERATION This unit can receive audio signal from a BLUETOOTH audio source device. Make sure that your peripheral has A2DP profile for a perfect compatibility. To prevent interference, we strongly recommend that you switch off WiFi on your peripheral during Bluetooth audio playback. Connect the BLUETOOTH - Press the STANDBY - button (2) until bL icon shown on the display Turn on the Bluetooth feature on your mobile compatible device. Search for WO243BT profile. Pair and connect to WO243BT.
SPECIFICATIONS TECHNIQUES S CARACTERISTIQUES - Connectivity by Bluetooth protocol (2.1 A2DP) – maximal distance: 10 meters FM radio auto scan: 87, 5 - 108MHz Alarm function (2 alarms) AUX IN jack (MP3 player, Smartphone, portable CD player) Format audio accepted: MP3 Earphones jack socket Speaker power: 20 W Main unit power supplied: AC adaptor: - This unit is designed to operate with AC/DC adaptor Input : 100-240V~ 50Hz, 0,5A. Output : 5V 1,5A - USB port: 5V 500mA - Clock power back up supply: 2 x 1.
END OF LIFE DISPOSAL Warning! This logo set on the product means that the recycling of this apparatus comes within the framework of the Directive 2002/96/CE of January 27, 2003 concerning the Waste of Electrical and Electronic Equipment (WEEE). This symbol means that used electrical and electronic products should not be mixed with general household waste. There is a separate collection system for these products.
ANTES DE COMENZAR Gracias por comprar el TOKAI WO-243 una minicadena Bluetooth, con un puerto compatible USB, un sintonizador digital y una entrada auxiliar. Esta es su garantía de calidad, rendimiento y valor. Nuestros ingenieros han incluido muchas características útiles y convenientes en este producto. Por favor, asegúrese de leer este manual de instrucciones completamente para asegurarse de que está obteniendo el máximo beneficio de cada función.
INSTRUCCIONES DE SEGURIDAD 1. LEA LAS INSTRUCCIONES--- Todas las instrucciones de 9. RELÁMPAGOS--- para añadir protección al producto seguridad y funcionamiento deben leerse antes de que la durante tormentas, o cuando se deje desatendido o sin uso por unidad esté en funcionamiento y conservarse para futuras largos períodos de tiempo, desenchúfelo de la pared y consultas. desconecte la antena o el sistema del cable. Esto podría 2.
PREPARACIÓN PARA EL USO Desembalar y montar WO-243 Adaptador de corriente Manual de usuario Colocar el aparato en una superficie plana y estable de manera que no pueda caerse Cuidadosamente quite todos los componentes de la caja. Asegúrese de que nada sea desechado accidentalmente con los materiales de embalaje y asegúrese de que todas las piezas estén en buen estado. Desenrolle el cable de alimentación de la parte trasera de la unidad y extiéndalo a su máxima longitud.
DESCRIPCIÓN DE LA UNIDAD Y CONTROLES 1 : Pantalla LCD 2 : Botón 3 : Símbolo 4 : Símbolo 5 : Botón 6 : Botón 7 : Botón 8 : Botón 9 : Botón - Encender-Apagar / Selector de modo - Lectura / Pausa/ Detener lectura - Modo Bluetooth - Disminución de volumen sonoro/ Repetición de la alarma - Aumento de volumen / Ajuste de la alarma - Retorno rápido - Avance rápido - Modo SLEEP / Ajuste de la hora 10 : Símbolo - Toma de auriculares 11 : Símbolo - Puerto USB 12 : Símbolo - Toma para altav
CONEXIÓN Y PUESTO EN SERVICIO INSTALACIÓN DE LAS PILAS (REGISTRO DE LA HORA) - Retire la tapa del compartimento de las pilas (17). - Introduzca 2 pilas LR3 (AAA) respetando la polaridad indicada. - Coloque la tapa. INFORMACION RELATIVA A LAS PILAS - Para guardar la hora, las pilas previstas para ello deben estar instaladas. - Sólo debe utilizar el tipo de pila recomendado. - Las pilas deben introducirse respetando el sentido de polaridad. - Los bornes de las pilas no deben entrar en cortocircuito.
CONFIGURACIÓN BASICA Encendido/Apagado/Selección de modo - Pulse sucesivamente el botón (2) para encender el aparato y seleccione un modo. - Para apagar el aparato, pulse el botón de manera prolongada (2). NOTA: El último modo activo antes de apagar el aparato queda seleccionado por defecto cuando este se enciende. Ajuste del volumen Pulse los botones (5) y (6) para ajustar el volumen de 0 à 16. Ajuste de la hora El aparato debe estar en el modo Apagado.
CONFIGURACIÓN BASICA Repetición de la alarma Tras la activación de la alarma, pulse el botón tarde. (5): la alarma sonará de nuevo unos 9 minutos más Función SLEEP En modo de espera, pulse sucesivamente el botón (2) hasta llegar a la fuente deseada. Pulse detenidamente el botón (9), se visualizará ‘90’ en la pantalla. Pulse sucesivamente el botón (9) para elegir la duración de escucha: 90, 80, 60, 50, 40, 30, 20, 10 minutos. El aparato se apagará automáticamente al final de la duración programada.
USO DEL BLUETOOTH Este aparato puede recibir una señal de audio desde un periférico de audio Bluetooth. Para una compatibilidad perfecta, en las instrucciones de uso del periférico cerciórese de que este utilice el perfil de distribución A2DP. Para evitar cualquier interferencia, se recomienda encarecidamente apagar el Wi-Fi de su periférico durante la reproducción de audio vía Bluetooth. - Pulse sucesivamente el botón (2) hasta que el símbolo bL aparezca en la pantalla.
DISPOSICIÓN DESPUÉS DE LA VIDA ÚTIL ¡Advertencia! Este logo en el producto significa que el reciclaje de este aparato está dentro del margen de la Directiva de Residuos de Aparatos Eléctricos y Electrónicos (Waste Electrical and Electronic Equipment, WEEE), 2002/96/CE de 27 de enero de 2003. Este símbolo significa que los productos eléctricos y electrónicos usados no deben mezclarse con los desechos domésticos, existe un sistema de recogida selectiva para este tipo de productos.
VOORDAT WE BEGINNEN Dank U voor het kopen van de TOKAI WO-243 MICRO SYSTEM Bluetooth - Digitale FM tuner - USB compatibel en een AUX-ingang. Dit is uw garantie voor kwaliteit, prestatie en waarde. Onze ontwerpers hebben vele nuttige en makkelijke functies ingevoegd in dit product. Leest u alstublieft deze gebruiksaanwijzing compleet door om er zeker van te zijn dat u het grootste voordeel van elke functie behaald.
ALGEMENE VEILIGHEIDSVOORSCHRIFTEN 1. Alle veiligheid en bedieningsinstructies moeten worden gelezen, moeten worden opgevolgd, voordat het apparaat wordt bediend. Bewaar de bedieningsinstructies voor latere naslag. 2. SCHOONMAKEN — Trek de stekker van dit product uit het stopcontact voordat u het schoon gaat maken. Gebruik geen vloeibare schoonmaakmiddelen of sprays. Gebruik een vochtige doek om het toestel schoon te maken. 3.
ALGEMENE VEILIGHEIDSVOORSCHRIFTEN 15. VOORWERPEN EN VLOEISTOFFEN — Druk in geen geval voorwerpen via de openingen in het toestel. De voorwerpen zouden anders punten waarop hoogspanning staat kunnen raken of interne onderdelen van het toestel kort kunnen sluiten met brand of een elektrische schok tot gevolg. Mors nooit vloeistoffen van welke aard dan ook op het product. 16.
HET APPARAAT VERKENNEN 1 : Lcd-scherm 2 : Knop 3 : Symbool 4 : Symbool 5 : Knop - Lager volume / Herhaling alarm 6 : Knop - Hoger volume / Instellen van alarm 7 : Knop 8 : Knop 9 : Bouton - Aan-Uit/ Modus selecteren - Aflezen / Pauze / Aflezen uit - Bluetooth modus - Fast rewind - Fast forward - Sleep modus / Instellen van het uur 10 : Symbool - Aansluiting hoofdtelefoon 11 : Symbool - USB-poort 12 : Symbool - Aansluiting voor luidspreker rechts 13 : Symbool - Aansluiting v
CONNECTION & INGEBRUIKSTELLING INSTALLATIE VAN DE BATTERIJEN (HET UUR OPSLAAN) - De klem van het batterijvak (17) halen. - 2 LR03-batterijen (AAA) in het vak steken, rekening houdend met de aangegeven polariteit. - De klep terugplaatsen. INFORMATIE OVER DE BATTERIJEN - Om het uur op te slaan moet het horloge uitgerust zijn met hiertoe voorziene batterijen. - Alleen de batterijen van het aanbevolen type mogen gebruikt worden.
BASISINSTELLINGEN AAN/UIT/MODUS SELECTEREN - Druk herhaaldelijk op de knop (2) om het toestel aan te zetten en een modus te kiezen. - Om het toestel uit te schakelen, houdt u de knop (2) lange tijd ingedrukt. OPMERKING: De modus die vóór het uitschakelen van het toestel het laatst actief was, treedt standaard in werking wanneer het toestel heropgestart wordt. VOLUMEREGELING Druk op de knoppen (5) en (6) om het volume in te stellen van 0 tot 16. HET UUR INSTELLEN Het toestel moet in de Uit-modus staan.
BASISINSTELLINGEN HET ALARM HERHALEN Wanneer het alarm in werking treedt, druk op de knop opnieuw weerklinken. (5): het alarm zal ongeveer 9 minuten laten SLEEPFUNCTIE In de waakmodus, druk vervolgens op de knop (2) tot de gewenste bron verschijnt. Houd de knop (9) lange tijd ingedrukt, ‘90’ verschijnt op het scherm. Druk vervolgens op de knop (9) om de duur te selecteren: 90, 80, 60, 50, 40, 30, 20, 10 minuten. Het toestel wordt automatisch uitgeschakeld als de geprogrammeerde duur ten einde is.
BLUETOOTH - FUNCTIE Dit toestel kan een audiosignaal ontvangen van een Bluetooth-audiorandapparaat. Kijk in de gebruiksaanwijzing van het randapparaat na of het distributieprofiel A2DP ondersteund wordt voor een optimale compatibiliteit. Om interferentie te voorkomen, wordt aangeraden de wifi op uw randapparatuur uit te schakelen tijdens het afluisteren van Bluetooth-audiobestanden. Koppelingsprocedure Druk herhaaldelijk op de knop (2) tot het symbool bL op het scherm verschijnt.
TECHNISCHE SPECIFICATIES - Bluetooth-verbinding (2.1 A2DP) – maximale afstand: 10 meter Radio FM – FM-frequenties: 87, 5 tot 108MHz Wekfunctie (2 alarmen) Hulpcontact voor een externe audiobron (MP3-speler, smartphone, draagbare cd-speler) Compatibel audioformaat: MP3 Uitgang hoofdtelefoon Luidsprekervermogen: 20 W Elektriciteit via stroomadapter: Dit apparaat is ontworpen om te functioneren met een AC/DC adapter Ingang: 100-240V~ 50Hz, 0,5A.
AFVOER EINDE LEVENSDUUR Waarschuwing! Het waarmerk op dit product betekent dat het recyclen van dit apparaat gebeurt binnen de regels van de Directive 2002/96/CE van januari 27, 2003 betreffende de afvoer van elektrische en elektronische apparaten (WEEE). Dit symbool betekent dat gebruikte elektrische en elektronische producten niet moeten worden vermengd met het algemene huishoudelijk afval. Er is een apart inzamelsysteem voor deze producten.
WO-243 www.tokai.