3年01月 M11Y911 INSTALLATION MANUAL 鍛造ピストンキット FORGED PISTON KIT 日本語・・・・・・・・・・・・・・2p English・・・・・・・・・・・・・・13p ●この取扱説明書を良く読んでからお使いください。 ●各自動車メーカーの発行する整備要領書と併せてお使いください。 ●取り付け後も大切に保管してください。 ●販売店様で取り付けをされる場合は本書を必ずお客様へお渡しください。 TOMEI 製品のお買い上げありがとうございます。 TOMEIピストンキットは、レーシングエンジン開発のノウハウと各エンジンの特性から、 それぞれにもっとも相応しい設計を実施し優れた耐久性を実現しました。 また、強度と軽量という相反する性能も確保しています。 ● ● ● ● Please carefully read this manual prior to installation. Please also refer to the vehicles Service Manual with this Manual.
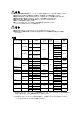
注意 ■本品は自動車競技専用部品です。サーキットや公道から閉鎖されたコース内に限って使用してください。 ■本品の取り付けは特別の訓練を受けた整備士が、設備の整った作業場で実施してください。 ■指定する車種以外への取り付けはおやめください。本品およびエンジンを破損する恐れがあります。 ■部品脱着の際には無理な力を加えないでください。部品を破損する恐れがあります。 ■取り付けの際は、適切な工具、保護具を使用しないと、けがにつながり危険です。 ■締めつけ部は定期的に点検してください。 ■エンジンオイル量および、オイルの漏れ、滲みは運転前に必ず点検してください。 エンジンオイルが不足するとエンジンを破損します。 警告 ■本品の取り付けはエンジン及びエンジンルーム内が冷えた状態で行ってください。 ■部品欠落による車輌の破損・火災が起こる可能性があるため、製品構成部品の取り付けは確実に 行ってください。 仕様 エンジン型式 モデル RB26DETT ボア径 (Φ) 品番 86.5 1121865111 87.
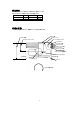
部品構成 キットの中にはピストン1個あたり下記のものが含まれています。 それぞれがピストンの数量分あることをご確認ください。 ピストン本体 1 トップリング 1 ピストンピン 1 セカンドリング 1 ピンクリップ 2 オイルリング 1セット 各部の名称 ※ 本図は解説用のもので、実際のピストン仕様とは異なります。 クラウン部 ピストンヘッド クーリングチャンネル ピストン全高 コンプレッションハイト トップランド トップリング溝 セカンドランド セカンドリング溝 サードランド オイルリング溝 ピストンリング装着部分 ピストンピンボス スラスト側 反スラスト側 ピストンピン穴 スカート スカ ト クランク回転方向 3
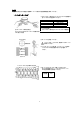
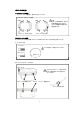
装着 基本的な組立および調整は自動車メーカーの発行する整備要領書を参照してください。 1. シリンダーボーリング ① ピストンスカート部外径と、ピストンクリアランス規定値から 各シリンダボア内径を求めてください。 スチールブロックの場合 アルミブロックの場合 EJの場合 10mm 【ピストンスカート部外径測定】 ピストンスラスト方向ピストンスカート部最下部より 10ミリ部分で測定 スラスト方向 クリアランス規定値(mm) 0.050~0.055 0.045~0.055 0.035~0.
2. バリ取り・R仕上げ ピストン角部、スカート下端については#400程度のサンドペーパーで面取り、R仕上げ、バリ取り を実施してください。 規定値 R 0.3 3. ピストンリング合口調整・測定 ① ピストンを利用して、リングをシリンダーの中間位置まで 挿入しシックネスゲージで合口の測定を実施します。 ② 合口寸法を規定値と比較し、規定値より狭い場合は、 ダイヤモンドヤスリを用いて規定値まで合口を広げます。 約110mm トップリング セカンドリング シックネスゲージ オイルリング 規定値(mm) 0.18~0.35 0.18~0.35 0.15~0.
4. ピストンリング合口調整・測定 注意 ■ ピストンピン角部に傷、バリが残った状態で組み付けるとピストンピン角部でピンクリップが損傷し、 ピストンからピストンピンが飛び出し、エンジンを破損します。 ■ ピストンピン及び、ピンクリップは再使用しないでください。 (1) ピストンピン点検 ① ピストンピン角部に傷、バリがないことを確認し、 #400程度のサンドペーパーでR加工を実施してください。 規定値 R 0.
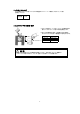
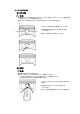
(3) ピンクリップ取り付け ① EJ以外の機種 注意 ■ 作業にラジオペンチ類を使わないでください。ラジオペンチ類でつかむと、ピンクリップが過度に変形し 張力を失い、ピストンピンが固定できません。 ■ ピンクリップの外径が小さくなったものは、張力を失っているため使用できません。 B ① ピンクリップの先端をAの位置で溝に入れてください。 ② Cの位置を指で押さえながら、Bの部分までを溝に 入れてください。 C A ③ 順次C、Dを抑えながら溝に入れてください。 D D ② EJ全機種 注意 ■ 作業にはラジオペンチを使用します。 ■ エンジン内部にピンクリップを落とさないよう、作業を行ってください。 万一、落とした場合は必ずエンジンを分解してピンクリップを回収してください。 そのまま作業を行うとエンジン損傷の原因となります。 ① ピンクリップをラジオペンチでAの部分を中心軸方向へ 縮める。 ② Bの部分を指でガイドしてピストンに取り付ける。 入れてください。 ③ ピストンの溝部に確実に取り付けられたかを確認する。 A B 7
5.
(1)ピストンマークの確認 ピストンマークに十分注意し、組み付けを行ってください。 [TOMEI EJ25/26ピストンの場合] RH側 ピストンマークをフロント側 注意 ピストンの方向を誤ると、本来の 性能を発揮できないばかりか エンジンを破損する原因となる 場合があります。 LH側 ピストンマークをリヤ側 (2)ピストンリングの確認 キット内のピストンを使用する際、ピストンリングの取り付けにおいて下記の点を注意してください。 ① リングの上下面 トップリング リングの打刻マーク側を上にしてください。 セカンドリング 打刻マーク ②オイルリングサイドレールの合口 ピストンマーク オイルリングサイドレールの回り止めを ピストン側の凸部に入れて組付けを 行ってください。 サイドレールロア側回り止め サイドレールアッパー側回り止め オイルリング回り止め 9
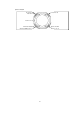
③ピストンの合口 オイルリングの エキスパンダ トップリング ピストンマーク オイルリングの サイドレール上 セカンドリングおよび オイルリングのサイドレール 10
6.
7. 組み付け点検 ① ピストンクーラー付きエンジンについては、ピストンクーラーとピストンのクリアランスがあることを目視にて 確認してください。 ② クランクウエイトとピストンスカートが干渉しないことを確認してください。 ③ 上死点の時、ピストンがシリンダーから必要以上に突き出さないことを確認してください。 ④ 実測での圧縮比の計算を実施してください。 V2 V3 V1 : 1気筒の排気量(cc) V2 : 燃焼室容積(cc) V1 V3 : ガスケット厚み分の容積(cc) V4 V4 : クラウン部容積(cc) 圧縮比= V1 V2 + V3 + V4 +1 8.
CAUTION ■ This product has been designed for competition use only and is not to be used on any public roads. ■This product is to be fitted by an experienced professional in a fully equipped workshop. ■This product was specifically designed for the vehicle application as stated above. This is not designed and may not be suitable for other cars/engines other than stated in this manual.
13 KIT CONTENTS The following is for each Piston suppplied in the kit. Please confirm that each Piston comes with the right parts. PISTON 1 PISTON PIN 1 SECOND RING PIN CLIP 2 OIL RING TOP RING 1 1 1 SET PRODUCT INFORMATION ※ The following figure is for illustration purposes. Actual Piston design may vary.
INSTALLATION Please refer to the official workshop service manual from the vehicles manufacturer for detailed assembly informatio 1. CYLINDER BORING ① Always compare diameter of each cylinder bore with the Pistons skirt to confirm the correct clearance. IRON BLOCKS ALUMINUM BLOCKS EJ 10mm 【MEASURING THE PISTONS SKIRT DIAMETER】 Measurements are to be taken from the lower side of the Piston, Trust side, 10mm from the base of the Skirt. Thrust Direction CLEARANCE SPECS (mm) 0.050~0.055 0.045~0.055 0.
2. DEBURRING CASTING ERRORS & RADIUS FINISH Chamfer and radius the edges and galleries to remove all casting flashes/errors. You can also use #400 grit sandpaper for certain areas like the bottom of the piston skirts and on sharp edges. Clearance R 0.3 3. PISTON RING ADJUSTMENTS & PREPARATIONS ① Insert the Piston Ring & position it in the middle of the cylinder bore by using the head of the Piston, or a ring squaring tool. Then check the ring gap clearances with a thickness gauge.
4. PISTON & CONROD INSTALLATION CAUTION ■ Check the Piston Pin hole metal flash errors around the edges. Deburr any that is found. These can cause problems if they are not checked and addressed before assembly, which can lead to engine failure. ■ If you find problems with either the Piston & or Piston Pin, then do not use them. (1) PISTON PIN INSPECTION ① Check the Piston and Piston Pin edges for metal flash errors. If found, then use a 400 grit sandpaper or file to radius the edges. Clearance R 0.
(3) CIRCLIP INSTALLATION ① EJ以外の機種 CAUTION ■ Do not use the long-nose pliers when working. The Circlip will deform when a long-nose pliers is used. Tension is lost and the piston pin will not be secured. ■ Because of tension loss, the clip on the outer diameter will become smaller and cannot be used. B ① Position the Circlips point in the ditch at the position marked "A". C ② Next place the Circlip in ditch at part "B", whilst pressing the point "C" with your finger.
5. PISTON RING INSTALLATION ① The Oil Rings spacer is built into the piston-ring groove. サイドレール端 Side Rail Edge ② The side rail of the oil ring is built in an upper & lower order. Position a part of the side rail in the Piston ditch, hold it in place with your finger & fit it. Do not install with the Piston Ring Expander as the ring side will be damaged. ③ Install the Second Ring and Top Ring with the Piston Ring Expander. Position the clock mark side of the ring up.
(1)PISTON MARK POSITIONING Pay attention to the position of the Piston Marking prior to assembly. [TOMEI EJ25/26 Piston notes] RH side CAUTION If the Pistons are installed facing the wrong way, the performance will not be the same and you'll risk possible damage to the pistons and the engine. LH side Piston mark facing the front side. Piston mark facing the rear (2) PISTON RING CONFIRMATION Note the positioning of the Piston Rings when installing the Tomei Piston Kit.
③Piston Gap Top Ring Oil Ring expander Piston Mark Oil Ring upper side rail Secondary Ring & Oil Ring 21
6. PISTON & CONNECTING ROD ASSEMBLY INSTALLATION CAUTION If you didn't position the Crankshaft at Bottom Dead Center when inserting the Piston & Conrod assembly, the Crankpin & or the Conrod bearing can be damage from the Conrod Bolt. ① Spread engine oil or Assembly paste on the cylinder wall, Pistons sides and the surface of the Conrod Bearing. ② Check the Piston Rings Ring Gap position. ③ Check the Pistons front side before installing the Piston & Connecting Rod Assembly with a Piston Ring Compressor.
7. ASSEMBLY VERIFICATION ① Check the clearance of the piston in relation to the position oil jet during rotation. ② Check that neither the Crank weight nor Piston Skirt has any interference. ③ Confirm that the Piston does not protrude more than required from the cylinder bore at Top Dead Center. ④ Be sure to calculate the final compression ratio once done.
株式会社 東名パワード 〒194-0004 東京都町田市鶴間1737-3 TEL : 042-795-8411(代) FAX : 042-799-7851 1737-3 Tsuruma Machida-shi Tokyo 194-0004 JAPAN TEL : +81-42-795-8411(main switchboard) FAX : +81-42-799-7851 http://www.tomei-p.co.jp この製品に関わる取り付け、操作上のご相談は上記へお願いします。 営業時間:月~金(祝祭日、年末年始を除く)9:00~18:00 If you have any questions in regards to the installation of this product, o r local authorised a thorised Tomei Powered Po ered distributor.