
Installation Guide

Installation of Tommy Docks in Water (rst year only)
Thank you for choosing our Tommy Dock Interlocking system. The following instructions assume you have
chosen your Tommy Dock layout and examined the bill of materials. The bill of materials describes all
necessary hardware, post (refer to post length formula), and optional accessories to assemble and install
your Tommy Dock system. Ask your dealer for answers to any questions you may have.
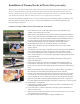
Note: These instructions include the use of our styrofoam log. Our styrofoam log makes it possible for one
person to install our Tommy Dock system. A two-person installation is recommended while using the
styrofoam log for assistance.
Caution: Use only cordless power tools when near or on water.
1. We recommend you level your shoreline with blocks. Level shoreline blocks will
stabilize your dock and ensure a good start.
2. While on shore, install brackets on section (refer to dock layout and bracket installation
sheets for correct bracket location and installation). We recommend the use of sawhorses
or other suitable level work area for hardware installation. When installing brackets for a
tee section, measure correct distance of mating docks (standard width is 47-3/4”).
3. Install predetermined length of post through brackets and temporarily tighten
bracketadjusting bolts leaving 3” of post below the bottom of each bracket.
4. Install footpad to the bottom of the post and tighten bolt at the top of the footpad to
secure its position.
5. After brackets, post, and footpads are installed on a section, slide Styrofoam log under far
endofsectionandoatintoposition.Onceinplace,walkouttobracketlocations.
Loosen bracket adjusting bolt and let post slide down to the bottom of the lake. Once
dock is at desired height (12” is recommended), tighten bracket adjusting bolt (repeat this
step for each bracket).
6. Repeat steps 2-5 for each dock section to be installed. Note: Refer to dock layout for
properdockconguration.
7. If using auger feet, slide the footpad up to desired depth (footpad depth depends on
bottom surfaces such as hard, soft, or rocky conditions, etc.). Position the auger at the
bottom of the post. Once in position, tighten the two bolts on the auger foot until they are
secure.
8. Slide post down until the auger touches the bottom of the lake. Attach a post wrench to
the post and turn clockwise until the footpad touches the bottom of the lake.
9. Leveling: Attach winch hook to cable (level section closest to shore and work your way
out). Attach 1/2-13x3” bolt and nylon hex nut to tube on winch. Place winch assembly
over post leg until the 1/2-13x3” bolt stops it. Place hook under dock bracket and reel to
tighten (do not lift dock). Loosen dock bracket adjusting hex bolt. Lift or lower dock to
level, then tighten dock bracket adjusting hex bolt. Remove winch and go to the next post leg.
10. Drill all holes for assembly pins.
11. Install all pins, post bumpers (optional), and safety caps. Refer to available option sheet
for bumper installation instructions.
12. Ifyourdocksettlesorifwaterleveluctuates,thelevelingoperationshouldbedone
without removing L pins.
13. When mooring your crafts at docks, replace 1/2-13x2-1/4” bolts with 1/2-13x3” eye bolts
where needed (do not use L pin holes).
14. Note: Mark each dock section to make next spring’s installation easy.