Tommy Docks 8608 Progress Way, Weston, WI 54476 Phone : 715-842-3804 Toll Free : 866-675-1880 Fax : 715-842-3420 Aluminum Dock Frame SKU-TD-40008 Assembly Instructions www.tommydocks.
Aluminum Dock Kit Components 48” End Rail Qty 2 Side Rail (96” ) Qty 2 Center I-Beam (96” ) Qty 1 23 7/8” Intermediate Crossmember Qty 2 Hardware Hardware Self Tapping Screw Qty 2 Stainless Steel Hex Head Bolt Qty 20 Stainless Steel Truss Head Screw Qty 20 Stainless Steel Nylon Locknut Qty 40 Tools Tools Power Drill 3/8” Box End Wrench 3/8” Socket Wrench #2 Phillips Bit *3/8” Drill Bit *NOTE: Optional use for Step 8.
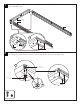
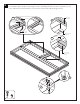
1 Start by sliding the two (2) Side Rails into the End Rail (1a). The End Rail fits in between the flanges on the Side Rail (1b). End Rail Side Rail Side Rail 1a 1b Side Rail End Rail Flange of Side Rail 2 Insert the Stainless Steel Trust Head Screws at the corner (2 screws per corner) (2a). Hand tighten the Stainless Steel Locknuts to all (4) corner screws at the top side of the frame (2b).
3 Slide opposite ends of the two (2) Side Rails into the other End Rail (3a). The End Rail fits in between the flanges on the Side Rails (3b). 3a 3b Side Rail Side Rail End Rail Flange of Side Rail Side Rail End Rail 4 Insert the Stainless Steel Trust Head Screws at the corner (2 screws per corner) (4a). Hand tighten the Stainless Steel Locknuts to all (4) corner screws at the top side of the frame (4b).
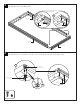
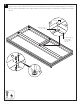
Insert the center I-Beam into the End Rail as shown (5a). Make sure notch in I-Beam engages Top Flange of Side Rail (5b). The top flange of the I-Beam goes on top of the End Rail Flange and the Bottom Flange of the I-Beam sits on top of the Bottom Flange of Side Rail (5c). Insert the screws and locknuts (5d) and hand tighten (5e).
Install one Intermediate Crossmember I-Beam into the Side Rail (6a). Notice that the Intermediate Crossmember fits in between the flanges on the Side Rails (6b) but not where it attaches to the center I-Beam (6c). Attach with the screws and locknuts (6d) and hand tighten (6e).
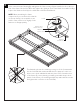
Notice that the bottom flange of the Intermediate Crossmember I-Beam fits underneath the bottom flange of the center I-Beam (7a). Insert the screws and lock nuts (7b) and hand tighten (7c). Attach the second Crossmember in the same manner as the first, but do not install the screws into this side rail yet.
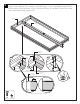
You now have all the frame components attached to the frame except the last End Rail. Make sure all of the connections are fitted tightly and tighten all of the screws you have installed so far on the top side of the frame. Use the Hex Bit to fully tighten the Stainless Steel Truss Head Screw while holding in place the Stainless Steel Nylon Locknut with a 3/8” Box End Wrench.
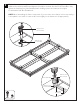
Flip the frame over to install the remainder of the fasteners into the frame. Where indicated install Stainless Steel Hex Head Bolt and Stainless Steel Nylon Locknut. Use the 5/16” Driver Bit to fully tighten the Stainless Steel Hex Head Bolt while holding in place the Stainless Steel Nylon Locknut with a 3/8” Box End Wrench.