TomTom Action Camera Reference Guide 1.
Contents Welcome 3 CAMERA 4 Camera Quick Start................................................................................................ 5 What's in the box.............................................................................................. 5 Charging your camera ......................................................................................... 5 Inserting a memory card...................................................................................... 6 Setting up .............
Welcome This Reference Guide explains everything you need to know about your new TomTom Action Camera. Your camera lets you easily record your action adventures: Record videos. Automatically tag action shots using action metrics, or manually tag your video. Easily create videos from your video tags using the TomTom Mobile Camera app or TomTom MyCamera computer program. Use your smartphone to quickly and easily publish your edited videos online, within moments of the action.
CAMERA 4
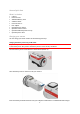
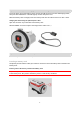
Camera Quick Start What's in the box Camera IPX7 lens cover 2000 mAh Battery stick Adhesive mount Universal disc x 2 Disc adapter Optional bicycle mount Optional remote control Optional IPX8 waterproof lens cap Optional power cable Charging your camera You can charge your Action Camera in the following two ways: Charging the battery stick using a USB socket Important: If you remove the battery stick be extra careful not to let dirt or water enter the camera or the battery stick.
Tip: While the battery stick is charging, the LEDs show the charge level and one LED flashes. To see the power level of the battery stick, remove the USB connector from the USB charging socket, then press the START button. The LEDs light up to show the power level. When the battery stick is charged, insert the battery stick into the camera and turn it until it locks. Charging the camera using the optional power cable Open the connector cap on the back of the battery stick.
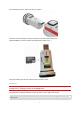
Turn the battery stick to remove it from your camera. Insert the micro-SD memory card into the memory card slot in the battery stick. NOTE TO GERRY: we need to replace this image with a cleaner one :-) Insert the battery stick into the camera and turn it until it locks. Setting up Note: The language you choose will be used for all text on the screen. You can always change the language later in Language and Units in the Settings menu.
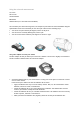
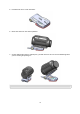
Using the universal camera mount Hi, ClaireWe can use: Universal Mount Bike Mount Adhesive discs (FYI: used with Universal Mount) You can mount your camera in many places, for example on your helmet or on the handlebars using the optional bike mount. Once mounted you can move your camera in the following ways: You can lift it up and down by 90 degrees, known as the pitch. You can twist it around by 360 degrees, know as yaw. You can roll the whole camera by 100 degrees to the left or right.
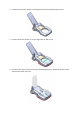
2. Attach the universal disc adapter to the adhesive disc by first fully opening the mount. 3. Push the mount onto the disc at any yaw angle until you hear a click. 4. Fold down the camera platform to any angle between 90 degrees to horizontal and fully closed. This locks the mount to the disc.
5. Push down the lever to lock the mount. 6. Mount the camera on the camera platform. 7. Set the desired angle of shot. Explain pitch, yaw and roll here? You can see from amlibu app what you are focusing on/pointing on. Note: To remove the mount, reverse the above instructions.
Switching on and off Switching on your Action Camera Press the START button (button 2) at the back of the camera for 2 seconds to switch your camera on. If no SD card is inserted into the battery stick, you are asked to insert one so that the camera can switch on. If the camera is in standby mode, press the control button to wake up the camera. Switching off your Action Camera Press the STOP button (button 1) at the front of the camera for 2 seconds to switch off the camera.
Tagging a video During recording, you can add a tag to your video. You can add a tag when something exciting or memorable happens such as reaching a fast speed, or crashing. Or you could tag a beautiful view or the highest peak on a walk. You can easily create videos from your video tags using the TomTom Mobile Camera app or TomTom MyCamera computer program. Automatic tags can be added to your video using action metrics, for example speed, crashes and jumps.
Your camera Getting started Before you start making videos, it's a good idea to charge your camera, download any software updates and download QuickGPSfix. Note: QuickGPSfix helps your camera get a GPS fix and find your location quickly. 1. Download TomTom MySports Connect from tomtom.com/getstarted/sports and install it on your computer. TomTom MySports Connect is available for free. 2. Place your camera in the desk dock and connect the dock to your computer.
TomTom MySports app Important: Before usng the MySports app on your smartphone, you need to link your camera to your MySports account using a computer. This needs to be done only once. You can download the TomTom MySports app for free from your usual app store or by going to tomtom.com/app. To learn more, go to TomTom MySports mobile app in this guide. Pairing your camera with your phone To learn more, go to Phone in this guide.
8. 9. 10. 11. Camera mount. Lens. START button Connector for optional power cable. What's on the screen The camera screen lets you select the type of video or photos you want to record, and let's you change the settings for each video and photo mode. You move to other screens using the control button: Move up or down to select items in a menu. Move right to select an item and open the menu for that item. Move left to exit a menu.
Icons on the Hub screen The following icons can be shown along the top of the Hub and Recording screens: This symbol shows the strength of GPS reception. While your camera is looking for GPS satellites, the satellite images flashes. The heart symbol shows that your camera is connected to a Heart Rate Monitor. When your camera is trying to connect to the Heart Rate Monitor, the heart flashes. The chainring symbol shows that your camera is connected to a Cadence Sensor.
Turn the battery stick to remove it from your camera. Insert the battery stick USB connector into your computer's USB socket or a standard USB wall-charger. Tip: While the battery stick is charging, the LEDs show the charge level and one LED flashes. To see the power level of the battery stick, remove the USB connector from the USB charging socket, then press the START button. The LEDs light up to show the power level.
NOTE TO GERRY: we need to replace this image with a cleaner one :-) Tip: You don't have to remove the battery stick from the camera. Connect the power cable to the battery stick connector and to a USB socket. Inserting a memory card The photos you take and the videos you record are stored on a micro-SD memory that is located in the battery stick.
Turn the battery stick to remove it from your camera. Insert the micro-SD memory card into the memory card slot in the battery stick. NOTE TO GERRY: we need to replace this image with a cleaner one :-) Insert the battery stick into the camera and turn it until it locks. Camera modes The camera has the following photo and video modes: Photo mode has the following options: Single - For taking a single photograph. Burst - For taking a series of photos in a very short time.
Normal high-quality video mode. You can set the video quality to 1080p or 720p, and the frame rate to 30 fps or 60 fps. *** ADD LINKS TO GLOSSARY HERE for 1080p etc **** Video In SLOW MO or slow motion mode, the camera records at a multiple of the normal frame rate (2x, 4x, 8x), but stores the video with the normal frame rate (30 fps) for playback, which results in slow motion video. Audio and sensor data are also recorded in the slow motion mode.
These symbols are used to show the status of QuickGPSfix: QuickGPSfix on your camera is up-to-date. or QuickGPSfix on your camera is out-of-date. If the QuickGPSfix information on your camera is out-of-date, your camera still works as usual. It may, however, take longer to get a GPS fix when you want to start an activity. If you see this icon, you are using a very old version of the software and should update your camera as soon as possible. Version - the software version number of your camera.
Standby To save power the camera automatically switches to standby after a few minutes if it's not being used. You can wake up the camera by pressing the control button or by using Bluetooth to connect to the camera from your smartphone. Resetting your camera You can reset your Action Camera in the following ways: Soft reset - Switches the camera off and then back on. Hard reset - Clears the camera memory and settings. Factory reset - Returns your camera to the original factory settings.
To perform a factory reset on your camera, follow these steps: 1. Connect your camera to your computer and wait until MySports Connect finishes updating your camera. 2. Expand SETTINGS in MySports Connect. 3. Click FACTORY RESET at the bottom of MySports Connect. MySports Connect downloads the latest version of the software for your camera. 4. Keep your camera connected when the window for MySports Connect closes. MySports Connect installs the software on your camera. 5.
Using peripherals Using the universal camera mount Hi, ClaireWe can use: Universal Mount Bike Mount Adhesive discs (FYI: used with Universal Mount) You can mount your camera in many places, for example on your helmet or on the handlebars using the optional bike mount. Once mounted you can move your camera in the following ways: You can lift it up and down by 90 degrees, known as the pitch. You can twist it around by 360 degrees, know as yaw.
2. Attach the universal disc adapter to the adhesive disc by first fully opening the mount. 3. Push the mount onto the disc at any yaw angle until you hear a click. 4. Fold down the camera platform to any angle between 90 degrees to horizontal and fully closed. This locks the mount to the disc.
5. Push down the lever to lock the mount. 6. Mount the camera on the camera platform. 7. Set the desired angle of shot. Explain pitch, yaw and roll here? You can see from amlibu app what you are focusing on/pointing on. Note: To remove the mount, reverse the above instructions.
Using the optional remote control The remote control can be used to start and stop recording, and to manually tag your video. Use the remote control when you can't easily or safely reach your camera. You can hold the remote control in your hand, or you can attach it to a place you can easily reach. Note: The remote uses Bluetooth Smart to connect to your camera and can only be used with one camera at a time. Connecting the remote control 1.
Remote control straps and mounts The remote control is supplied a strap which will fit both around your bare wrist and around a winter coat during snow sports. Other straps are available, as well as mounts for handlebars and dashboards. Tip: The remote control is waterproof to a depth of 3 m. WHY IS THERE A CHARGING CABLE FOR THE REMOTE IF IT USES BATTERIES? Using lens covers The camera is waterproof with the standard IPX7 lens cover (black and white).
Adding sensors About sensors Sensors are used by your Action Camera to record data simultaneously with your video, audio or photos. This makes it easier for you to find the highlights in the video when reviewing it and adds context like your GPS trace or a speed graph. There are two types of sensors for your camera - built-in sensors and external sensors. Built-in sensors For more information about built-in sensors, see Sensors in your camera.
Tip: Wet the sensors on the inside of the strap before placing it around your chest. This makes it easier for the monitor to pick up your heartbeat. 3. From the Camera Status screen on your camera, move down to open the SETTINGS screen. 4. 5. 6. 7. Select GENERAL then select CONNECT. Select SENSORS then move right. Select HEART, then move right to turn it on. When you begin an activity, your camera connects to the monitor and you see a heart icon at the top of the screen.
Recording videos About recording videos You can use your Action Camera to take videos in the following modes: Video - Use this mode to record normal high-quality videos. Slow Mo - This mode records slow-motion videos at high-qulaity. Timelapse - This mode creates videos from time-lapse recordings taken at set intervals. Cinematic - Very high quality video mode for the video specialist. Use the control button to select the mode.
Timelapse This camera records a time-lapse video directly as a video recording, using the currently set resolution and at the "normal" frame rate. You can choose the interval. A time lapse video does not have audio recording. GPS data is recorded, but sensor data will not be recorded. You can manually tag your video. Cinematic The Cinematic mode allows you record videos at very high resolutions of 4k and 2.7k. Recording a video 1.
Taking photos About photo modes You can use your Action Camera to take photos in the following modes: Single - A single photo is taken. Burst - A series of photos are taken in a very short time. Continuous - A series of photos are taken at a pre-set interval (also called photo logging).
The screen shows the number of photos taken. 4. Press STOP to stop taking photos.
Settings About settings To change settings that you use frequently like WHAT, move WHERE from the Camera Status screen. To access other settings that you may need to change less frequently, use the Settings menu. These settings determine the overall behaviour of your camera, and are used to adjust the mode settings for each photo and video mode. From the Camera Status screen, move down to open the Settings menu.
8 MP Burst 5 per sec 10 per sec Scene Auto Preset: Sun, Cloudy, Mountain Metering Continuous settings Size 16 MP Interval 1s, 5s, 10s, 15s, 30s, 60s Scene Auto Preset: Sun, Cloudy, Mountain Metering Video Each video mode has its own settings. From the Camera Status screen, move down to the SETTINGS screen and select the mode settings, for example VIDEO. Move right, then select the settings you want to change.
View Wide Normal Scene Auto Preset: Sun, Cloudy, Mountain Metering Cinematic settings Size 4k at 15 fps 2.7k at 30 fps WVGA at 6x speed Scene Auto Preset: Sun, Cloudy, Mountain Metering Timelapse settings Size 4k 1080 Interval 1s, 5s, 10s, 15s, 30s, 60s Scene Auto Preset: Sun, Cloudy, Mountain Metering General settings These settings determine the overall behaviour of your camera.
Use these settings to select the general options for your camera, such as language and units. Language Select LANGUAGE to set the language used for menus and messages on your camera. Units Select UNITS to set the units to KM (metric) or Miles (imperial). REVIEW QUESTION: NO nautical miles for this release? Sound Select SOUND to switch the buzzer sound on the camera ON or OFF.
Important: Formatting a memory card deletes all files stored on the memory card. Tip: When a memory card is formatted by the camera, the volume name is chosen by the camera, for example "TOMTOMCAM" and you cannot change the name.
Glossary of Terms G Glossary Term Wi-Fi - 802.11n, Wi-Fi is in Wi-Fi Direct (or as a fallback ad-hoc) mode. Range will be minimum 10 meters and bandwidth will be at minimum 10Mbps.
Addendum How TomTom uses your information Information regarding the use of personal information can be found at tomtom.com/privacy. FCC information for the user THE DEVICE COMPLIES WITH PART 15 OF THE FCC RULES Federal Communications Commission (FCC) Statement This equipment radiates radio frequency energy and if not used properly - that is, in strict accordance with the instructions in this manual - may cause interference to radio communications and television reception.
A minimum separation distance of 1.2 cm must be maintained between the user’s body and the device, including the antenna during body-worn operation to comply with the RF exposure requirements in Europe. FCC Country Code Selection The Country Code Selection feature is disabled for TomTom Action Cameras marketed in the US or Canada. Per FCC regulations, all WiFi products marketed in US must be fixed to US operation channels only. Responsible party in North America TomTom, Inc.
IMPORTANT NOTE: IC Radiation Exposure Statement for the CAMERA The product comply with the Canada portable RF exposure limit set forth for an uncontrolled environment and are safe for intended operation as described in this manual. The further RF exposure reduction can be achieved if the product can be kept as far as possible from the user body or set the device to lower output power if such function is available.
Battery operating temperatures Operating temperatures for camera battery: -20°C (-4°F) to 40°C (104°F). Do not expose to temperatures beyond this. Regulatory Compliance Mark This product displays the Regulatory Compliance Mark (RCM) to show that it complies with relevant Australian regulations. Notice for New Zealand This product displays R-NZ to show it complies with relevant New Zealand regulations.
Copyright notices © 2015 TomTom. All rights reserved. TomTom and the "two hands" logo are registered trademarks of TomTom N.V. or one of its subsidiaries. Please see tomtom.com/legal for limited warranty and end user licence agreements applying to this product. © 2015 TomTom. All rights reserved. This material is proprietary and the subject of copyright protection and/or database rights protection and/or other intellectual property rights owned by TomTom or its suppliers.