
User Manual
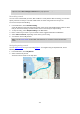
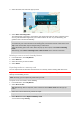
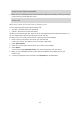
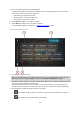
Table Of Contents
- Welcome to navigation with TomTom
- What's new
- Get going
- Connecting to TomTom services
- What's on the screen
- Traffic
- Syncing using TomTom MyDrive
- About TomTom MyDrive
- Logging in to MyDrive
- Setting a destination using MyDrive
- Planning a route with stops using MyDrive
- Showing a planned destination in MyDrive
- Clearing a MyDrive destination
- Deleting a MyDrive destination from My Places
- Set a phone contact as your destination using the MyDrive app
- Finding and syncing locations using MyDrive
- Syncing My Places locations with MyDrive
- Importing a community POI list
- Deleting a community POI list
- Importing a track GPX file
- Deleting a track GPX file
- Saving and restoring your personal navigation information
- Quick search
- Choosing which search to use
- Using quick search
- Planning a route using quick search
- Using destination prediction
- Planning a route to an address
- Planning a route to a city centre
- Planning a route to a POI
- Planning a route to a POI using online search
- Planning a route using the map
- Planning a route using My Places
- Planning a route using coordinates
- Planning a route using a mapcode
- Planning a route in advance
- Finding a car park
- Finding a petrol station
- Step by step search
- Choosing which search to use
- Using step by step search
- Planning a route using step by step search
- Using destination prediction
- Planning a route to an address
- Planning a route to a POI
- Planning a route to a city centre
- Planning a route to a POI using online search
- Planning a route using the map
- Planning a route using My Places
- Planning a route using coordinates using step by step search
- Planning a route in advance
- Finding a car park
- Finding a petrol station
- Changing your route
- The Current Route menu
- Avoiding a blocked road
- Avoiding part of a route
- Finding an alternative route
- Types of route
- Avoiding features on a route
- Avoiding an incident or route feature using the route bar
- Adding a stop to your route from the current route menu
- Adding a stop to your route using the map
- Deleting a stop from your route
- Skipping the next stop on your route
- Reordering stops on a route
- My Routes
- About My Routes
- About GPX and ITN files
- Saving a route
- Navigating using a saved route
- Navigating to a stop on a saved route
- Adding a stop to a saved route using the map
- Recording a track
- Navigating using a track
- Deleting a route or a track from My Routes
- Exporting tracks to a memory card
- Importing routes and tracks from a memory card
- Voice control (Speak&Go)
- About voice control
- Starting voice control
- Making your own wake-up phrase
- The voice control screen
- Some tips for using voice control
- What you can use voice control for
- Saying commands in different ways
- Entering an address using voice control
- Going to home using voice control
- Going to a POI using voice control
- Changing a setting using voice control
- Map Share
- Speed Cameras
- Danger Zones
- My Places
- About My Places
- Setting your home or work location
- Changing your home location
- Adding a location from My Places
- Add a location to My Places from the map
- Adding a location to My Places using search
- Adding a location to My Places by marking
- Deleting a recent destination from My Places
- Deleting a location from My Places
- Using community POI lists
- Hands-free calling
- Settings
- Getting Help
- Product certification
- Updating using MyDrive Connect
- Addendum
- Copyright notices

102
3. Select the track, then select the pop-up menu.
4. Select Drive to Starting Point.
The starting point of the track is converted to your first stop and then the route is planned. Guid-
ance to your destination begins from your current location. As soon as you start driving, the
guidance view is shown automatically.
Note: You see two different colours on the map for your route and track. You see one colour for
the route from your current location to the starting point, and another second colour for the track.
Tip: There are two other ways to navigate using a saved route:
Select the starting point of the route. When the pop-up menu opens, select Drive to Starting
Point.
Alternatively, select Drive to Starting Point or Ride to Route in the Current Track menu.
Deleting a route or a track from My Routes
1. In the Main Menu, select My Routes.
2. Select Edit List.
3. Select the routes you want to delete.
4. Select Delete.
Exporting tracks to a memory card
You can export tracks as GPX files and save them on a memory card for sharing with other users.
Important: Routes and tracks cannot be stored on the same memory card as maps because different
memory card formatting is used.
Note: Currently, you can export only tracks from your VIA.
To export one or more tracks, do the following:
1. In the Main Menu, select My Routes.
2. Select Share Tracks.
Tip: Alternatively, when in map view, select a track and select Share Track from the pop-up
menu.
3. Select one or more tracks from your list for export.
Tip: To select or deselect all routes for export, select the pop-up menu button.
4. Select Share then select Export to Memory Card.
You see the message Saving.