
User Manual
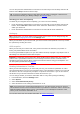
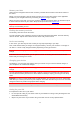

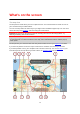
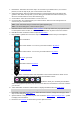
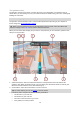
Table Of Contents
- Welcome to navigation with TomTom
- What's new
- Get going
- Connecting to TomTom services
- What's on the screen
- Traffic
- Syncing using TomTom MyDrive
- About TomTom MyDrive
- Logging in to MyDrive
- Setting a destination using MyDrive
- Planning a route with stops using MyDrive
- Showing a planned destination in MyDrive
- Clearing a MyDrive destination
- Deleting a MyDrive destination from My Places
- Set a phone contact as your destination using the MyDrive app
- Finding and syncing locations using MyDrive
- Syncing My Places locations with MyDrive
- Importing a community POI list
- Deleting a community POI list
- Importing a track GPX file
- Deleting a track GPX file
- Saving and restoring your personal navigation information
- Quick search
- Choosing which search to use
- Using quick search
- Planning a route using quick search
- Using destination prediction
- Planning a route to an address
- Planning a route to a city centre
- Planning a route to a POI
- Planning a route to a POI using online search
- Planning a route using the map
- Planning a route using My Places
- Planning a route using coordinates
- Planning a route using a mapcode
- Planning a route in advance
- Finding a car park
- Finding a petrol station
- Step by step search
- Choosing which search to use
- Using step by step search
- Planning a route using step by step search
- Using destination prediction
- Planning a route to an address
- Planning a route to a POI
- Planning a route to a city centre
- Planning a route to a POI using online search
- Planning a route using the map
- Planning a route using My Places
- Planning a route using coordinates using step by step search
- Planning a route in advance
- Finding a car park
- Finding a petrol station
- Changing your route
- The Current Route menu
- Avoiding a blocked road
- Avoiding part of a route
- Finding an alternative route
- Types of route
- Avoiding features on a route
- Avoiding an incident or route feature using the route bar
- Adding a stop to your route from the current route menu
- Adding a stop to your route using the map
- Deleting a stop from your route
- Skipping the next stop on your route
- Reordering stops on a route
- My Routes
- About My Routes
- About GPX and ITN files
- Saving a route
- Navigating using a saved route
- Navigating to a stop on a saved route
- Adding a stop to a saved route using the map
- Recording a track
- Navigating using a track
- Deleting a route or a track from My Routes
- Exporting tracks to a memory card
- Importing routes and tracks from a memory card
- Voice control (Speak&Go)
- About voice control
- Starting voice control
- Making your own wake-up phrase
- The voice control screen
- Some tips for using voice control
- What you can use voice control for
- Saying commands in different ways
- Entering an address using voice control
- Going to home using voice control
- Going to a POI using voice control
- Changing a setting using voice control
- Map Share
- Speed Cameras
- Danger Zones
- My Places
- About My Places
- Setting your home or work location
- Changing your home location
- Adding a location from My Places
- Add a location to My Places from the map
- Adding a location to My Places using search
- Adding a location to My Places by marking
- Deleting a recent destination from My Places
- Deleting a location from My Places
- Using community POI lists
- Hands-free calling
- Settings
- Getting Help
- Product certification
- Updating using MyDrive Connect
- Addendum
- Copyright notices

19
Note: Select the instruction panel to see a list of turn-by-turn text instructions for your planned
route.
4. Route symbols. Symbols are used on your route to show your starting location, your stops, and
your destination.
5. Main Menu button. Select the button to show the Main Menu.
6. Speed panel. This panel shows the following information:
The speed limit at your location.
Your current speed. If you drive more than 5 km/h or 3 mph over the speed limit the speed
panel turns red. If you drive less than 5 km/h or 3 mph over the speed limit the speed panel
turns orange.
The name of the street you are driving on.
The speed camera or risk zone report button.
7. Current location. This symbol shows your current location. Select the symbol or the speed panel to
open the quick menu.
Note: If your VIA cannot find your location the symbol appears grey.
Note: You cannot change the current location symbol.
8. Route bar. The route bar is shown when you have planned a route.
Important: To see a wider route bar showing additional route information, change the setting for
Route Information.
The route bar
The route bar is shown when you have planned a route. It has an arrival information panel at the top,
and a bar with symbols underneath.
Tip: You can also choose to see a wider route bar showing additional route information (not
available on all devices or apps).
Note: The distance ahead shown by the route bar depends on the overall length of your route.
The arrival information panel shows the following information:
Tip: If your destination is in a different time zone, you see a plus (+) or a
minus (-) sign and the time difference in hours and half hours in the
arrival information panel. The estimated time of arrival is the local time
at your destination.
The estimated time that you will arrive at your destination.
The length of time to drive to the destination from your current location.
A parking button is shown near the destination flag when parking is
available near your destination.
If you have stops on your route, select this panel to change between
information about the next stop and your final destination.
You can choose the information you see on the arrival information panel.
Traffic status - if your VIA isn't receiving any traffic information, a symbol
showing traffic with a cross appears underneath the arrival information
panel.
The bar uses symbols to show the following information:
A faster route, if there is traffic on your route.
The stops on your route.
Tip: To quickly remove a stop, select it in the route bar and use the
pop-up menu.